Failover to cloud appliance in case of DR event
In a disaster recovery (DR) scenario, the primary device stops functioning. StorSimple uses the primary device as source and moves the associated cloud data to another target device. This process is referred to as the failover. The following graphic illustrates the process of failover.
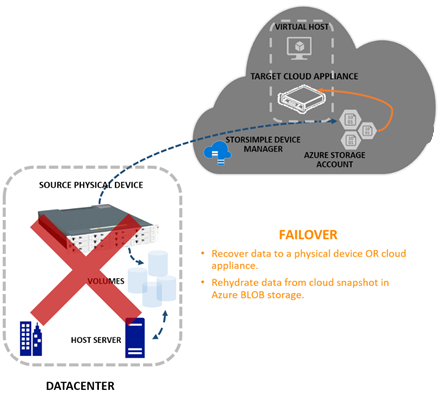 The target device for a failover could be a physical device or even a cloud appliance. The target device may be located in the same or a different geographical location than the source device.
During the failover, volume containers can be selected for migration. StorSimple then changes the ownership of these volume containers from the source device to the target device. Once the volume containers change ownership, StorSimple deletes these containers from the source device. After the deletion is complete, fail back to the target device can be performed. Failback transfers the ownership back to the original source device.
Following a DR, the most recent cloud backup is used to restore the data to the target device.
Fail over to the cloud appliance
Disaster recovery (DR) is one of the key scenarios that the StorSimple Cloud Appliance was designed for. In this scenario, the physical StorSimple device or entire datacentre may not be available. In such a scenario the cloud appliance can be used to restore operations in an alternate location. During DR, the volume containers from the source device change ownership and are transferred to the cloud appliance.
In an event of DR, the storage volume will be restored from cloud snapshots and assigned to cloud appliance. The on-prem file server clusters have not been configured to see volumes from cloud appliance. A separate Azure VM has been configured to act like a fileserver in case of DR. The file share server mapping will be controlled using CNAME in the DNS server.
DR Prerequisites:
- The cloud appliance is created and configured.
- All the volumes within the volume container are offline.
- The volume container that is failed over, has an associated cloud snapshot.
Steps to fail over to a cloud appliance
- Communicate to the end user to stop using the file share during planned failover
- Shutdown the fileserver cluster
- Verify that the volume container you want to fail over has associated cloud snapshots.
- Go to your StorSimple Device Manager service and click Devices. In the Devices blade, go to the list of devices connected with your service.
- Select and click your source device. The source device has the volume containers that you want to fail over. Go to Settings > Volume Containers.
- Select a volume container that you would like to fail over to another device. Click the volume container to display the list of volumes within this container. Select a volume, right-click, and click Take Offline to take the volume offline.
- Repeat this process for all the volumes in the volume container.
- Repeat the previous step for all the volume containers you would like to fail over to another device.
- Ensure that on the target there exist no volume container with the same name as the one you are trying to failover. If there is a volume container with the same name, failover will fail. So, you might have to delete the volume container. This might happen if the volume container was failed over from this device previously.
- Go back to the Devices blade. From the command bar, click Fail over.
- In the Failover blade, perform the following steps:
- Click Source. Select the volume containers to fail over. Only the volume containers with associated cloud snapshots and offline volumes are displayed
- Click Target. Select a target cloud appliance from the dropdown list of available devices. Only the devices that have sufficient capacity to accommodate source volume containers are displayed in the list.
- Review the failover settings under Summary and select the checkbox indicating that the volumes in selected volume containers are offline.
- A failover job is created. To monitor the failover job, click the job notification.
- After the failover is completed, go back to the Devices blade.
- Select the device that was used as the target for the failover.
- Click Volume Containers. All the volume containers, along with the volumes from the old device, should be listed.
- Login to the Azure file server VM
- Open Administrative tasks -> Disk management and scan for new disks
- Once the StorSimple volume has been populated, bring it online by right clicking on it
- Mount the drive by assigning it a drive letter
- If this is the first time a particular fileshare is failed over, create necessary SMB shares
- Redirect the CNAME pointer to azure fileserver vm so that end users can continue using the file shares using the same name as before.
If the volume container that you failed over has locally pinned volumes, those volumes are failed over as tiered volumes. Locally pinned volumes are not supported on a StorSimple Cloud Appliance.
Steps to fail over to an on-prem storage and servers
The following steps describe the procedure required to fail over the StorSimple 8020 series cloud appliance to on-prem StorSimple physical device and fileserver cluster when the services in datacentre are restored. StorSimple uses the device failover feature to migrate data from a cloud appliance running in Azure to physical device in the datacenter.
- Communicate to the end user to stop using the file share during planned failover
- Unmount the volume from file server and bring the disk offline.
- Go to your StorSimple Device Manager service and click Devices. In the Devices blade, go to the list of devices connected with your service.
- Select and click your source device. The source device has the volume containers that you want to fail over. Go to Settings > Volume Containers.
- Select a volume container that you would like to fail over to another device. Click the volume container to display the list of volumes within this container. Select a volume, right-click, and click Take Offline to take the volume offline.
- Repeat this process for all the volumes in the volume container.
- Repeat the previous step for all the volume containers you would like to fail over to another device.
- Ensure that on the target there exist no volume container with the same name as the one you are trying to failover. If there is a volume container with the same name, failover will fail. So, you might have to delete the volume container. This might happen if the volume container was failed over from this device previously.
- Go back to the Devices blade. From the command bar, click Failover.
- In the Failover blade, perform the following steps:
- Click Source. Select the volume containers to fail over. Only the volume containers with associated cloud snapshots and offline volumes are displayed
- Click Target. Select the target physical device from the dropdown list of available devices. Only the devices that have sufficient capacity to accommodate source volume containers are displayed in the list.
- Review the failover settings under Summary and select the checkbox indicating that the volumes in selected volume containers are offline.
- A failover job is created. To monitor the failover job, click the job notification.
- After the failover is completed, go back to the Devices blade.
- Select the device that was used as the target for the failover.
- Click Volume Containers. All the volume containers, along with the volumes from the old device, should be listed.
- Create a new 2GB volume under the volume container to serve as a Quorum disk to file server cluster and assign it to the on-prem fileserver
- Login to the on-prem file servers
- Open Administrative tasks -> Disk management and scan for new disks
- Once the storsimple volume has been populated, bring it online by right clicking on it
- Start the file server cluster and make sure that data disk is marked as green
- For the failed quorum disk:
- Right click on the cluster and modify the quorum settings by selecting the new 2GB disk as Quorum disk
- You can now remove the old failed disk from cluster
- Redirect the CNAME pointer to on-prem fileserver cluster so that end users can continue using the file shares using the same name as before.
StorSimple Snapshot Manager
The StorSimple Snapshot Manager is a Microsoft Management Console (MMC) snap-in that simplifies data protection and backup management in a Microsoft Azure StorSimple environment. With StorSimple Snapshot Manager, Microsoft Azure StorSimple on-premises and cloud storage can be managed as if it were a fully integrated storage system, thus simplifying backup and restore processes and reducing costs.
More detail regarding StorSimple snapshot manager can be found here.
Other parts of the series are as below:
Part 1: Introduction to solution, Microsoft StorSimple device and Windows 2016 file server cluster
Part 2: Setting up the on-prem StorSimple 8600 device and StorSimple 8020 cloud appliance