Setting up the on-prem StorSimple 8600 device and StorSimple 8020 cloud appliance
In the part1 of this series, I discussed about the solution, an overview of different products involved and how those products hang together to provide a fileserver solution with DR capability in Azure.
Now, lets discuss the step-by-step implementation procedure to get the solution into a working state. In this part I am going to show you the steps to configure on-prem StorSimple storage and StorSimple cloud appliance. I’ll also cover the steps to provision storage to the fileserver nodes. So, let’s get started.
Before the StorSimple physical device and cloud appliance can be configured, there are certain pre-requisites that you need to make sure are met properly. Otherwise storage provisioning to servers in itself can really be a journey.
The pre-requisites and configuration requirements for StorSimple can be found on Microsoft link below:
https://docs.microsoft.com/en-us/azure/storsimple/storsimple-8000-system-requirements
https://docs.microsoft.com/en-us/azure/storsimple/storsimple-8000-cloud-appliance-u2
StorSimple Device manager Services
Microsoft Azure StorSimple provides a web-based user interface (the StorSimple Device Manager service) that enables administrators to centrally manage datacenter and cloud storage. The StorSimple Device Manager service is used to perform the following tasks:
- Configure system settings for StorSimple devices.
- Configure and manage security settings for StorSimple devices.
- Configure cloud credentials and properties.
- Configure and manage volumes on a server.
- Configure volume groups.
- Backup and restore data.
- Monitor performance.
- Review system settings and identify possible problems.
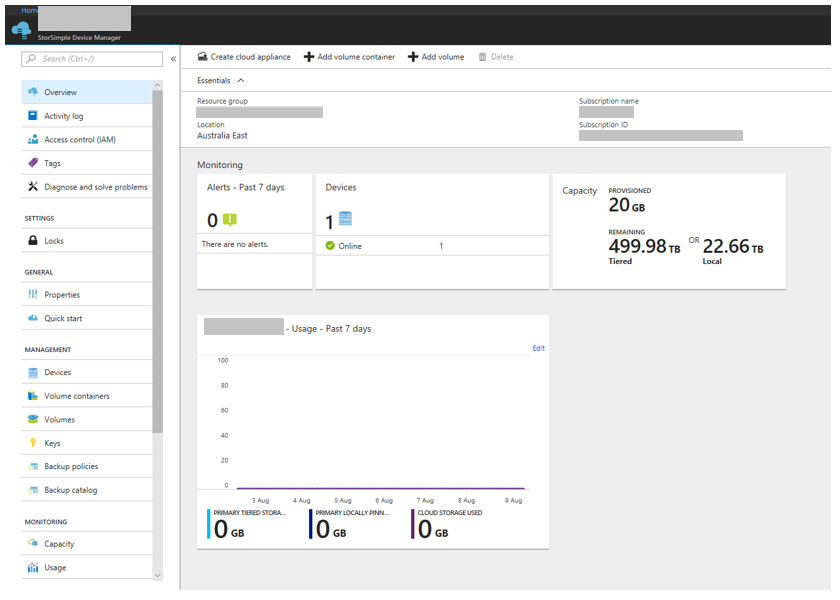
StorSimple Service Dashboard
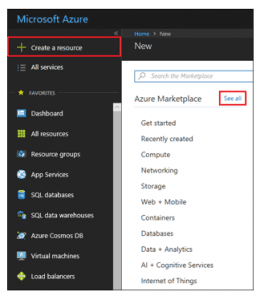
Step 1: Create a Service Account
A StorSimple Device Manager service can manage multiple StorSimple devices. Following steps are to be performed to create an instance of the StorSimple Device Manager service.
- Use your Microsoft account credentials to sign in to the Azure portal.
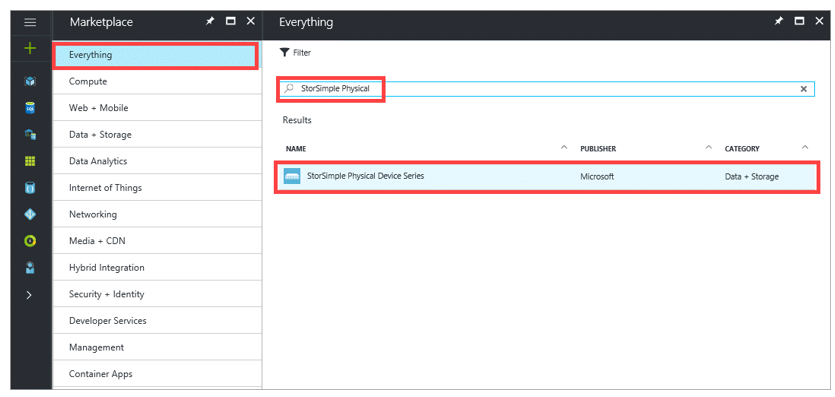
- In the Azure portal, click Create a resourceand then in the marketplace, click See all.
Search for StorSimple Physical. Select and click StorSimple Physical Device Series and then click Create. Alternatively, in the Azure portal click +and then under Storage, click StorSimple Physical Device Series.
Create a Service Account
- In the StorSimple Device Manager blade, following needs to be keyed in:
- Name:
- Subscription:
- Resource group:
- Storage Account:
Step 2: Get the Service registration key
After the StorSimple Device Manager service is up and running, you will need to get the service registration key. This key is used to register and connect your StorSimple device with the service.
- On the StorSimple Device Manager blade, click the service that you created. This opens up a new blade to the right.
- Go to Management > Keys.
- In the blade that opens up, click the copy icon to copy the service registration key and save it for later use.

Generate Service registration Key
Step 3: Configure and Register the Device
Below input is required during configuration and post registration of StorSimple 8600 device (I used data4 and data5 as iSCSI ports for my setup):
- IP v4 Address:
- Subnet Mask:
- Gateway:
- DNS:
- NTP:
Post Registration Device Setup
- Device Friendly Name:
- Time Zone:
- Controller 0 IP Address:
- Controller 1 IP Address:
- iSCSI NICS:
- Network Interface – DATA 4
- Status: Enabled
- Cloud Enabled: No
- iSCSI Enabled: Yes
- IP Address Family: IPV4
- IP Address:
- Subnet Mask:
- Gateway:
- Network Interface – DATA 5
- Status: Enabled
- Cloud Enabled: No
- iSCSI Enabled: Yes
- IP Address Family: IPV4
- IP Address:
- Subnet Mask:
- Gateway:
- Network Interface – DATA 4
Note: To minimize disruptions and downtime, it’s a good idea to enable portfast on each of the switch ports that the iSCSI network interface (Data4 and Data5) of device are connecting to. This will ensure that network connectivity can be established quickly in the event of a failover.
Step 4: Create a Volume Container
A volume container has storage account, bandwidth, and encryption settings for all the volumes contained in it. A volume container needs to be created before provisioning volumes on your StorSimple device.
- Go to your StorSimple Device Manager service and click Devices. From the tabular listing of the devices, select and click a device.
- In the device dashboard, click + Add volume container
- In the Add volume container blade:
- The device is automatically selected.
- Volume Container Name:
- Select Enable Cloud Storage Encryption to enable encryption of the data sent from the device to the cloud.
- Provide and confirm a Cloud Storage Encryption Key that is 8 to 32 characters long. This key is used by the device to access encrypted data.
- Azure Storage Account:
- Specify bandwidth drop-down list (I used unlimited to be able consume all the available bandwidth.)
- Click Create.
For file shares, iSCSI volumes were provisioned to the servers from StorSimple as below. One more volume worth 2GB was created as quorum disk for the on-prem fileshare server cluster.
Volume Name: VOL-Test001
Size: 20GB
Usage Type: File services
ACR Name: XXX-001, XXX-002 and XXX-AES-001
Volume Name: XXX-Quorum
Size: 2GB
Usage Type: Quorum disk
ACR Name: XXX-001 and XXX-002
Step 6: Mount, Initialize and Format Volume
The following steps are performed on your Windows Server hosts that are part of file server cluster and Azure based file server:
- Start the Microsoft iSCSI initiator.
- In the iSCSI Initiator Properties window, on the Discovery tab, click Discover Portal.
- In the Discover Target Portal dialog box, supply the IP address of your iSCSI-enabled network interface, and then click OK.
- In the iSCSI Initiator Properties window, on the Targets tab, locate the Discovered targets. The device status should appear as Inactive.
- Select the target device and then click Connect. After the device is connected, the status should change to Connected. (For more information about using the Microsoft iSCSI initiator, see Installing and Configuring Microsoft iSCSI Initiator.)
- On the Windows host, press the Windows Logo key + X, and then click Run.
- In the Run dialog box, type Diskmgmt.msc. Click OK, and the Disk Management dialog box will appear. The right pane will show the volumes on your host.
- In the Disk Management window, the mounted volumes will. Right-click the discovered volume (click the disk name), and then click Online.
- Right-click the volume (click the disk name) again, and then click Initialize.
- To format a simple volume, perform the following steps:
- Select the volume, right-click it (click the right area), and click New Simple Volume.
- In the New Simple Volume wizard, specify the volume size and drive letter and configure the volume as an NTFS file system.
- Specify a 64 KB allocation unit size. This allocation unit size works well with the deduplication algorithms used in the StorSimple solution.
- Perform a quick format.
Note: For the high availability of your StorSimple solution, configuring MPIO on file server cluster (optional) prior to configuring iSCSI might be helpful. MPIO configuration on host servers will ensure that the servers can tolerate a link, network, or interface failure.
For MPIO and iSCSI installation and configuration instructions on Windows Server host, go to Configure MPIO for your StorSimple device. These also include the steps to mount, initialize, and format StorSimple volumes.
Step 7: Create a Backup Policy
Backups provide point-in-time protection of volumes and improve recoverability while minimizing restore times. StorSimple device allows to take two types of backup: local snapshots and cloud snapshots. Each of these backup types can be Scheduled or Manual.
Following steps need to be performed in the Azure portal to create a scheduled backup:
- Go to your StorSimple Device Manager service. From the tabular listing of devices, select and click your device and then click All settings. In the Settings blade, go to Settings > Manage > Backup policy.
- In the Backup policy blade, click + Add policy.
- In the Create backup policy blade, supply a name that contains between 3 and 150 characters for your backup policy.
- Select the volumes to be backed up. If you select more than one volume, these volumes are grouped together to create a crash-consistent backup.
- On Add first schedule blade:
- Select the type of backup. For faster restores, select Local snapshot. For data resiliency, select Cloud snapshot.
- Specify the backup frequency in minutes, hours, days, or weeks.
- Select the starting time and date for the backup policy.
- Click OK to create the backup policy.
- Click Create to start the backup policy creation.
The StorSimple 8020 Cloud Appliance is an additional capability that comes with your Microsoft Azure StorSimple solution. The StorSimple Cloud Appliance runs on a virtual machine in a Microsoft Azure virtual network, and it will be used to back up and clone data from on-prem StorSimple device that provide storage to file server hosts. The volumes from this appliance will only be provisioned to Azure file server VM and not to the on-prem file server cluster to avoid iSCSI data transfer between on-prem server and Azure.
Step 1: Create a cloud appliance
Following information will be needed to create the StorSimple Cloud Appliance.
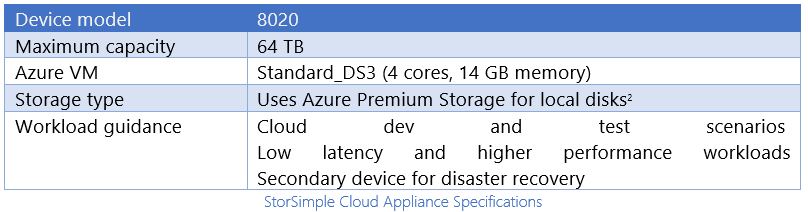
- Name –
- Model – For this implementation device 8020 is chosen which has 64 TB of Premium Storage. 8020 is recommended by Microsoft to deploy high performance, low latency workloads, or use as a secondary device for disaster recovery.
- Version – Latest available version will be chosen
- Virtual network –
- Subnet –
- Storage account –
Step 2: Configure and register the cloud appliance
Before this procedure can be started, you need to have the service data encryption key handy. The service data encryption key is created when StorSimple 8600 physical device was registered with the StorSimple Device Manager service.
- Select and click the StorSimple Cloud Appliance created in the Devices blade.
- In the Configure device blade, do the following steps:
- Enter the Service Data Encryption Key in the space provided. This key is generated when StorSimple 8600 physical device was registered with StorSimple Device Manager service.
- Enter the Device admin password and Snapshot Manager password of the specified length and settings.
- Click OK to finish the initial configuration and registration of the cloud appliance.
StorSimple Snapshot Manager is a Microsoft Management Console (MMC) snap-in that can be used to create consistent, point-in-time backup copies of local and cloud data. The snap-in runs on a Windows Server–based host. StorSimple Snapshot Manager will be used to:
- Configure, back up, and delete volumes.
- Configure volume groups to ensure that backed up data is application-consistent.
- Manage backup policies so that data is backed up on a predetermined schedule and stored in a designated location (locally or in the cloud).
- Restore volumes and individual files.
Backups are captured as snapshots, which record only the changes since the last snapshot was taken and require far less storage space than full backups. You can create backup schedules or take immediate backups as needed. Additionally, it can be used to establish retention policies that control how many snapshots will be saved.
If a disaster occurs or if you need to restore data for another reason, StorSimple Snapshot Manager can be used to restore it incrementally as it is needed. Data restoration does not require to shut down the entire system while a file is being restored, replacing equipment, or moving operations to another site.
Other parts of the series are as below:
Part 1: Introduction to solution, Microsoft StorSimple device and Windows 2016 file server cluster.
Part 4: Failover to cloud appliance in case of DR event