
Last year I wrote Lithnet Microsoft Identity Manager plug-ins for PoshBot. After publishing those I developed the majority of a PoshBot plugin to enable ChatOps for Azure Active Directory. Finally with a little more bandwidth at the start of 2020 I’ve been able to put the finishing touches on the module and release it. ChatOps for Azure Active Directory using PoshBot is available from the PowerShell Gallery here and the source in GitHub here.
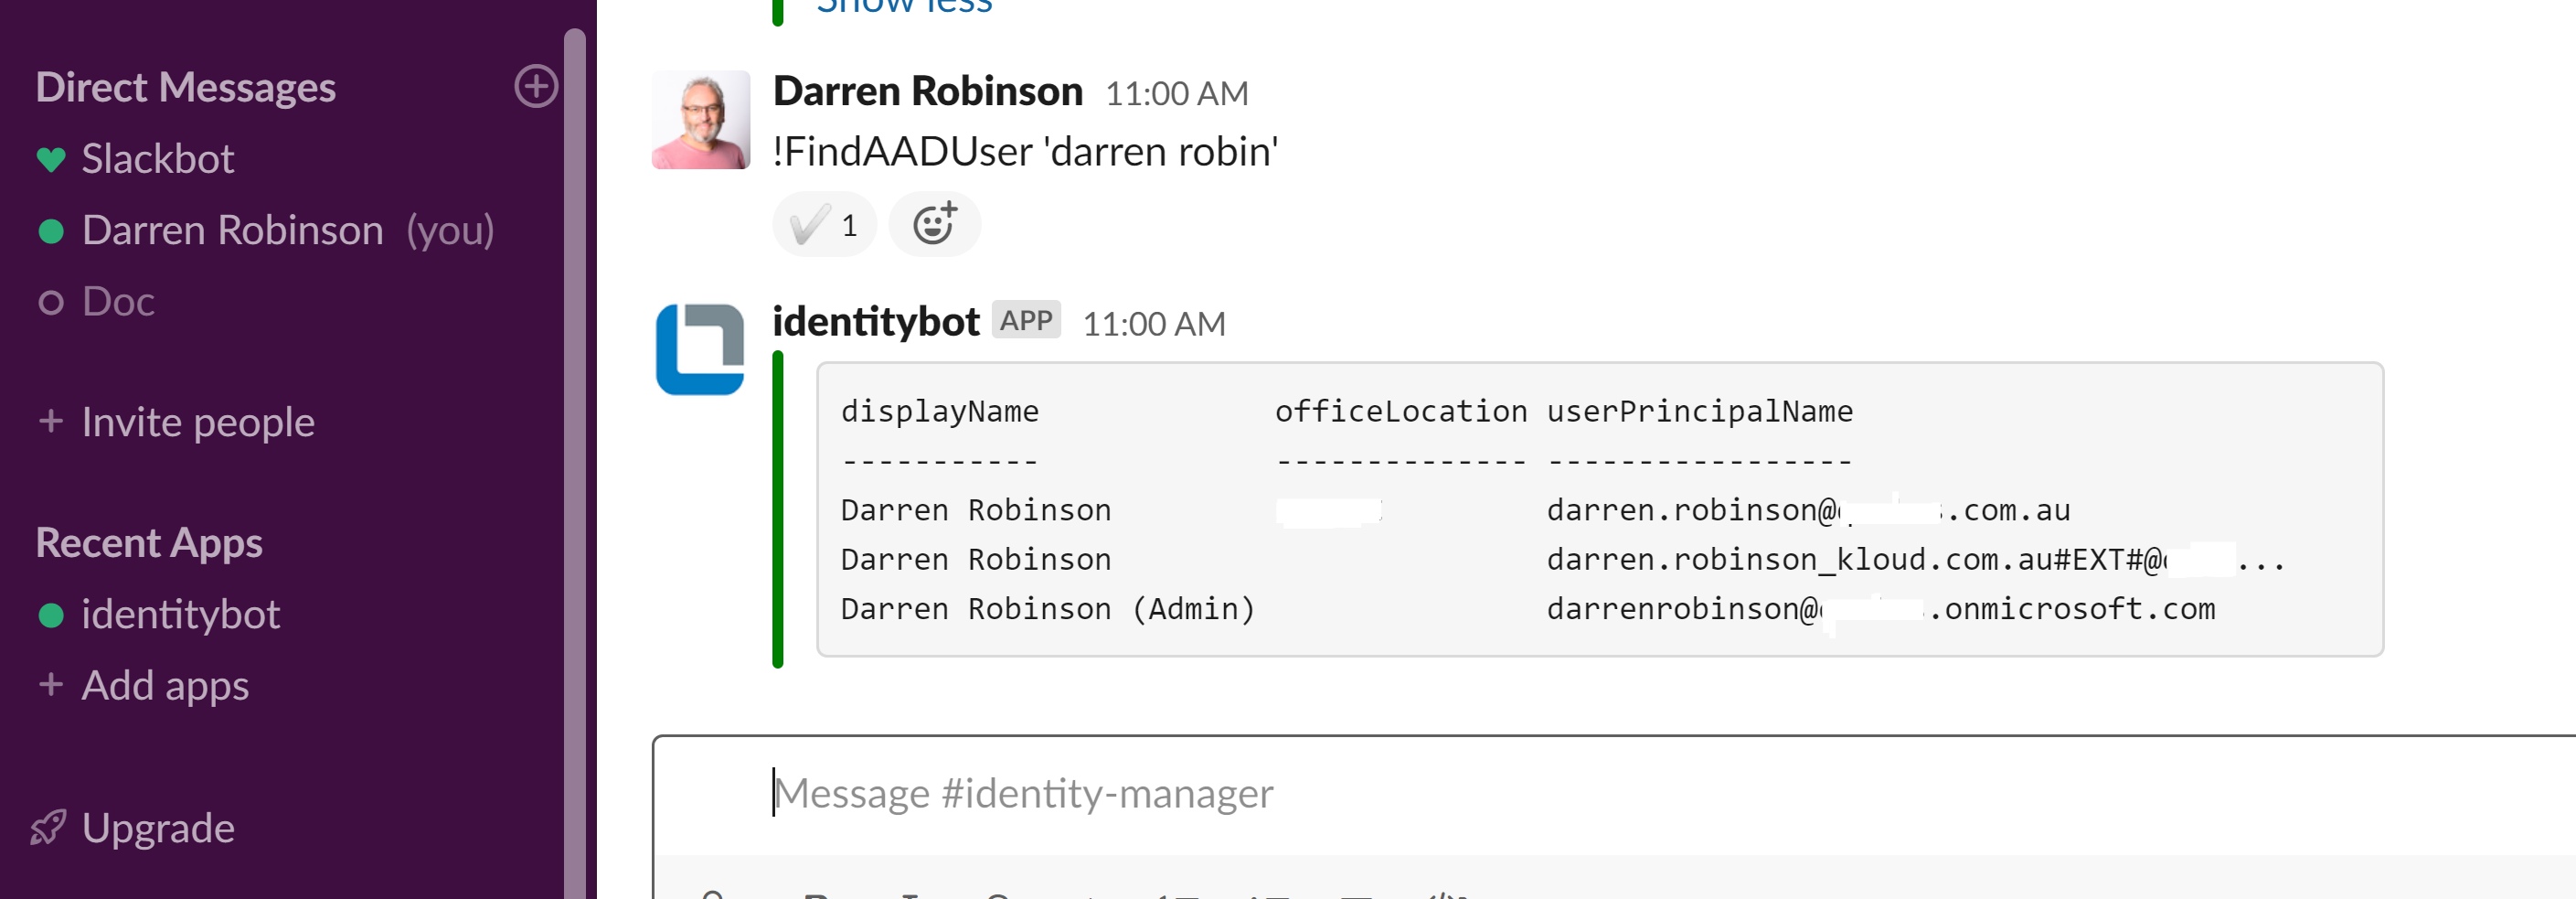
ChatOps for Azure Active Directory provides a read-only Microsoft Teams and Slack PoshBot interface, that allows you to query Azure Active Directory to find and get Azure Active Directory. To find AAD users we search for them using their displayName. The PoshBot command is !FindAADUser e.g
!FindAADUser 'darren robin'
You will be returned a list of Azure AD accounts whose displayName attribute startswith ‘darren robin’.
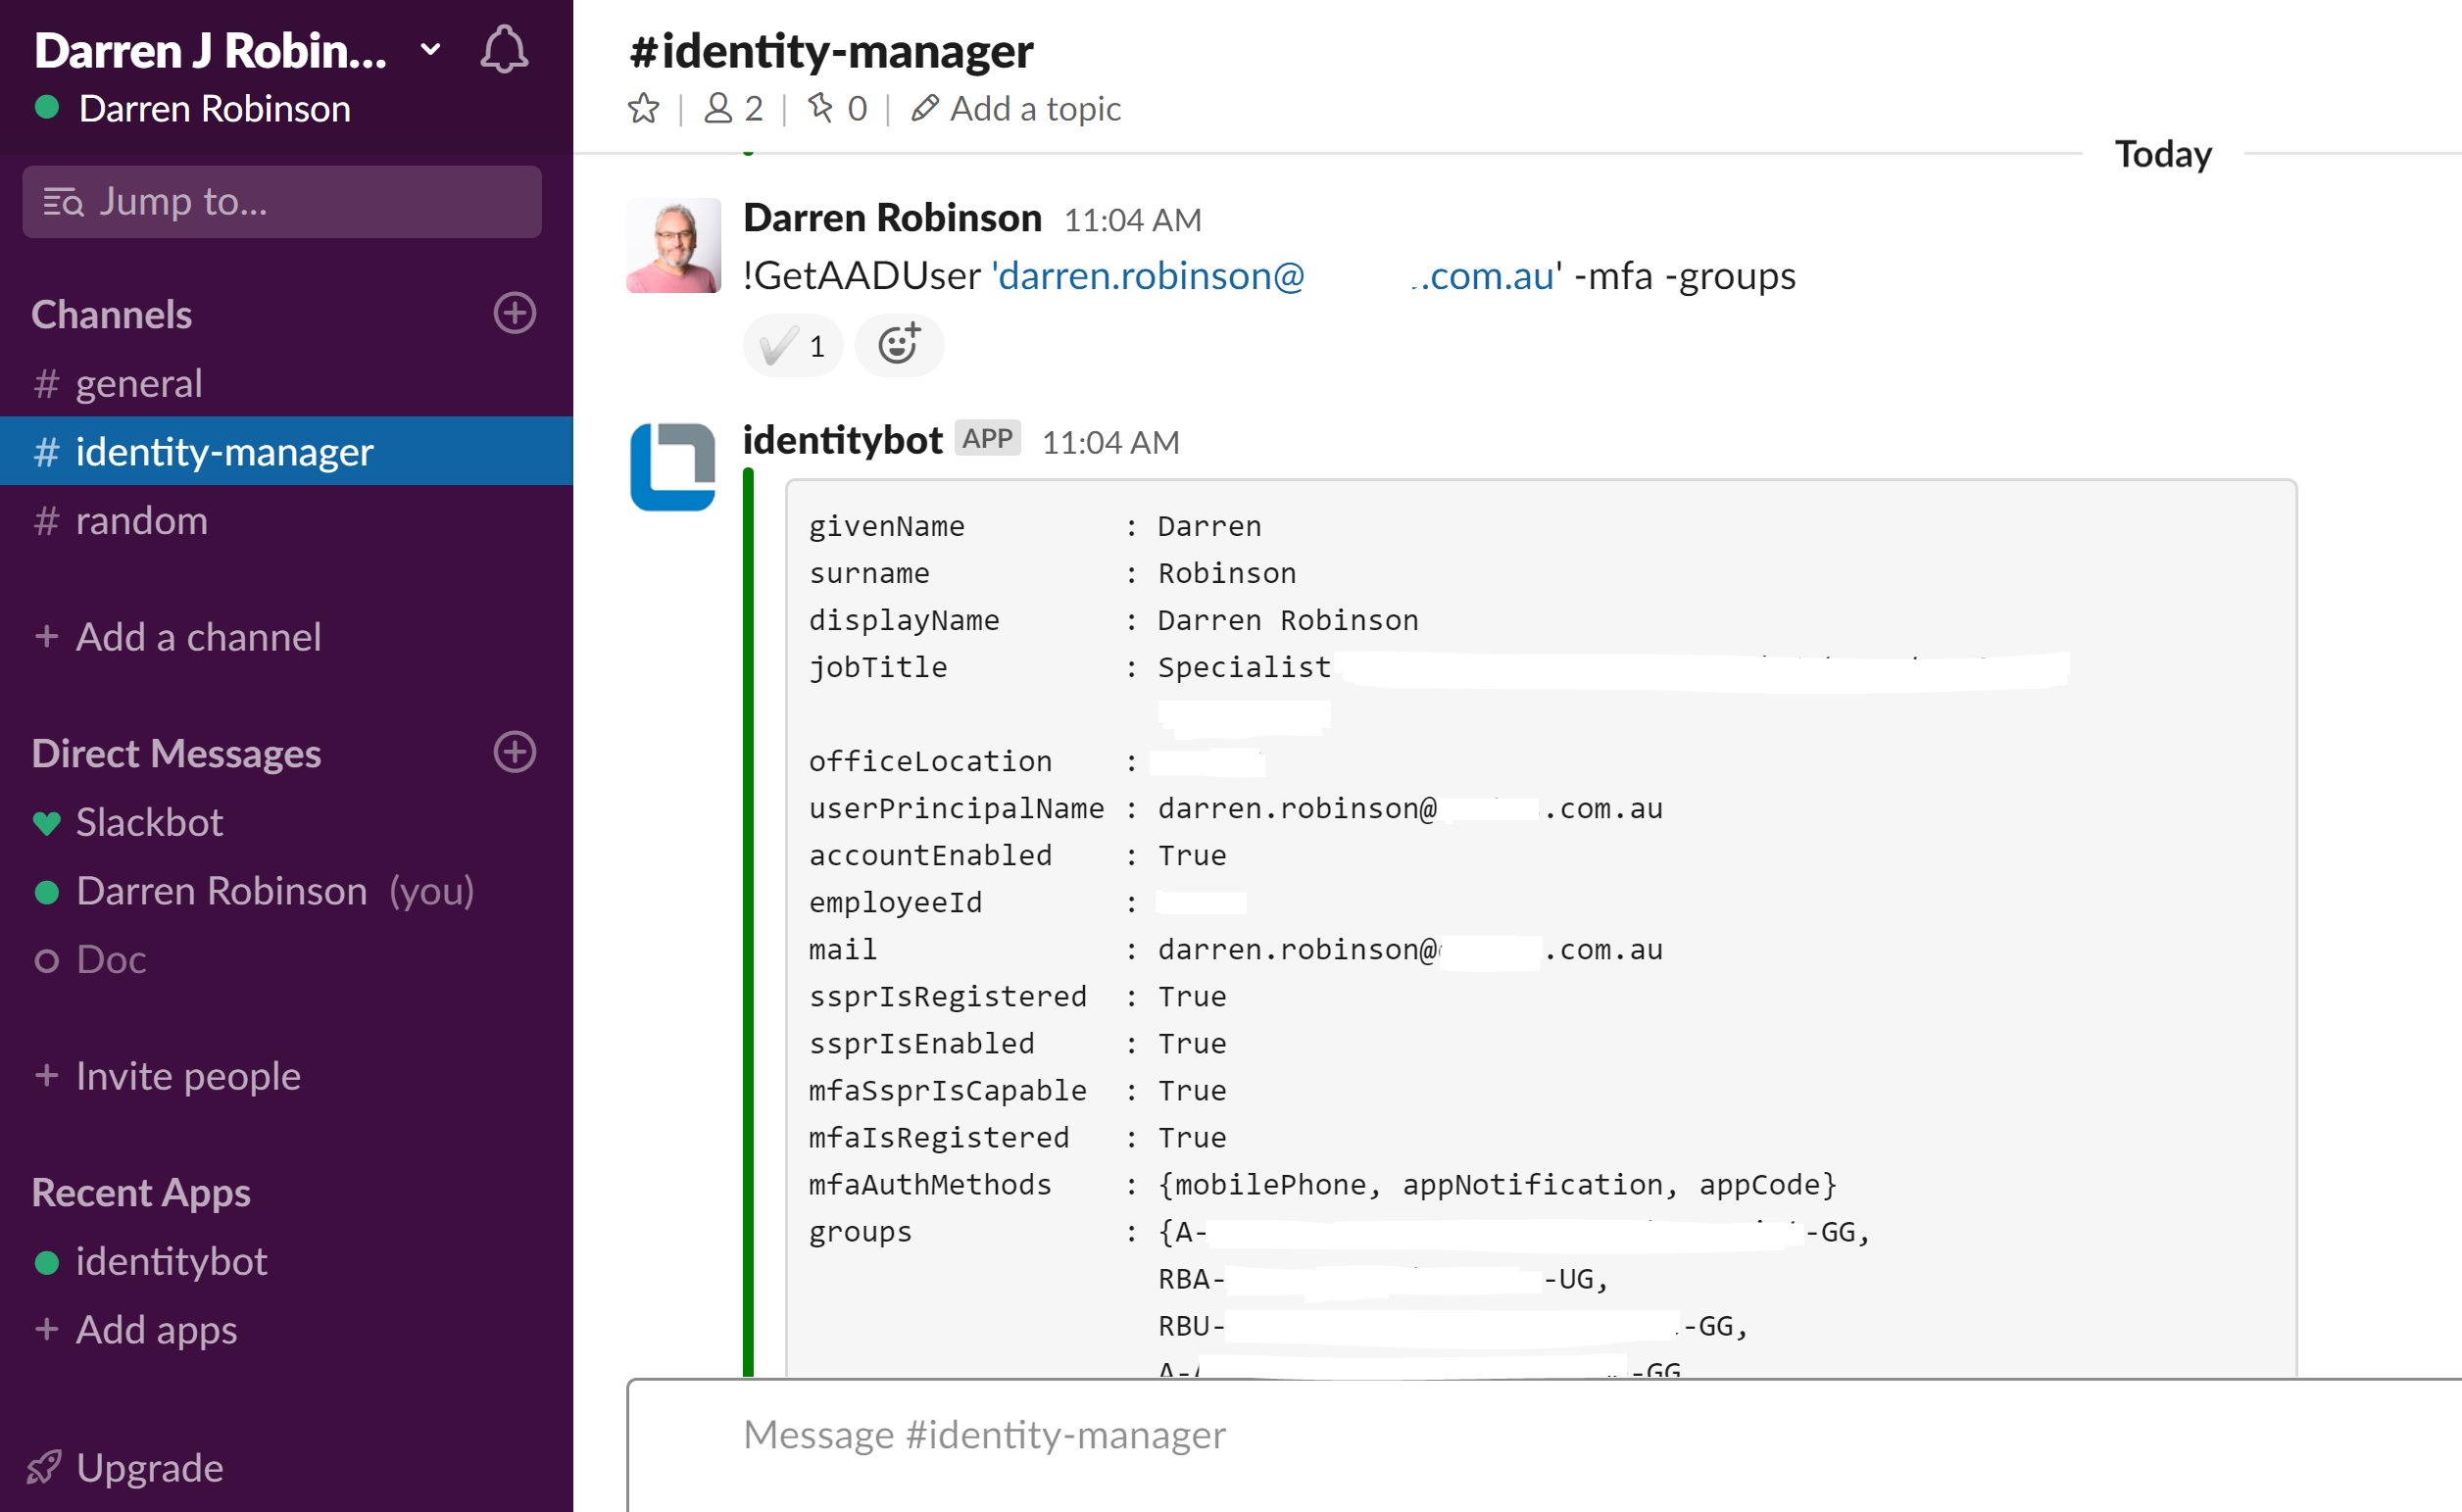
You can then use !GetAADUser to get the details of an Azure AD Account. The PoshBot command is !GetAADUser . Two options switches (-MFA & -Group) instruct the !GetAADUser command to also return the MFA/SSPR details for the account and Azure AD Group Membership(s). The screenshot below shows returning a users’ account along with MFA/SSPR details and a list of group memberships.
!GetAADUser 'darren.robinson@company.com.au' -mfa -groups
If you are just getting started with PoshBot then definitely checkout my post for the ChatOps for Microsoft Identity Manager as it details the configuration steps for setting up a PostBot for Microsoft Teams and Slack.
PoshBot.AzureAD Dependencies
ChatOps for Azure Active Directory uses the beta Microsoft Graph endpoint in order to return users Multi-Factor Authentication/SSPR details. Authentication is handled using the MSAL.PS PowerShell Module that I’ve previously written about here. Install it from the PowerShell Gallery from an Administrative PowerShell session;
install-module MSAL.PS
You will also need to register and Azure AD Application that has the following permissions to Microsoft Graph;
- Reports.Read.All (required for MFA details)
- User.Read.All
Azure Active Directory Authentication Credentials
You will need to generate an Azure AD authentication credential file for the Azure AD Application you created above. This will be imported by the PoshBot Configuration script when the bot starts.
Note: Keep in mind that these generated credential files will be referenced by the PostBot configuration. If you set these up as a Windows Service, the account that runs the Service must be the same account that generated the credential files otherwise the credential password will not be accessible. Likewise if you want to store your credentials in a KeyVault or similar then you can. You will then will need to provide the PowerShell command(s) as part of the configuration script (further below) to retrieve them.
Update AADClientID and AADClientSecret values for your environment.
# AAD Application Creds Config File
$AADClientID = 'yourAADClientID'
$AADClientSecret = 'yourAADClientSecret'
$ClientSecret= ConvertTo-SecureString $AADClientSecret -AsPlainText -Force
$Credentials = New-Object System.Management.Automation.PSCredential $AADClientID,$ClientSecret
$Credentials | export-clixml C:\poshbot\AADCreds.xml
PoshBot Configuration Script
In your PoshBot Configuration Start Script you will need to provide the path to the credentials file created above, the Azure AD Tenant ID and attributes you wish to be displayed for search users results and get user results.
NOTE: you don’t need to supply the MFA or Groups attributes. These are automatically added if the -MFA or -Groups switches are used.
 PluginConfiguration = @{
   'PoshBot.AzureAD' = @{
        AADCreds = import-clixml C:\poshbot\AADCreds.xml
        AADTenant = 'yourAADTenantID'
        FindAADUserAttributes = @('displayName','officeLocation','userPrincipalName')
        GetAADUserAttributes = @('givenName','surname','displayName','jobTitle','officeLocation','userPrincipalName','accountEnabled','employeeId','mail')
   }
}
Module Installation
Once you have your PostBot instance configured and started you will need to install and configure the PoshBot.AzureAD plugin to make it available for ChatOps for Azure Active Directory functions.
From within Teams or Slack with PoshBot configured, install the PoshBot.AzureAD module using the PoshBot install-plugin command;
!install-plugin PoshBot.AzureAD
If this is a fresh PoshBot install, as per the details in this post you can create PoshBot Groups and Roles using the !New-Group and !New-Role commands. Or you can add the PoshBot Azure AD plugin to an existing role (e.g IdentityAdmins) as shown below.
!Add-RolePermission IdentityAdmins PoshBot.AzureAD:read
You are now ready to start using ChatOps for Azure Active Directory.
Summary
Using ChatOps for Azure Active Directory with your support teams will allow them to easily get information from Azure AD via Slack or Teams without having to access the Azure Portal. Great for quick lookups, and troubleshooting.