Security Translation – Local Profiles and things to consider for end user experience
The last bit of any migration project is to keep the end user experience as simple and smooth as possible. So, by now we have successfully migrated the groups, migrated the users keeping their mailboxes intact and providing them access to all their resources using SID history. As the last bit of the migration I would like to discuss about few things that should be considered from an end user’s perspective to make their experience good when they login to the new domain. Depending on the nature of your organizational structure, there might be numerous things that you would like to consider. However, a few things that I consider to be important for most of the migrations are:
- The user might have multiple alias (can receive emails on aliases but always send emails as primary email address). Have all these aliases been configured for the users?
- Is the
end user going to have a new UPN post migration? If yes, what is the impact and
what all application will need to be re-configured?
- O365 account
- SIP URI
- Authenticator app (if using Microsoft authenticator for MFA)
- OneDrive for business
- OneNote
- ……..
- User sign-in account to user machines
- Are there any login scripts that the users were using in old domain?
- What
about their local user profile, does this need to be migrated or user will have
new profile (loosing access to profile specific settings in old domains like
profile files, browser favourites, shortcuts etc.)
- While performing the local profile migration, user machine needs to be connected to the office network and be reachable from the ADMT machine, otherwise profile migration will fail
And again, the list can keep on growing depending upon different factors related to your environment.
So, before we discuss about the steps involved for user profile migration, lets look at a couple of pre-requisites.
Windows Firewall
If a firewall (windows or any other 3rd-party) is enabled, it might prevent local profile migration from source domain to target domain. It’s more relevant while computer migration is performed, but I would suggest disabling it for local profile migration as well. This can be achieved quite easily via group policies.
ADMT console uses Lightweight Directory Access Protocol (LDAP) port 389 to communicate with domain controllers and Remote Procedure Call (RPC) to communicate with ADMT agents. For RPC communication, any available RPC port in the range between 1024 and 5000 can be used.
For more information, see KB836429 . If the following error messages ERR3:7075, ERR2:7625, ERR2:7014, ERR2:7014, WRN1:7372 and ERR2:7228 are logged in the ADMT migration log, see KB929493 .
- On a domain controller in source domain, click Start, Administrative Tools, then click Group Policy Management.
- Create a new group policy object linking it to the OU containing user computer objects.
- In Group Policy Management Editor, go to Computer Configuration\Administrative Templates\Network\Network Connections\Windows Firewall\Domain Profile. Right click Windows Firewall: Protect all network connections, and then click Properties.
- On the Windows Firewall: Protect all network connections Properties page, select Disabled, then click OK.
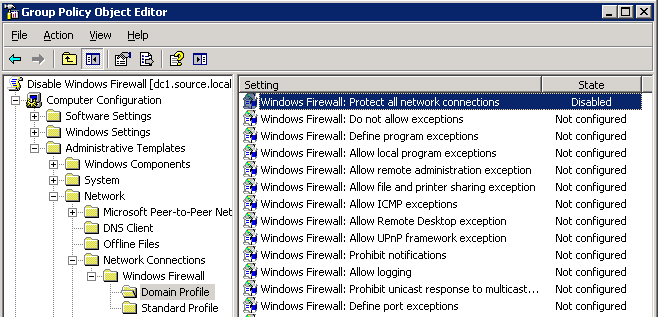
- Close all, open Command prompt and run GPUPDATE /force command.
Local Administrators access to ADMT account
The ADMT Migration Account that will be used for profile migration needs to have local administrator rights in the source domain. If the ADMT account is not assigned administrator privilege, ADMT agent cannot be deployed on user machines, which is required for granting settings from old profile to new profile. This can be achieved by creating a group policy and link it to the same OU of user computers in source domain as above.
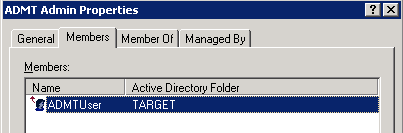
- Create a Domain Local Security Group in the Source Domain, add the ADMT Service Account to the group.
- Create a new GPO and link it to the OU with the user machines in it.
- In Group Policy Management Editor, go to Computer Configuration\Windows Settings\Security Settings\Restricted Groups.
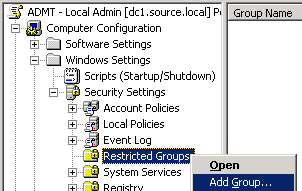
- Add the ADMT Admin Local Security group created earlier.
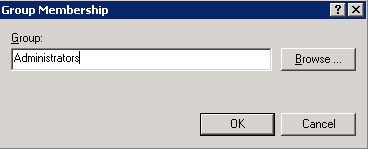
- Under “This group is a member of:” select add, type Administrators.
- Close all, open Command prompt and run GPUPDATE /force command.
Translate Local User Profile
User profiles store user data and information about the personal settings for the user. These may include files, printer settings, desktop settings including shortcuts and browser settings.
While the user profile translation is done, the machine must be up and connected to the network / reachable from ADMT machine. Preferably the user should not be logged in to the machine during the time of translation.
User profiles can be local or roaming.
| Type | Description | Migration Requirements |
| Roaming profiles | User profiles are stored centrally on servers. Profiles are available to the user, regardless of the workstation in use. | Migration account requires full access to profile folders. This would typically require taking ownership of folders to give the migration account permissions. Must be followed by local profile migration to update the local copy of the profile. |
| Local profiles | User profiles are stored locally on the workstation. When a user logs on to another workstation, a unique local user profile is created. | Migration account requires administrative access to PC. Permissions can be set by GPO. |
- On the computer in the target domain on which ADMT is installed, log on by using the ADMT account migration account.
- Use the Security Translation Wizard by performing the steps in the following table.
| Wizard page | Action |
| Security Translation Options | Click Previously migrated objects. |
| Domain Selection | Under Source, in the Domain drop-down list, type or select the NetBIOS or Domain Name System (DNS) name of the source domain. In the Domain controller drop-down list, type or select the name of the domain controller, or select Any domain controller. Under Target, in the Domain drop-down list, type or select the NetBIOS or DNS name of the target domain. In the Domain controller drop-down list, type or select the name of the domain controller, or select Any domain controller, and then click Next. |
| Computer Selection | Click Select computers from domain, and then click Next. On the Computer Selection page, click Add to select the computers in the source domain for which you want to translate security, click OK, and then click Next. Or Click Read objects from an include file, and then click Next. Type the location of the include file, and then click Next. |
| Translate Objects | Click User Profiles. |
| Security Translation Options | Click Replace. |
| ADMT Agent Dialog | Select Run pre-check and agent operation, and then click Start. |
- Review the results that are displayed on the screen for any errors. After the wizard completes, click View Migration Log to see the list of computers, completion status, and the path to the log file for each computer. If an error is reported for a computer, you will have to refer to the log file on that computer to review any problems with local groups. The log file for each computer is named MigrationTaskID.log, and it is stored in the Windows\ADMT\Logs\Agents folder.
And job done!!!
Series:
Part 1. Introduction and high-level migration approach
Part 2. Configuring source and target domains for SID history and accepted-domains
Part 3. Installation and configuration of ADMT tool and Password Export Server
Part 4. Groups Migration
Part 5. Users Migration
Part 6. Security Translation Wizard – Local Profiles and things to consider for end user experience
Nice post!