Installation and configuration of ADMT tool and Password Export Server
Now that we have got our active directories in both source and target domain ready for migration, let’s install the tools required for migration.
ADMT Migration Account
The ADMT service account needs to have administrative rights in both source and target domains. It’s a good idea to create a user specifically for the ADMT Migration, however you may still use an existing user if desired. A single service account will be used for the entire migration:
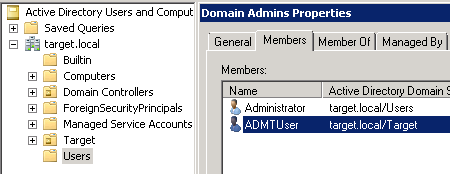
- In the target domain, create an administrator account
Target Domain:
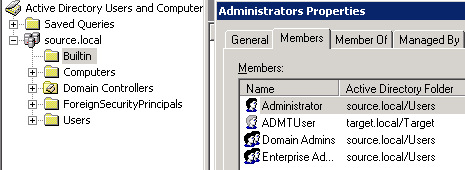
- In the source domain add the same user to the built-in Administrators group (it can’t be added directly to domain admins group).
- On the domain controller in Source domain, click Start, Administrative Tools, then select Active Directory Users and Computers.
- In left panel, select built-in, then in right panel right click on Administrators group, select Properties.
- Select Members tab, click Add and add the account to this group.
Source Domain:
- In the target domain, delegate permissions on OUs that are targets for migration to the above account
Installation and configuration of ADMT tool
ADMT tool should be installed on a machine in target domain. Also make sure that the user/client machines and the domain controllers (PES tool will be installed on a domain controller in source domain) in source domain are reachable from this machine. Otherwise you might end up having issues migrating users retaining their existing passwords and the user local profile on their machine.
ADMT v3.2 requires a preconfigured instance of SQL Server for its underlying data store. Use the ADMT migration service account created in above account for installation of SQL server and ADMT tool.
- Double click on SQLEXPR_x64_ENU.exe and run application.
- On right panel, click Installation, then on left side click New SQL Server stand-alone installation or add features to an existing installation.
- On the Setup Support Rules page, click OK.
- On the Product Key page, click Next.
- On the License Terms page, select I accept the license terms box, then click Next.
- On the Setup Support Files page, click Install.
- On the Setup Support Rules page, click Next.
- On the Feature Selection page, select Database Engine Service, then click Next.
- On the Instance Configuration page, accept default names and setting, click Next.
- On the Disk Space Requirements page, click Next.
- On the Server Configuration page for SQL Server Service, use your ADMT Service Account then click Next.
- On Database Engine Configuration page, select Windows authentication Mode, then in Specify SQL Server administrators add ADMT administrator account. Click Next.
- On Error and Usage Reporting page, click Next.
- On Installation Rules page, click Next.
- On Ready to Install page, click Install.
- On Installation Progress page, click Next.
- On Complete page, click Close.
Installing ADMT 3.2
Now, we install ADMT 3.2 on target domain. ADMT 3.2 installation is supported on Windows 2008 R2, Windows Server 2012 / 2012 R2 servers.
- On Welcome to the Active Directory Migration Tool Installation page, click Next.
- On License Agreement page, select I Agree, then click Next.
- On Customer Experience Improvement Program page, click Next.
- On Database Selection page, in Database write your SQL Database Instance, .\SQLEXPRESS, then click Next.
- On Database Import page, select No, do not import data from an existing database (Default), then click Next.
- Review information, then click Finish.
Password Export Server / ADMT Password Migration DLL
As mentioned in my 1st post, during the User account migration you will have the option to migrate passwords from the source domain to the target domain using ADMT. This can be achieved by installing Password Export Server onto a domain controller in the source domain. Again, make sure that the 2 machines, ADMT and PES, can communicate with each other. If the 2 machines can’t talk, user password migration will fail.
- Before installing PES, you need to create an encryption key from the ADMT machine in the target domain. From the command prompt run:
admt key
/option:create /sourcedomain:source.local /keyfile:"<localdirectory>\PES.pes"
/keypassword:*
| Syntax | Description |
| <SourceDomain> | Specifies the name of the source domain in which the PES service is being installed. Can be specified as either the Domain Name System (DNS) or NetBIOS name. |
| <KeyFilePath> | Specifies the path to the location where the encrypted key is stored. |
| {<password>|*} | A password, which provides key encryption, is optional. To protect the shared key, type either the password or an asterisk (*) on the command line. |
- On the DC in source domain, copy the encryption file created in previous step, to a local folder
- Run the PES installer (my suggestion is to run command prompt as an administrator and run the executable through command prompt otherwise the next step is going to fail.)
- When prompted choose the .key file you created on the ADMT machine.
- Key in the password you used while creating the key.
- Run the PES service as ADMT account user in the target domain.
- The installation is now complete, Click finish and restart the domain controller.
Starting Password Export Server Service
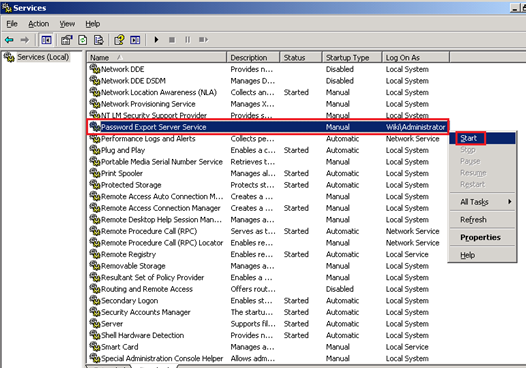
After restarting domain controller, the Password Export Server Services need to be manually started.
- Click Start, Administrative Tools, then click Services.
- Right click on Password Export Server Services, then click Start.
Series:
Part 1. Introduction and high-level migration approach
Part 2. Configuring source and target domains for SID history and accepted-domains
Part 3. Installation and configuration of ADMT tool and Password Export Server
Part 4. Groups Migration
Part 5. Users Migration
Part 6. Security Translation Wizard – Local Profiles and things to consider for end user experience