If you would like to know more about what the AWS DeepRacer is, please refer to my previous post: AWS DeepRacer – Overview
This post assumes you have followed the AWS DeepRacer Getting Started Guide which gets you to the point of being able to manually drive the car.
So now you have the AWS DeepRacer charged up and ready to go. You have a trained model you got from Re:Invent or you followed my other post here and trained your model with RoboMaker/SageMaker.
You also either have a file named model1.tar.gz on a USB stick from the DeepRacer console or a models folder in an S3 bucket that was trained with RoboMaker which just needs to be zipped up. You want this model to show up in the DeepRacer local web server in the Autonomous section.
How to load your model, unfortunately, seems to be missing from the documentation so far and it’s not something I found looking online. There is most likely a better way of doing this so if you find out a smoother method, let me know.
To complete this you will need to login to the Ubuntu server onboard. Instructions on how to do this are found in my previous post AWS DeepRacer – How to login to the Ubuntu Computer Onboard
Loading from DeepRacer Console via USB
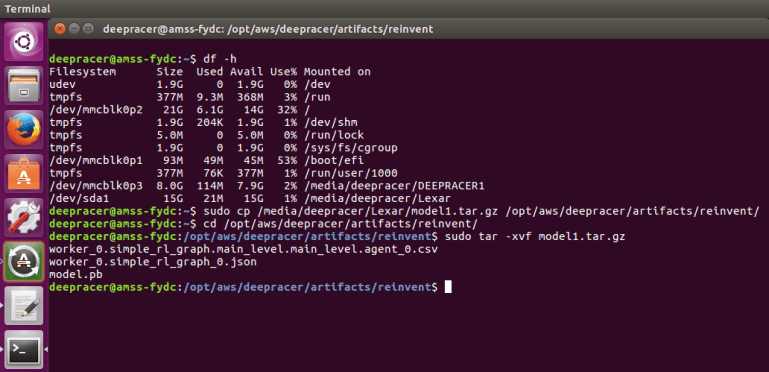
You should be logged into the Ubuntu server
- Plug in your USB into one of the free USB ports
- Open up a terminal
- type in df -h to list all the mounted volumes and identify which is your USB stick “for me this was /media/deepracer/Lexar”
- then type in the following:
- sudo mkdir /opt/aws/deepracer/artifacts/<the name of the model>
- sudo cp <the path of your USB stick>/<the filename of the model gz> /opt/aws/deepracer/artifacts/<the name of the model>
- cd /opt/aws/deepracer/artifacts/<the name of the model>
- sudo tar -xvf <the filename of the model gz>
- below is a screenshot of my commands for your reference
Checking that the model is now available
Now that you have placed the files in the correct directory, you can now go back to your AWS DeepRacer web server e.g. https://192.168.0.21/
- login to the DeepRacer web server with the password on the bottom of your car.
- You should now see the Autonomous option is selected and a drop-down allowing you to choose the model by the name of the folder you chose
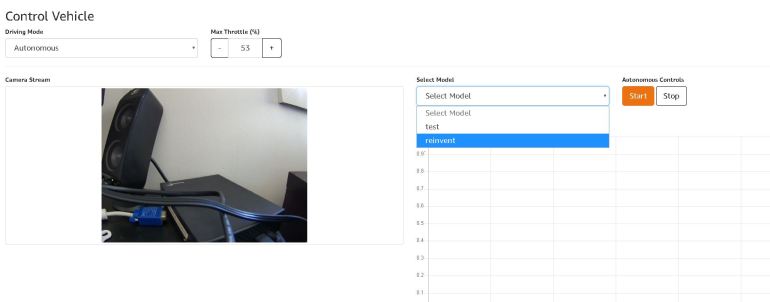
You should now be able to click the Start button and the AWS DeepRacer is now driving using the loaded model.
In the next few posts, we will explore running simulations with AWS RoboMaker and examine how we can change the reward function as well as other hyperparameters