A Bot or ChatOps for Microsoft Identity Manager is something I’ve had in the back of my mind for just over two years. More recently last year I did build the Voice Assistant for Microsoft Identity Manager as a submission for an IoT Hackathon. But what is ChatOps?
ChatOps is a collaboration model that connects people, tools, process, and automation into a transparent workflow. This flow connects the work needed, the work happening, and the work done in a persistent location staffed by the people, bots, and related tools. ^
You could therefore think of ChatOps for Microsoft Identity Manager as a chat version of my Voice Assistant for Microsoft Identity Manager. But without the requirement of an IoT Mic Array, thereby making it more accessible and practical.
This post details the two Plugins (PoshBot.LithnetRMA and Poshbot.LithnetMiisAutomation) that I have just published to the PowerShell Gallery. These plugins are for integration of ChatOps with Microsoft Identity Manager thanks to the Lithnet and Poshbot tools. The Plugins work the same integrated with Slack and Teams. If your organisation uses both, I don’t see why you couldn’t have both integrations configured in parallel.

The Poshbot.LithnetMiisAutomation Plugin is for the MIM Sync Engine, whilst the PoshBot.LithnetRMA is for the MIM Service just as the Lithnet RMA and MIISAutomation PowerShell Modules they are based off are.
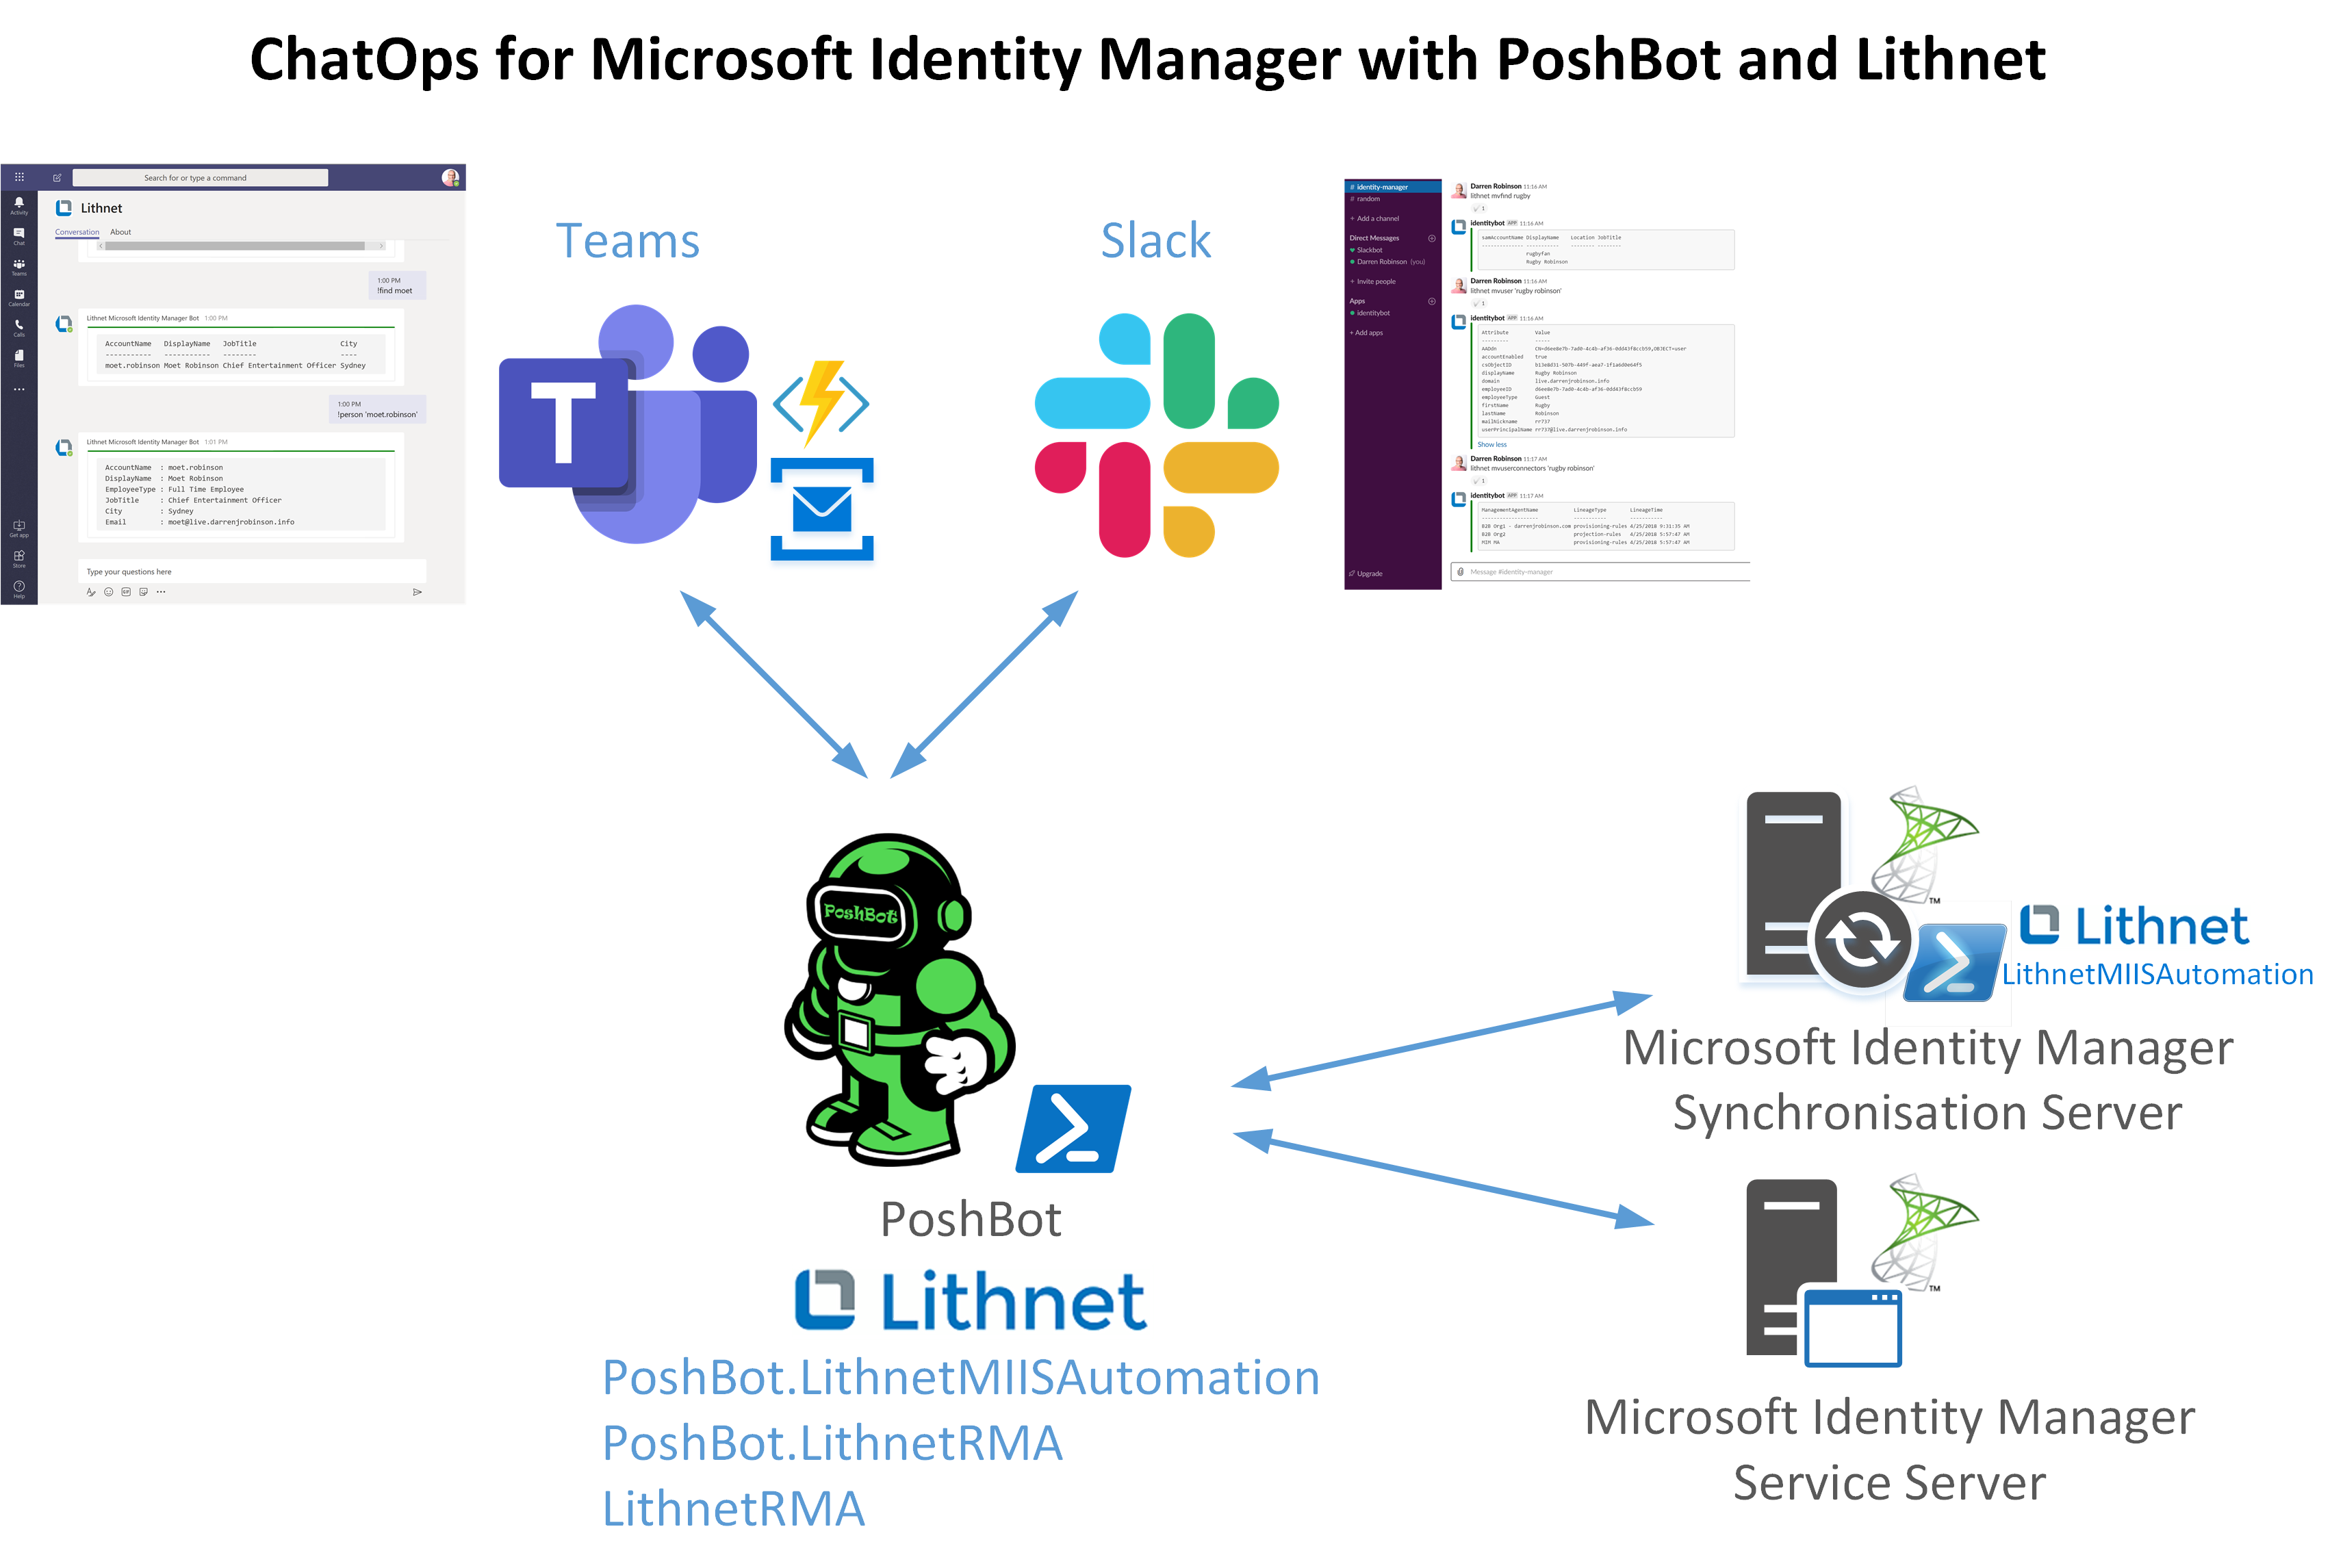
The integration architecture for ChatOps for Microsoft Identity Manager is shown below. A more detailed version of the more complex Teams integration is shown in the PoshBot Documentation.
Poshbot.LithnetMiisAutomation
!Get-Plugin PoshBot.LithnetMiisAutomation returns the commands and details of the plugin. Currently it contains four commands MVFind, MVStats, MVUser and MVUserConnectors.
!Get-CommandHelp MVUser returns the MVUser command details, most of which you don’t need to know. The MIM Sync Server Credentials and Host are configured in the PoshBot Configuration Script. That just leaves the Identity which you pass to the MVUser command.
If I add additional functions to this module or these commands the Get-CommandHelp command will expose them.

PoshBot.LithnetRMA
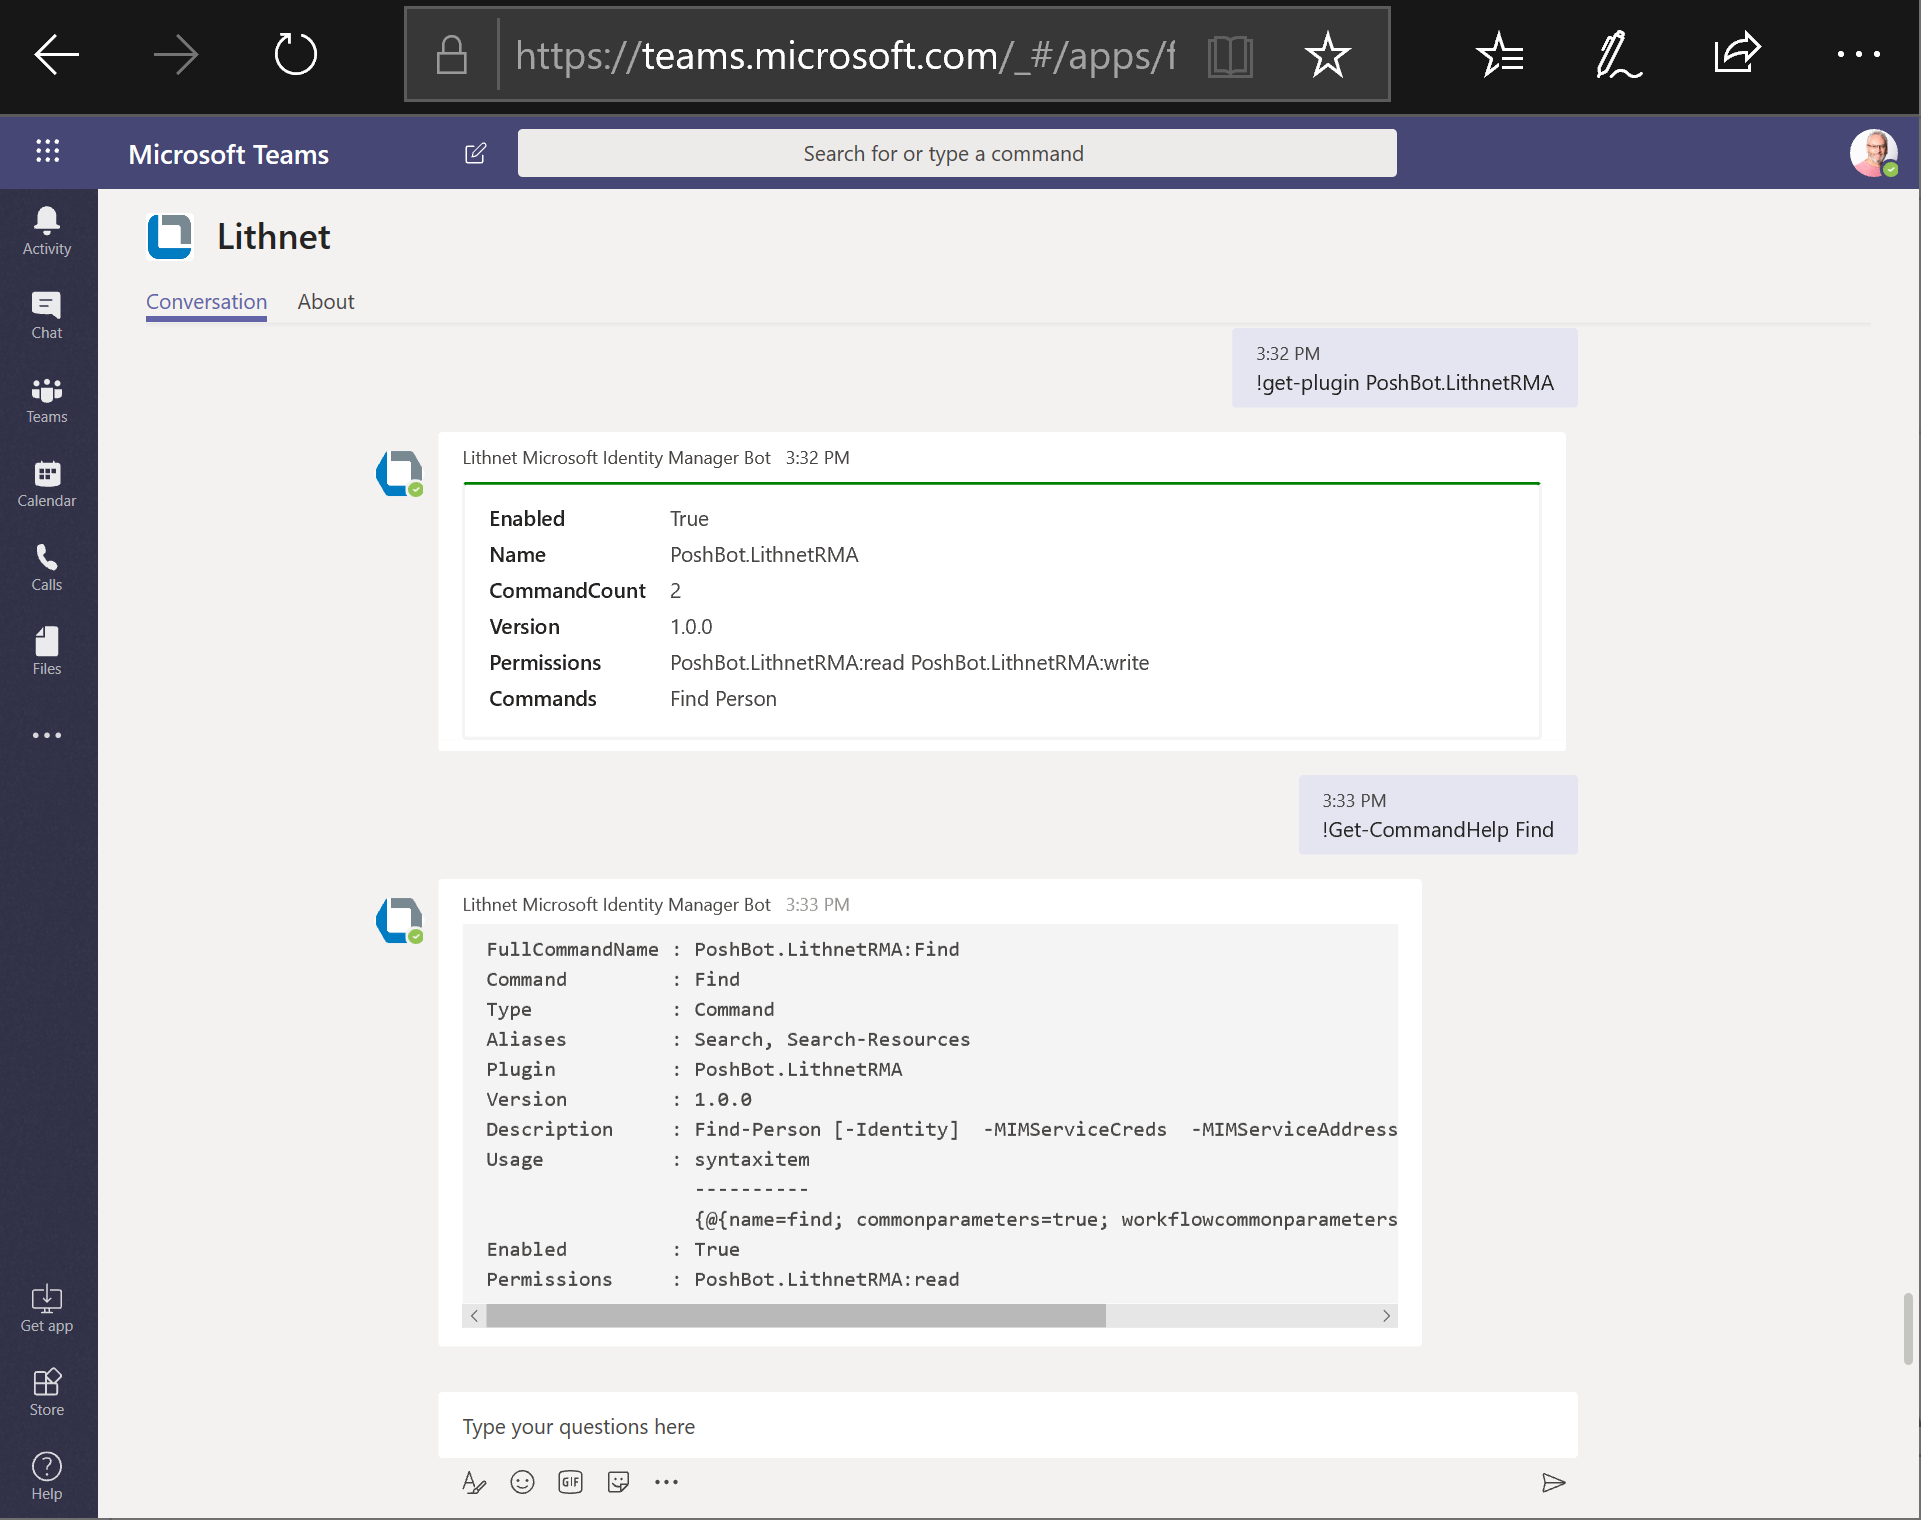
!Get-Plugin PoshBot.LithnetRMA returns the commands and details of the plugin. Currently it contains two commands Find, Person
!Get-CommandHelp Find returns the command details most of which you don’t need to know. The MIM Service Server Credentials and Host are configured in the PoshBot Configuration Script. That just leaves the Identity which you pass to the Find command.
If I add additional functions to this module or these commands the Get-CommandHelp command will expose them.
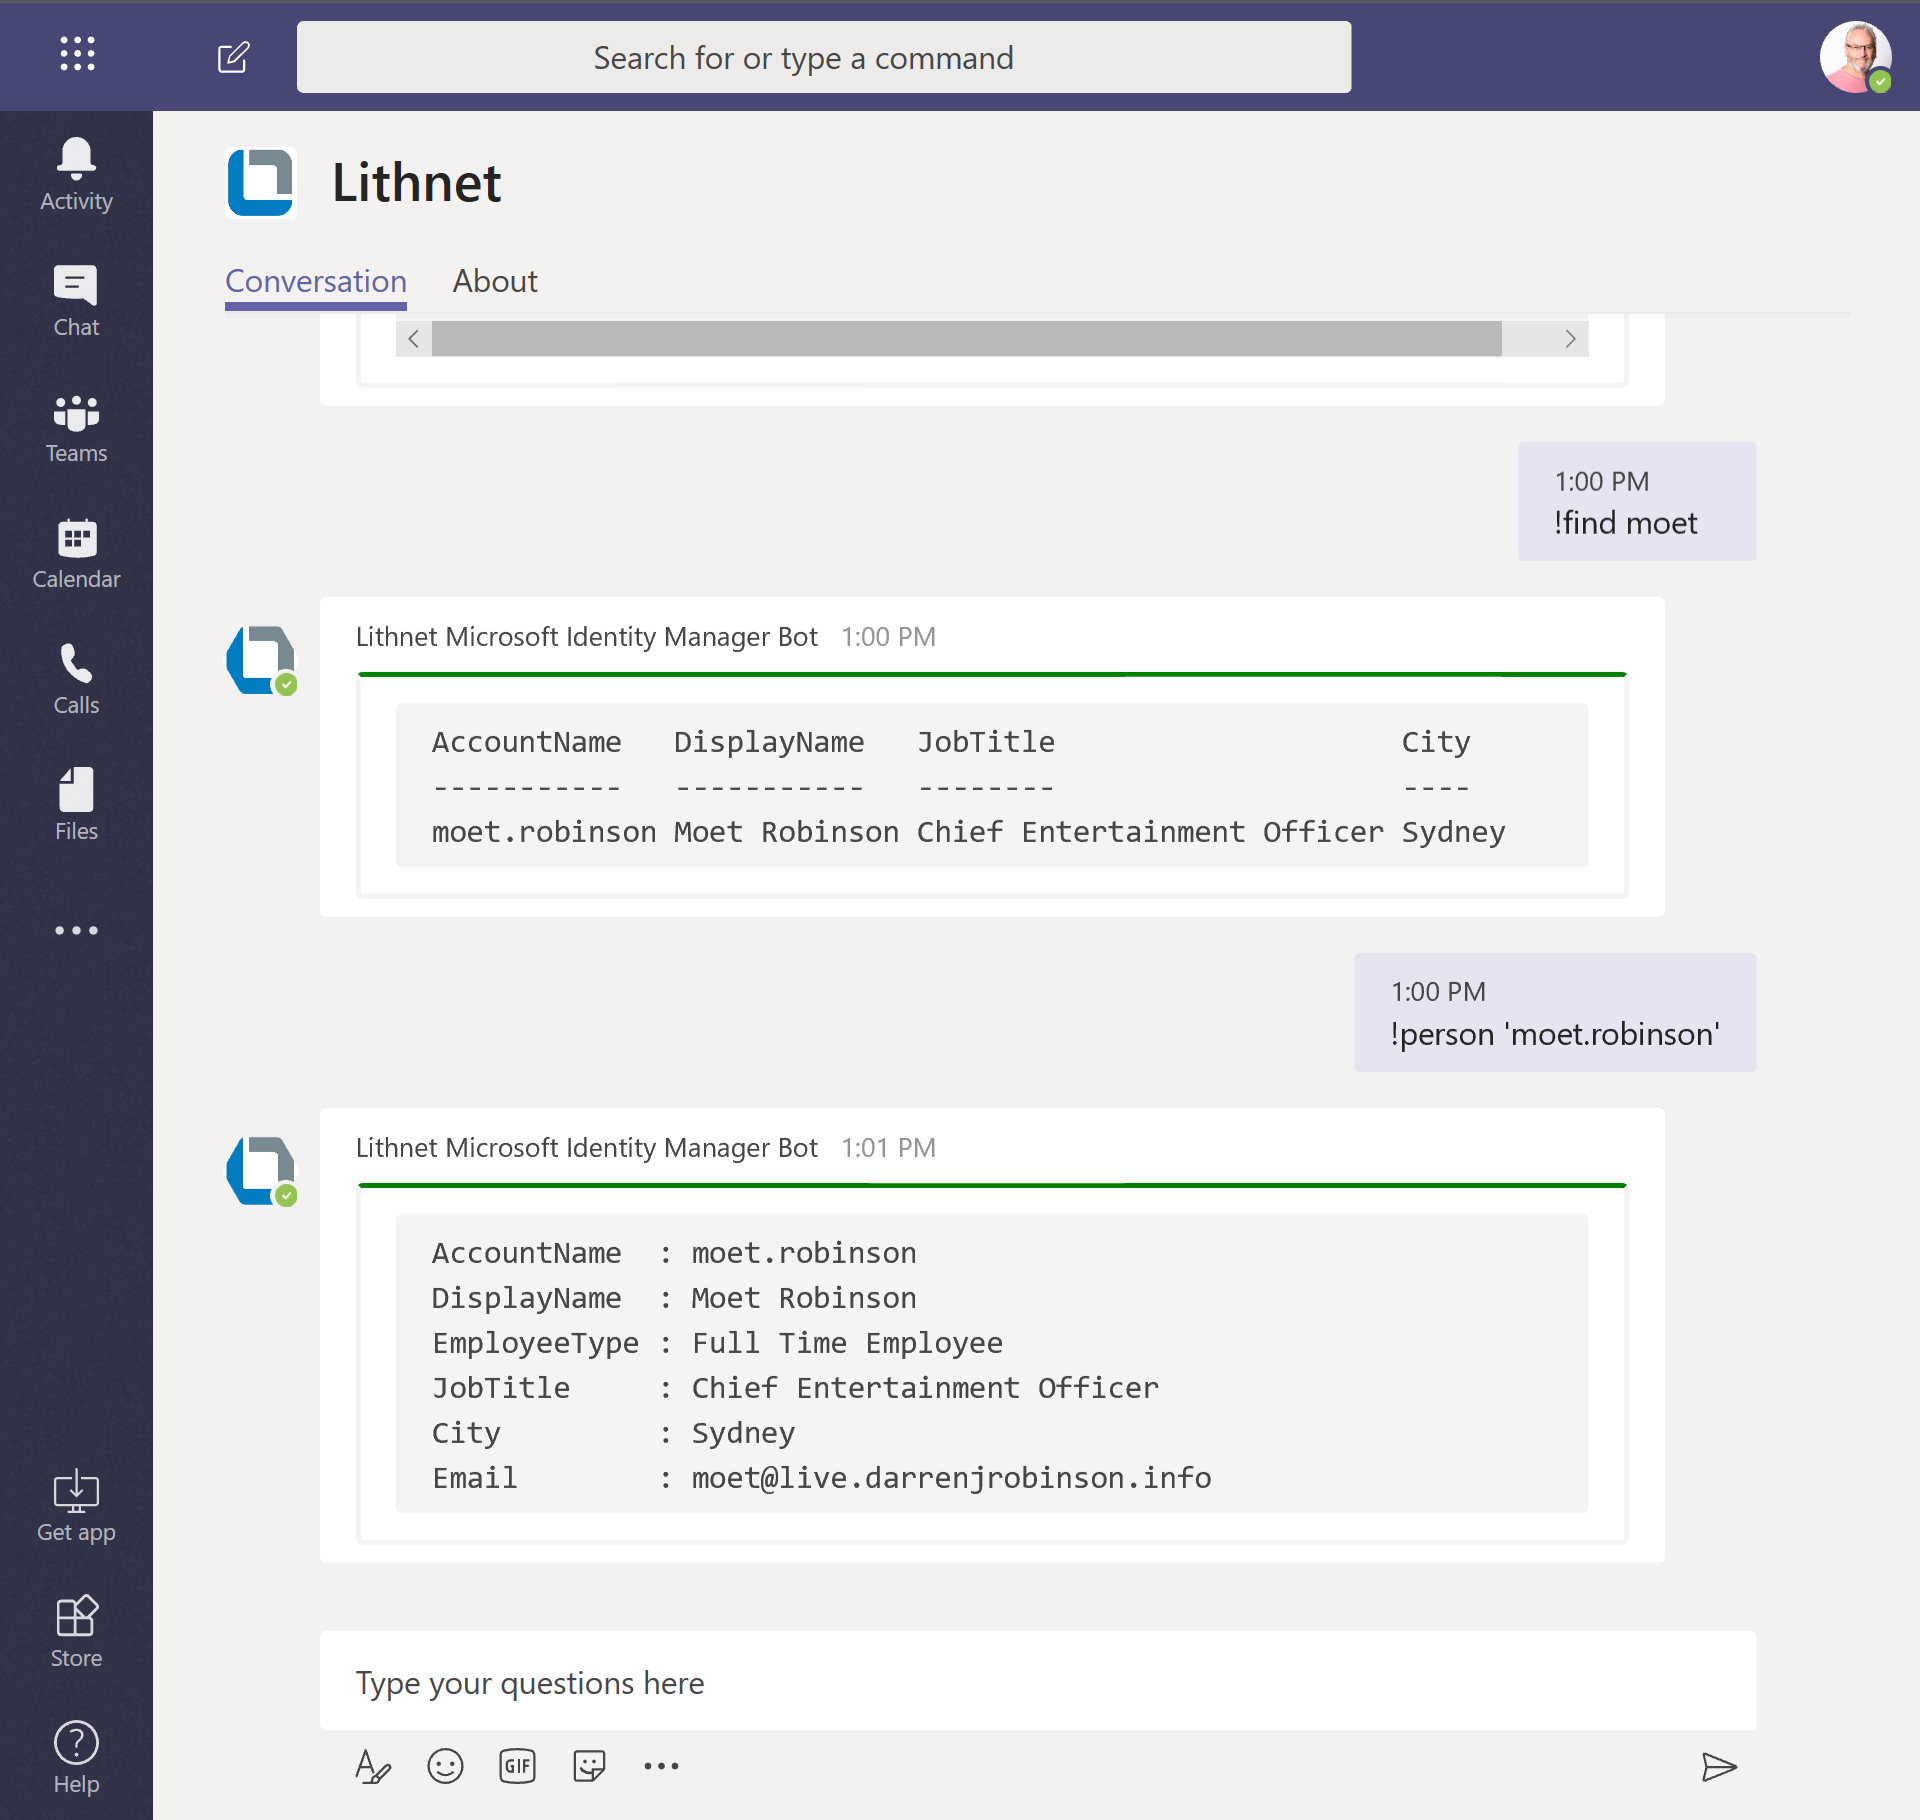
Using !Find <personObject> will search the MIM Service for Person objects that contain your search name in the DisplayName or AccountName attributes. If you want the Find command to search different attributes you will need to modify the Find-Person function in the PoshBot.LithnetRMA PowerShell module.
Then using !Person you can retrieve your user from the MIM Service again using either DisplayName or AccountName. However, keep in mind, !Person is written to retrieve a single MIM Service Person Resource. If you have multiple resources with the same Display Name !Person will return ‘The specified object was not found’. Use !Person specifying AccountName which must be unique and will return the single object.
NOTE: The LithnetRMA PowerShell module that the PoshBot.LithnetRMA plugin leverages will return a MIM Service Resource (Person) with the attributes specified to retrieve. Currently the default attributes I’m returning are the six shown in the screenshot below. If you want different or additional attributes returned then update the PoshBot.LithnetRMA Plugin PowerShell module accordingly.
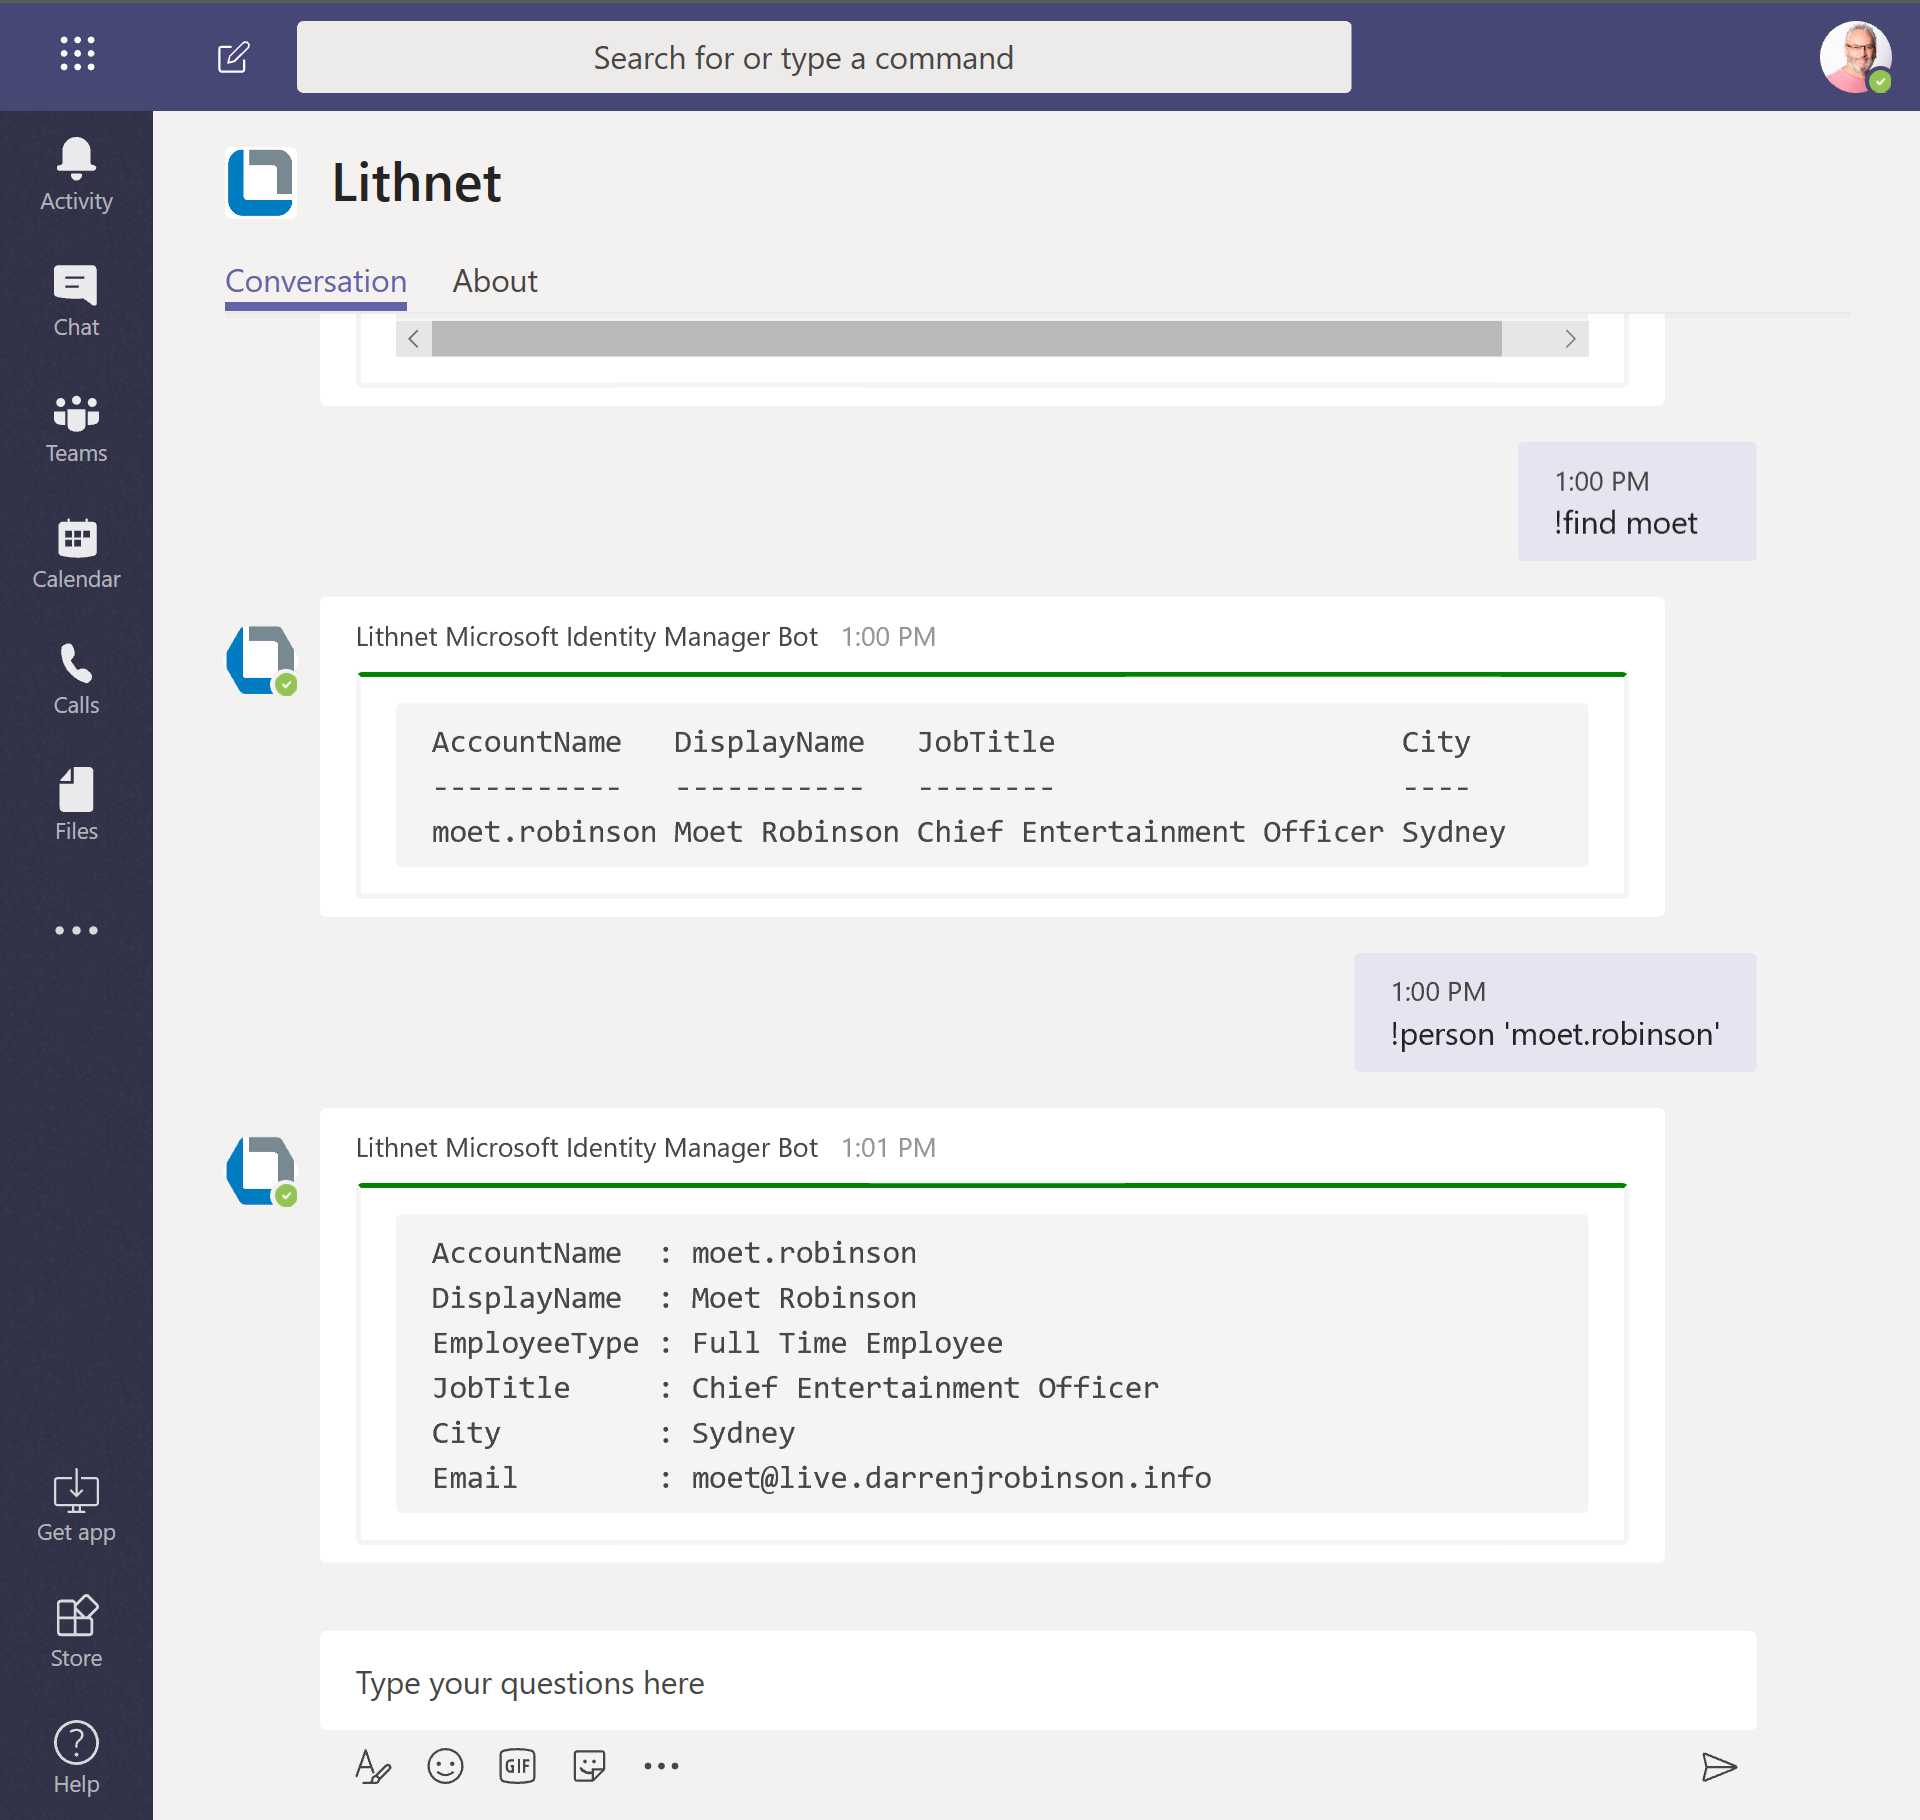
Plugins Help
Using !Help will also return the configured Plugins. It also allows you to see aliases for Plugins.
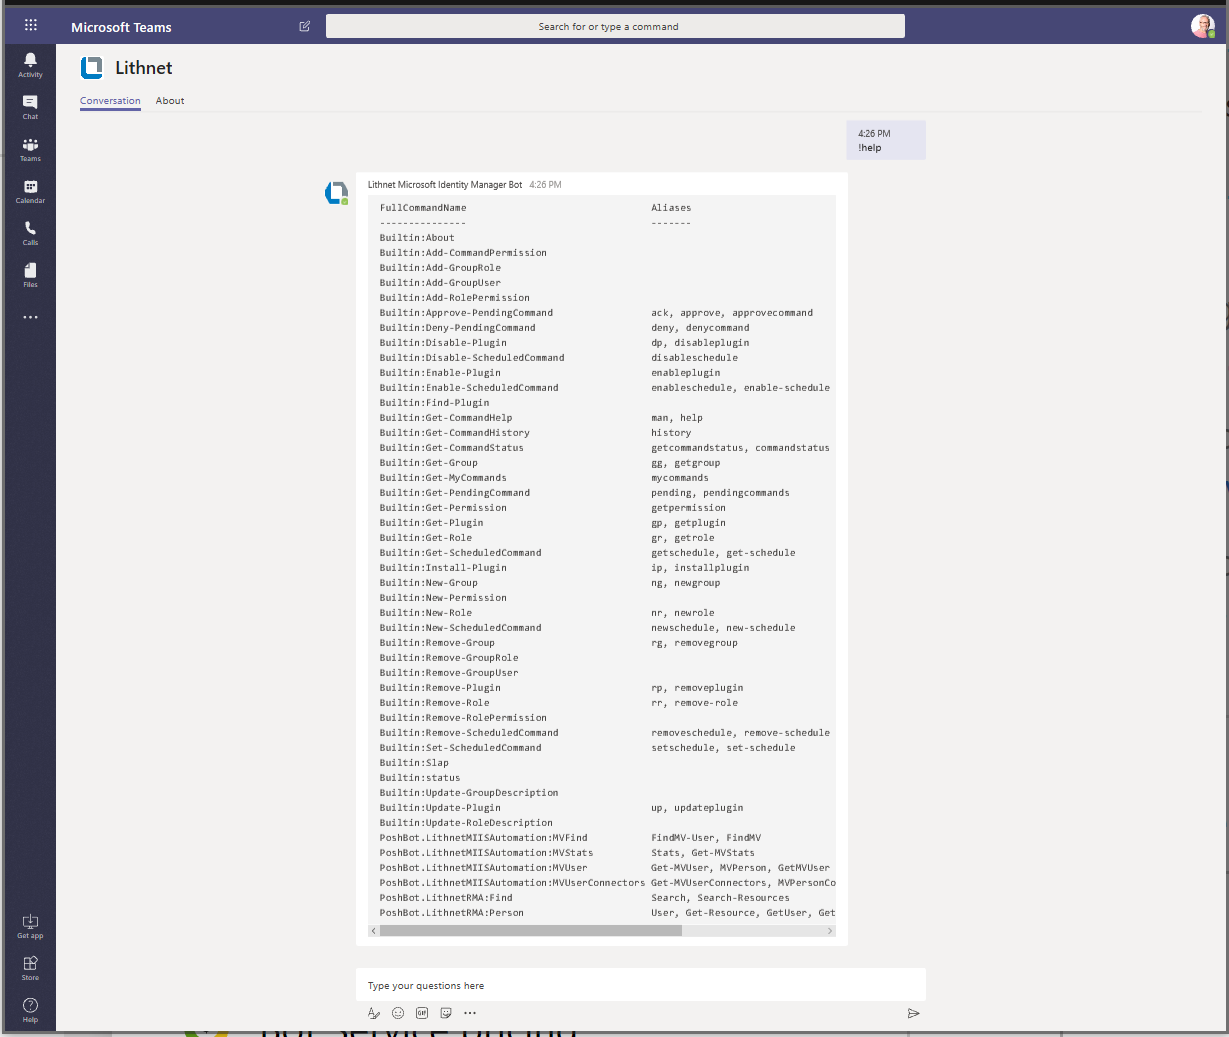
Aliases for the Lithnet.PoshBot Plugins align with those for the Lithnet PowerShell modules they are based on. So, you can use those if you are familiar with them. Just keep in mind the module however is ReadOnly and centred on User/Person objects.

PoshBot Installation – Slack
If you are installing for Slack integration the PoshBot documentation is very good. After that scroll down to PoshBot Slack Lithnet Microsoft Identity Manager Configuration & Start Script for configuring and starting the Lithnet.PoshBot Modules for Slack.
PoshBot Installation – Teams
If you are installing for Teams integration this awesome guide from Brad will get you started. After that scroll down to PoshBot Teams Lithnet Microsoft Identity Manager Configuration & Start Script for configuring and starting the Lithnet.PoshBot Modules for Teams.
If you have problems starting the Poshbot with a 400 Bad Request error or problems installing the Teams Bot see the Troubleshooting section at the end of this post.
Lithnet PoshBot Modules Configuration
The Lithnet PoshBot modules are the interface to your MIM Sync and MIM Service instances. This is accomplished leveraging the LithnetRMA and LithnetMIISAutomation modules. The later, is only supported on the MIM Sync Server. The Poshbot.LithnetMiisAutomation module has been built to run on a management host (not on the MIM Sync Server) and as such uses Remote PowerShell from the host you run the PoshBot Service on to your MIM Sync Server. You will need to configure Remote PowerShell from your Management Host to your MIM Sync Server as detailed here.
Microsoft Identity Manager Authentication Credentials
We need to generate authentication credential files for an appropriate account on your MIM Sync and MIM Service (they can be different accounts, and depending on your configuration your account may need to be in the format DomainName\Username). The following scripts generate the credentials files.
Note: Keep in mind that these generated credential files will be referenced by the PostBot configuration. If you set these up as a Windows Service, the account that runs the Service must be the same account that generated the credential files otherwise the credential password will not be accessible. Likewise if you want to store your credentials in a KeyVault or similar then you can. You will then will need to provide the PowerShell command as part of the configuration script (further below) to retrieve them.
Microsoft Identity Manager Service Credential
Use the following snippet to generate a credentials file for use with the LithnetRMA PowerShell Module (leveraged by the PoshBot.LithnetRMA Plugin) to connect to the MIM Service.
# MIM Service Admin Creds Config File
$adminUSR = "mimAdmin"
$adminPWDClear = 'p@$w0rd!'
$adminPWD = ConvertTo-SecureString $adminPWDClear -AsPlainText -Force
$Credentials = New-Object System.Management.Automation.PSCredential $adminUSR,$adminPWD
$Credentials | export-clixml C:\poshbot\MIMAdminCred.xml
You can test to make sure it works by modifying the following snippet for your MIM Service host and a valid identity in your MIM Service to search for.
import-module lithnetrma
$identity = 'darrenjrobinson'
$mimservice = 'http://mimserviceserver:5725'
$creds = Import-Clixml C:\poshbot\MIMAdminCred.xml
Set-ResourceManagementClient -BaseAddress $mimservice -Credentials $creds
# Try to find the user using AccountName
$result = Search-Resources -Xpath "/Person[starts-with(AccountName, `'$Identity`')]" -AttributesToGet @("AccountName", "DisplayName", "JobTitle", "City", "EmployeeType", "Email")
Microsoft Identity Manager Sync Service Credential
Use the following snippet to generate a credentials file for use with the LithnetMIISAutomation PowerShell Module (leveraged by the PoshBot.LithnetMIISAutomation Plugin) to connect to the MIM Sync Service.
# MIM Sync Admin Creds Config File
$adminUSR = "mimdev\mimAdmin"
$adminPWDClear = 'p@$w0rd!'
$adminPWD = ConvertTo-SecureString $adminPWDClear -AsPlainText -Force
$Credentials = New-Object System.Management.Automation.PSCredential $adminUSR,$adminPWD
$Credentials | export-clixml C:\poshbot\MIMAdminSyncCred.xml
You can test to make sure it works by modifying the following snippet for your MIM Sync host (must be FQDN for Remote PowerShell) below;
$creds = Import-Clixml C:\poshbot\MIMAdminSyncCred.xml
$mimsync = "mimsyncserver.yourdomain.com"
Enter-PSSession -ComputerName $mimsync -Credential $creds
PoshBot Teams Lithnet Microsoft Identity Manager Configuration & Start Script
Here is an example configuration and start script for ChatOps for Microsoft Identity Manager Teams Integration.
You will need to update it for your PoshBot installation path, your Teams Service Bus name, Queue, SASKey, Application/Bot ObjectID and Secret and your MIM Credentials and Hosts.
PoshBot Slack Lithnet Microsoft Identity Manager Configuration & Start Script
Here is an example configuration and start script for ChatOps for Microsoft Identity Manager Slack Integration.
You will need to update it for your PoshBot installation path, your Slack Bot token and your MIM Credentials and Hosts.
Module Installation
Now that you have the backend integration prerequisites met for Slack and/or Teams and you have generated the credential files and successfully started the integration Start Script we need to configure PoshBot for the Lithnet.PoshBot Plugins to make them available for ChatOps for Microsoft Identity Manager functions.
To install the PoshBot.LithnetRMA module use;
!install-plugin PoshBot.LithnetRMA
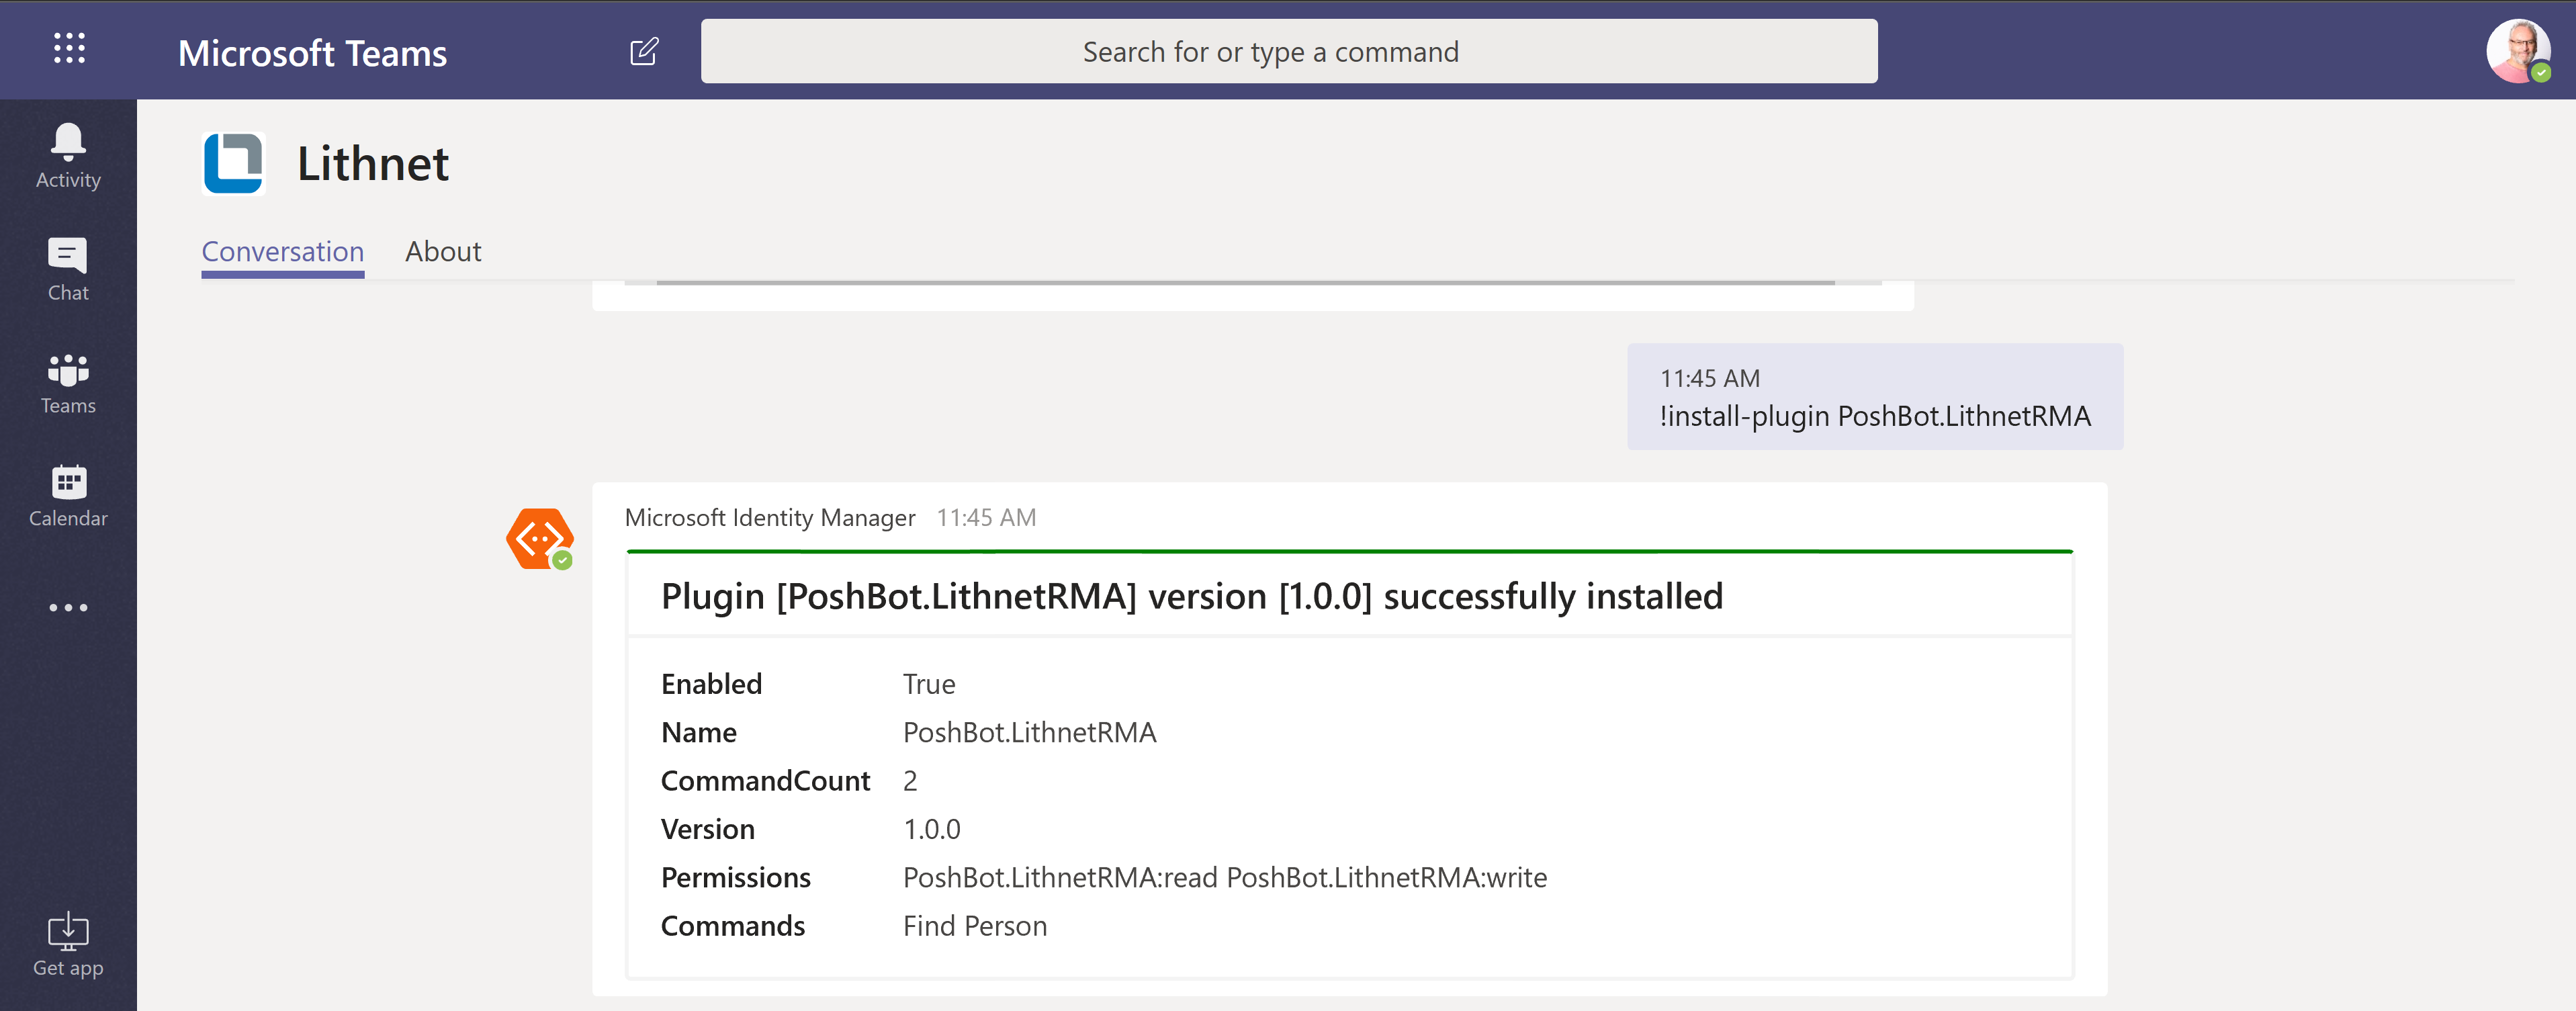
To install the Poshbot.LithnetMiisAutomation module use;
!install-plugin Poshbot.LithnetMiisAutomation
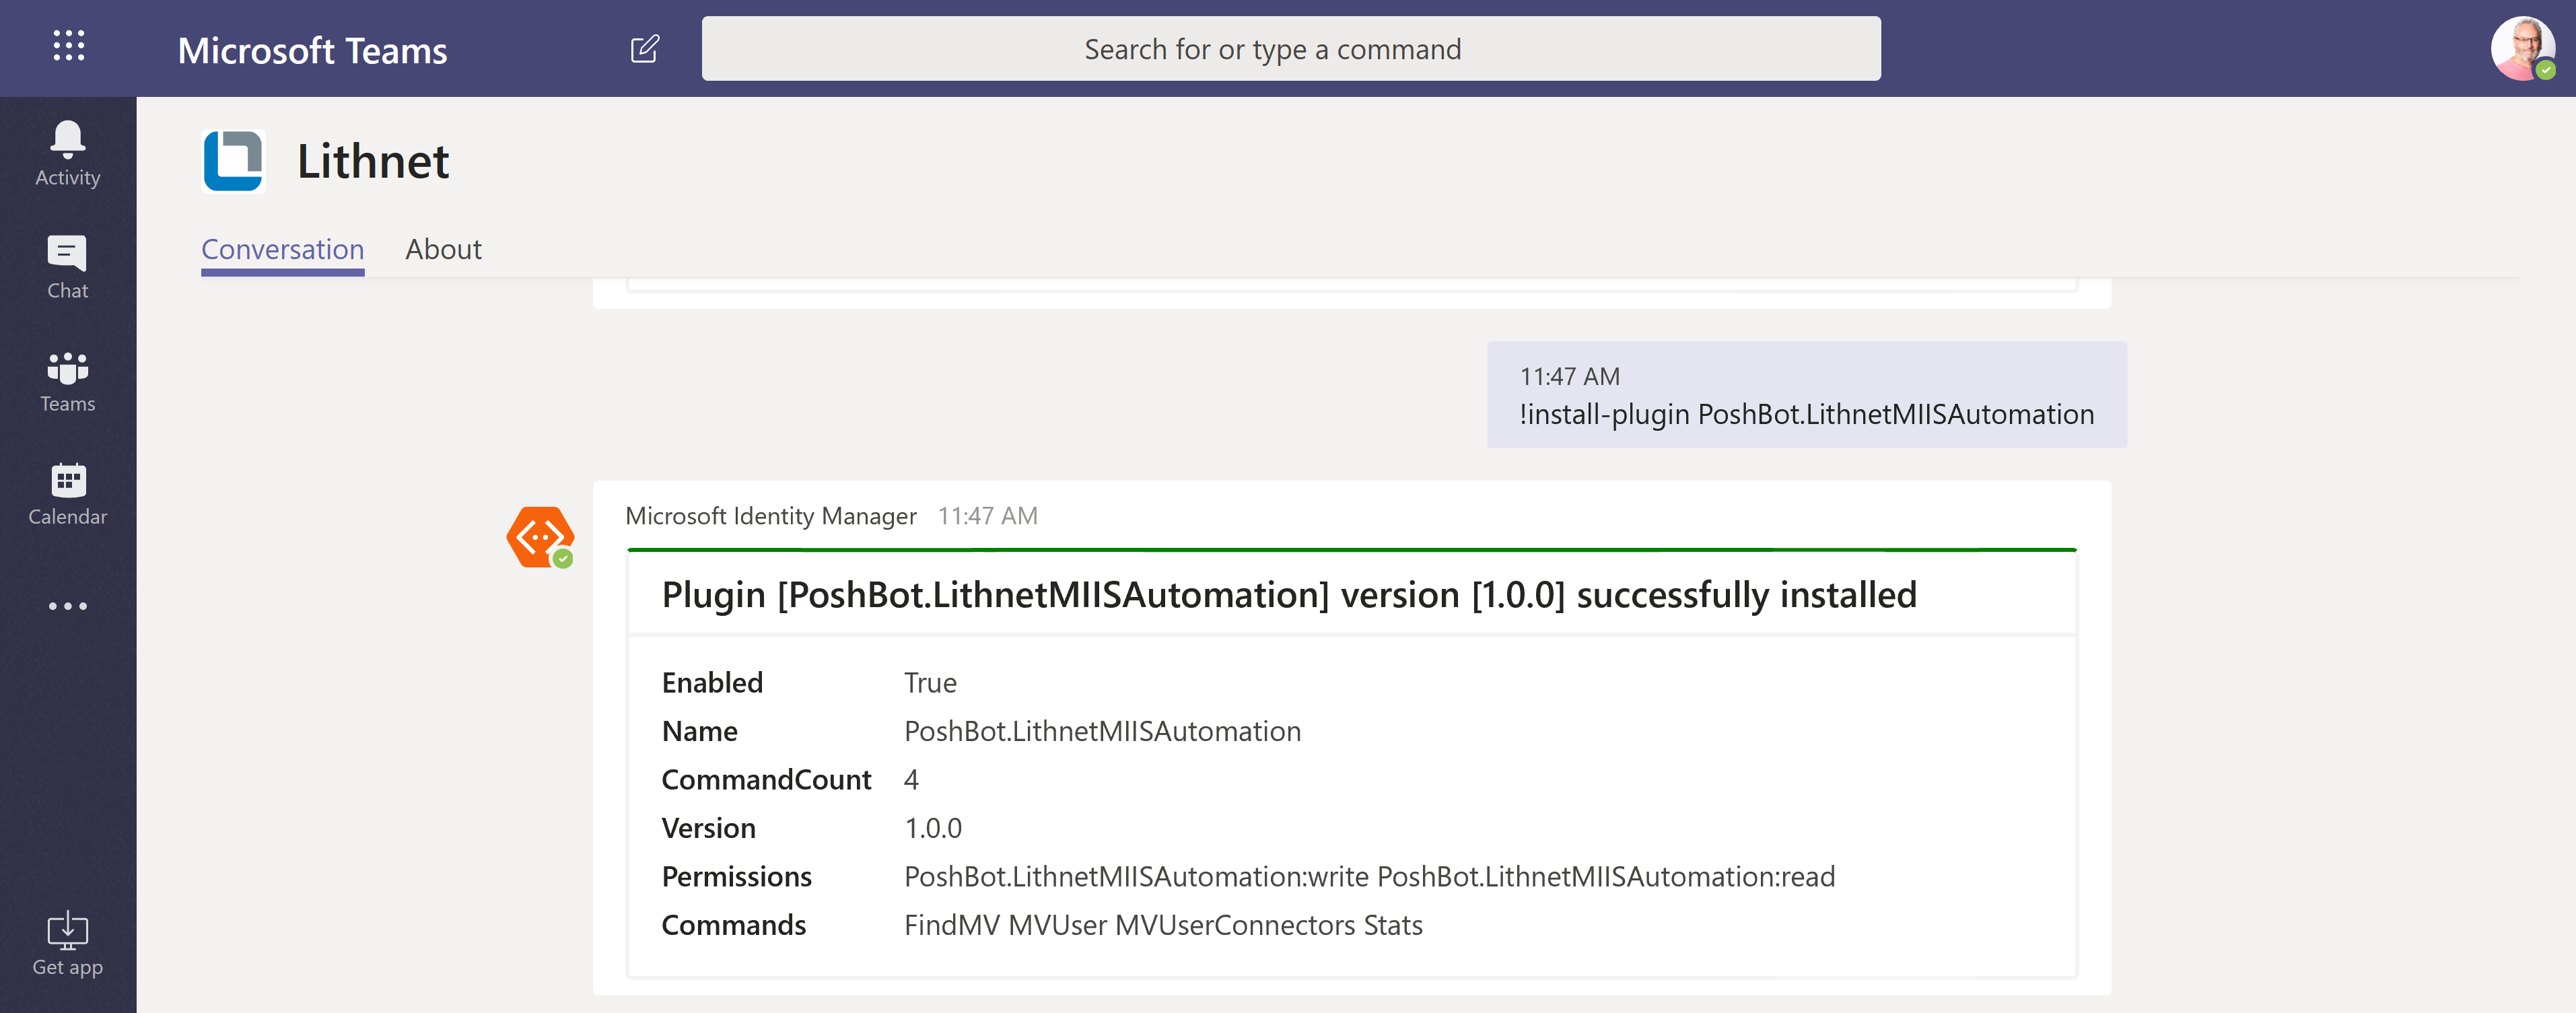
NOTE: As mentioned above the PoshBot.LithnetMIISAutomation Plugin leverages the LithnetMIISAutomation PowerShell module. The LithnetMIISAutomation PowerShell module is only supported on the MIM Sync Server. The Poshbot.LithnetMiisAutomation module therefore uses Remote PowerShell from the host you run the PoshBot Service on to your MIM Sync Server (which must have the LithnetMIISAutomation PowerShell module installed). You will also need to configure Remote PowerShell from your Management Host to your MIM Sync Server as detailed here.
Lithnet Module Role and Group
To restrict who can use the Lithnet PoshBot modules we need to create a Group (to which we will add users) and a Role (to which we will assign permissions).
New Group
I’m creating a Group named IdentityAdmins.
!NewGroup IdentityAdmins

New Role
I’m creating a Role named IdentityAdmins.
!New-Role IdentityAdmins

Add the Role to the Group
I’m then adding the Group to the Role.
!Add-GroupRole IdentityAdmins IdentityAdmins

Add Users to the Group
To complete the Roles and Groups configuration we add users to the Group that you wish to have access to the Lithnet PoshBot ChatOps for Microsoft Identity Manager functions.
!Add-GroupUser IdentityAdmins 'upn of user'

Module Permissions
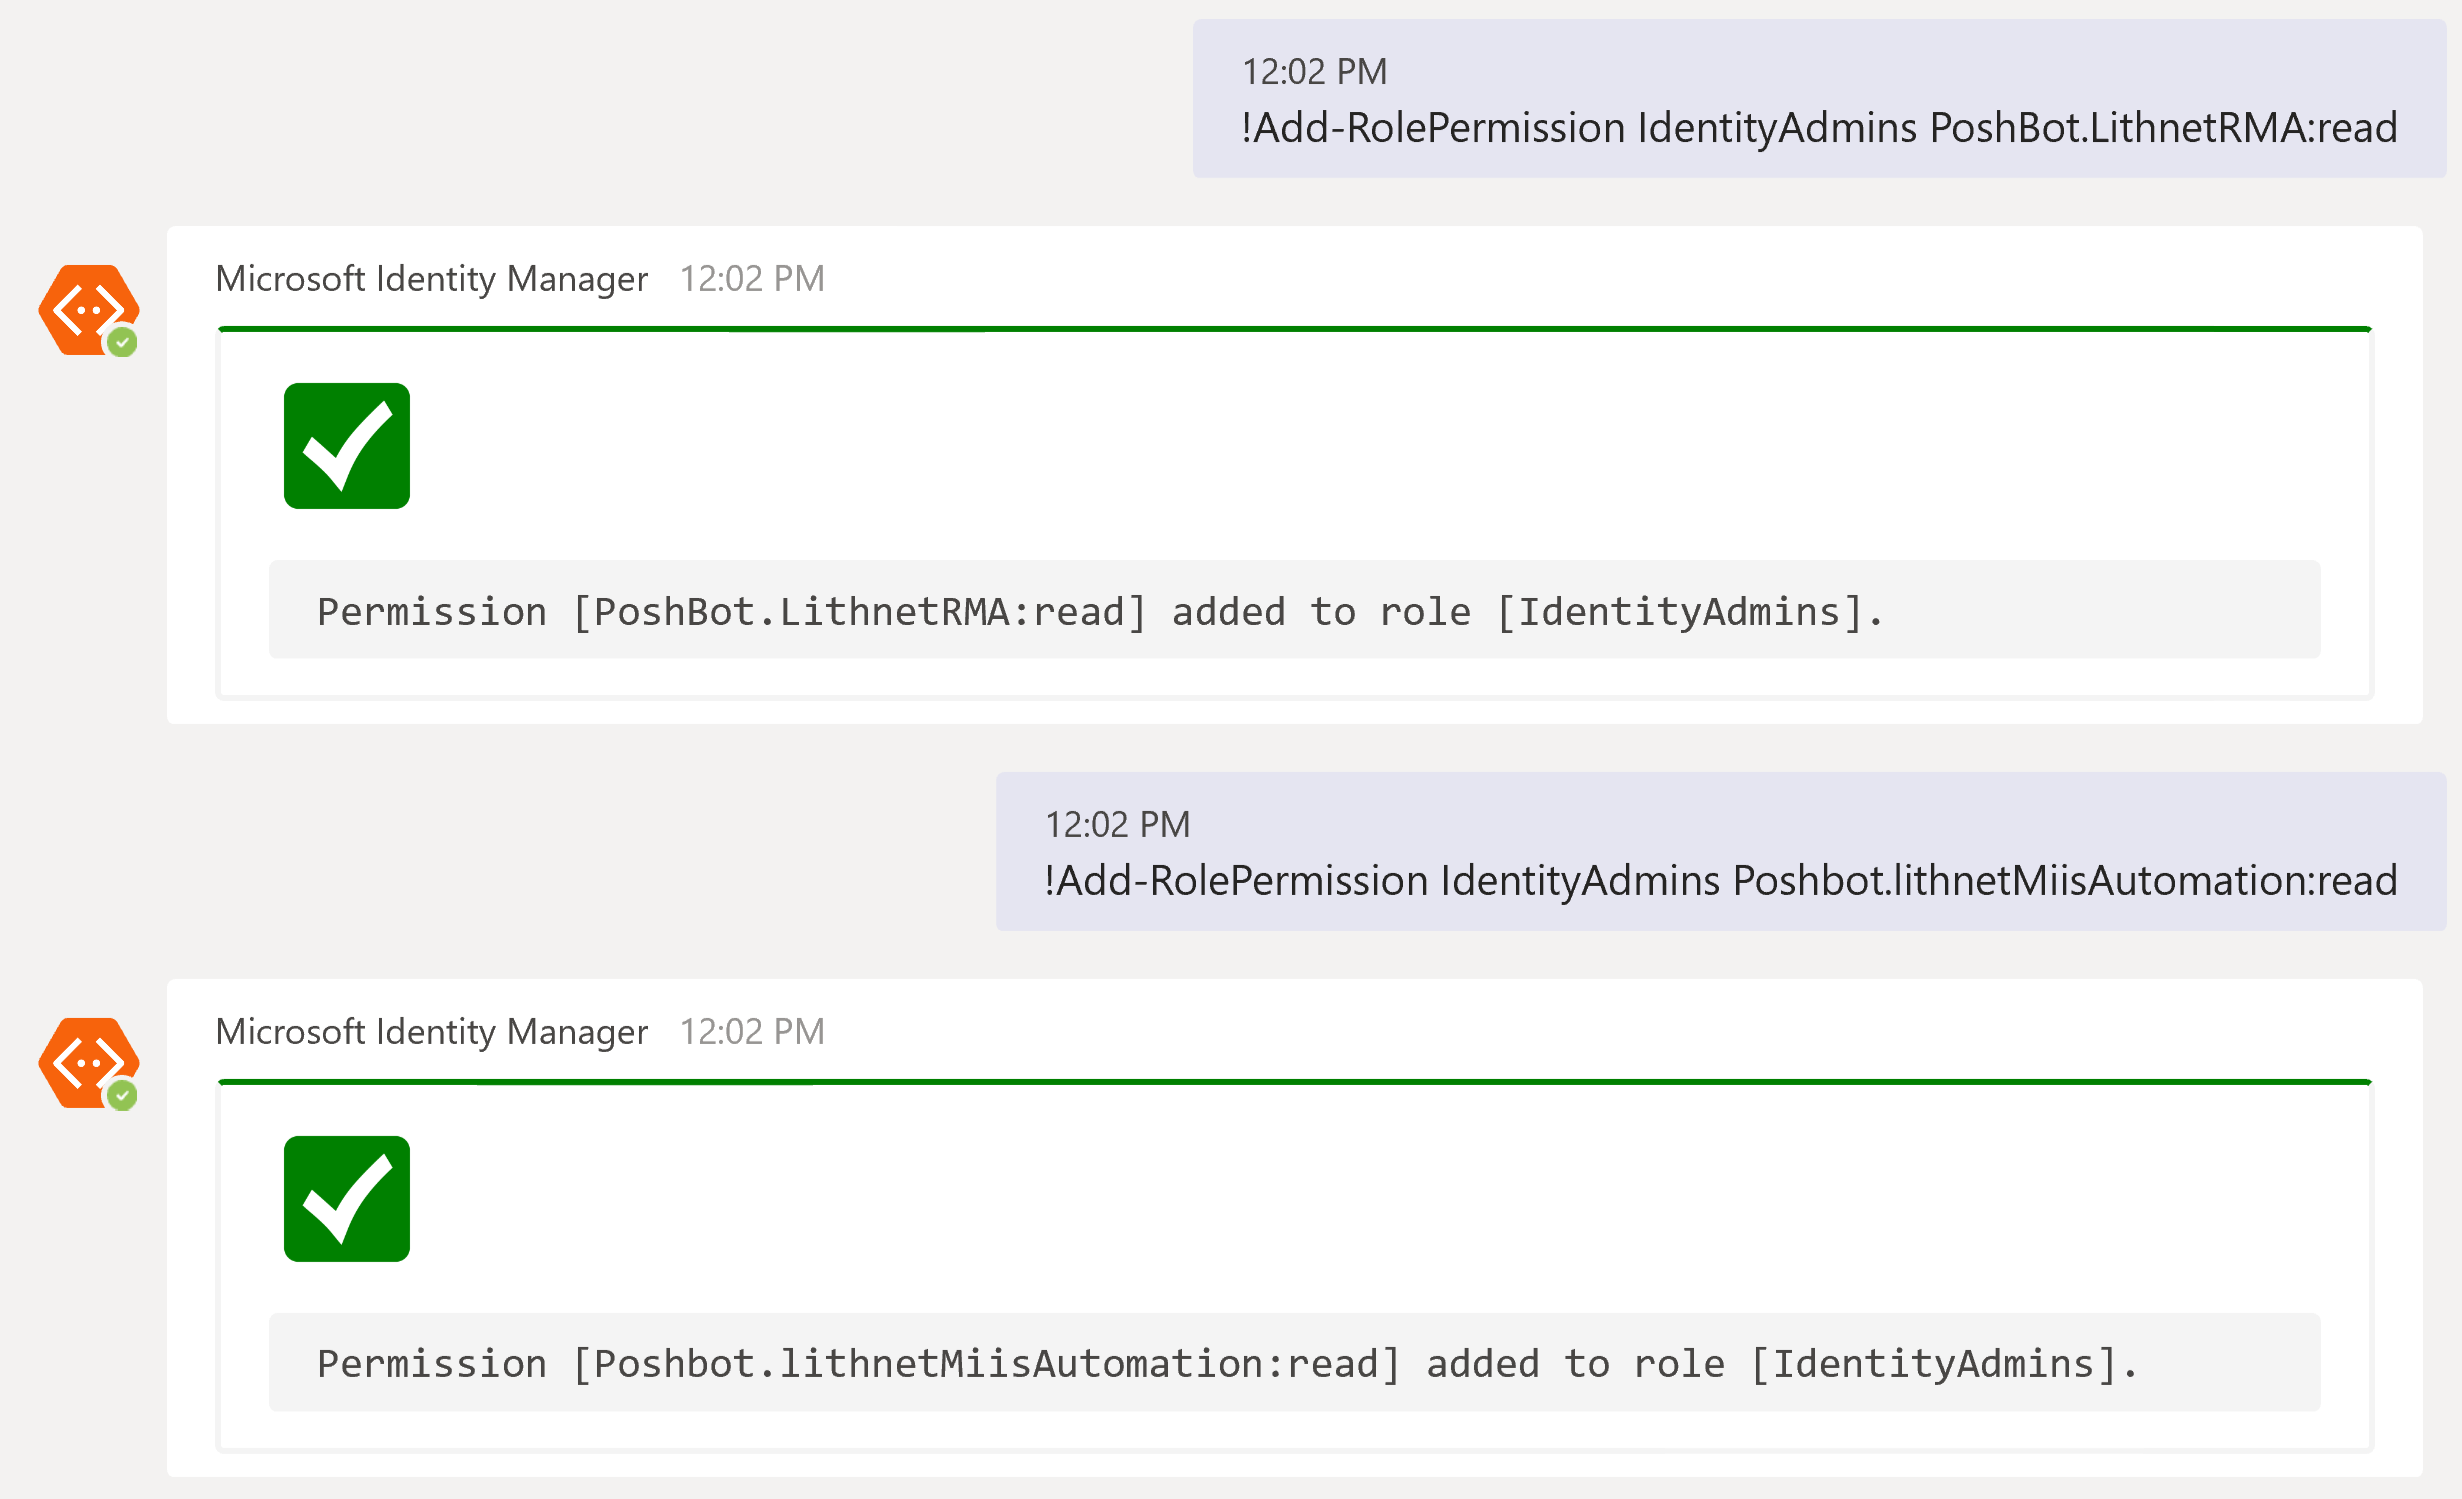
Finally we need to assign permissions to the Role. Currently the functions exposed through the plugins are targeted at Service Desk, Identity Operators and are therefore ReadOnly. So we will add Role Permissions to the IdentityAdmin Role for both Modules as Read.
Note: The Lithnet PoshBot plugin modules do allow Read and Write permissions to be assigned, however as a first release all commands are ReadOnly commands. If you want to write a command that say Creates a MIM Service Resource then you would assign the function to require Write permissions. You may then decide to only assign that to a higher privileged Role and Group.
!Add-RolePermission IdentityAdmins PoshBot.LithnetRMA:read
!Add-RolePermission IdentityAdmins Poshbot.LithnetMiisAutomation:read
Setting up PoshBot as a Service
Now that you have PoshBot integrated with Teams/Slack and configured with the Lithnet.PoshBot plugins you will need to make sure the PoshBot Service is always running. The best way to do that is to set it up to run as a service.
The PoshBot documentation here describes how to do that.
Remember: if you use credential files as detailed in this post you must generate them using the account that will run the PoshBot Service otherwise it will not be able to read the credential password.
Using the Lithnet.PoshBotRMA Plugin
As shown in the overview of the modules at the beginning of this post the PoshBot.LithnetRMA Plugin currently exposes two commands, Find and Person and is designed to locate a MIM Service Person Resource and Get a MIM Service Person Resource. I may extend these with additional operators to allow for the Find and Get of any resource. The Get-CommandHelp as detailed earlier will show if that has been implemented (after I’ve written this post).
Using the Lithnet.PoshBotMIISAutomation Plugin
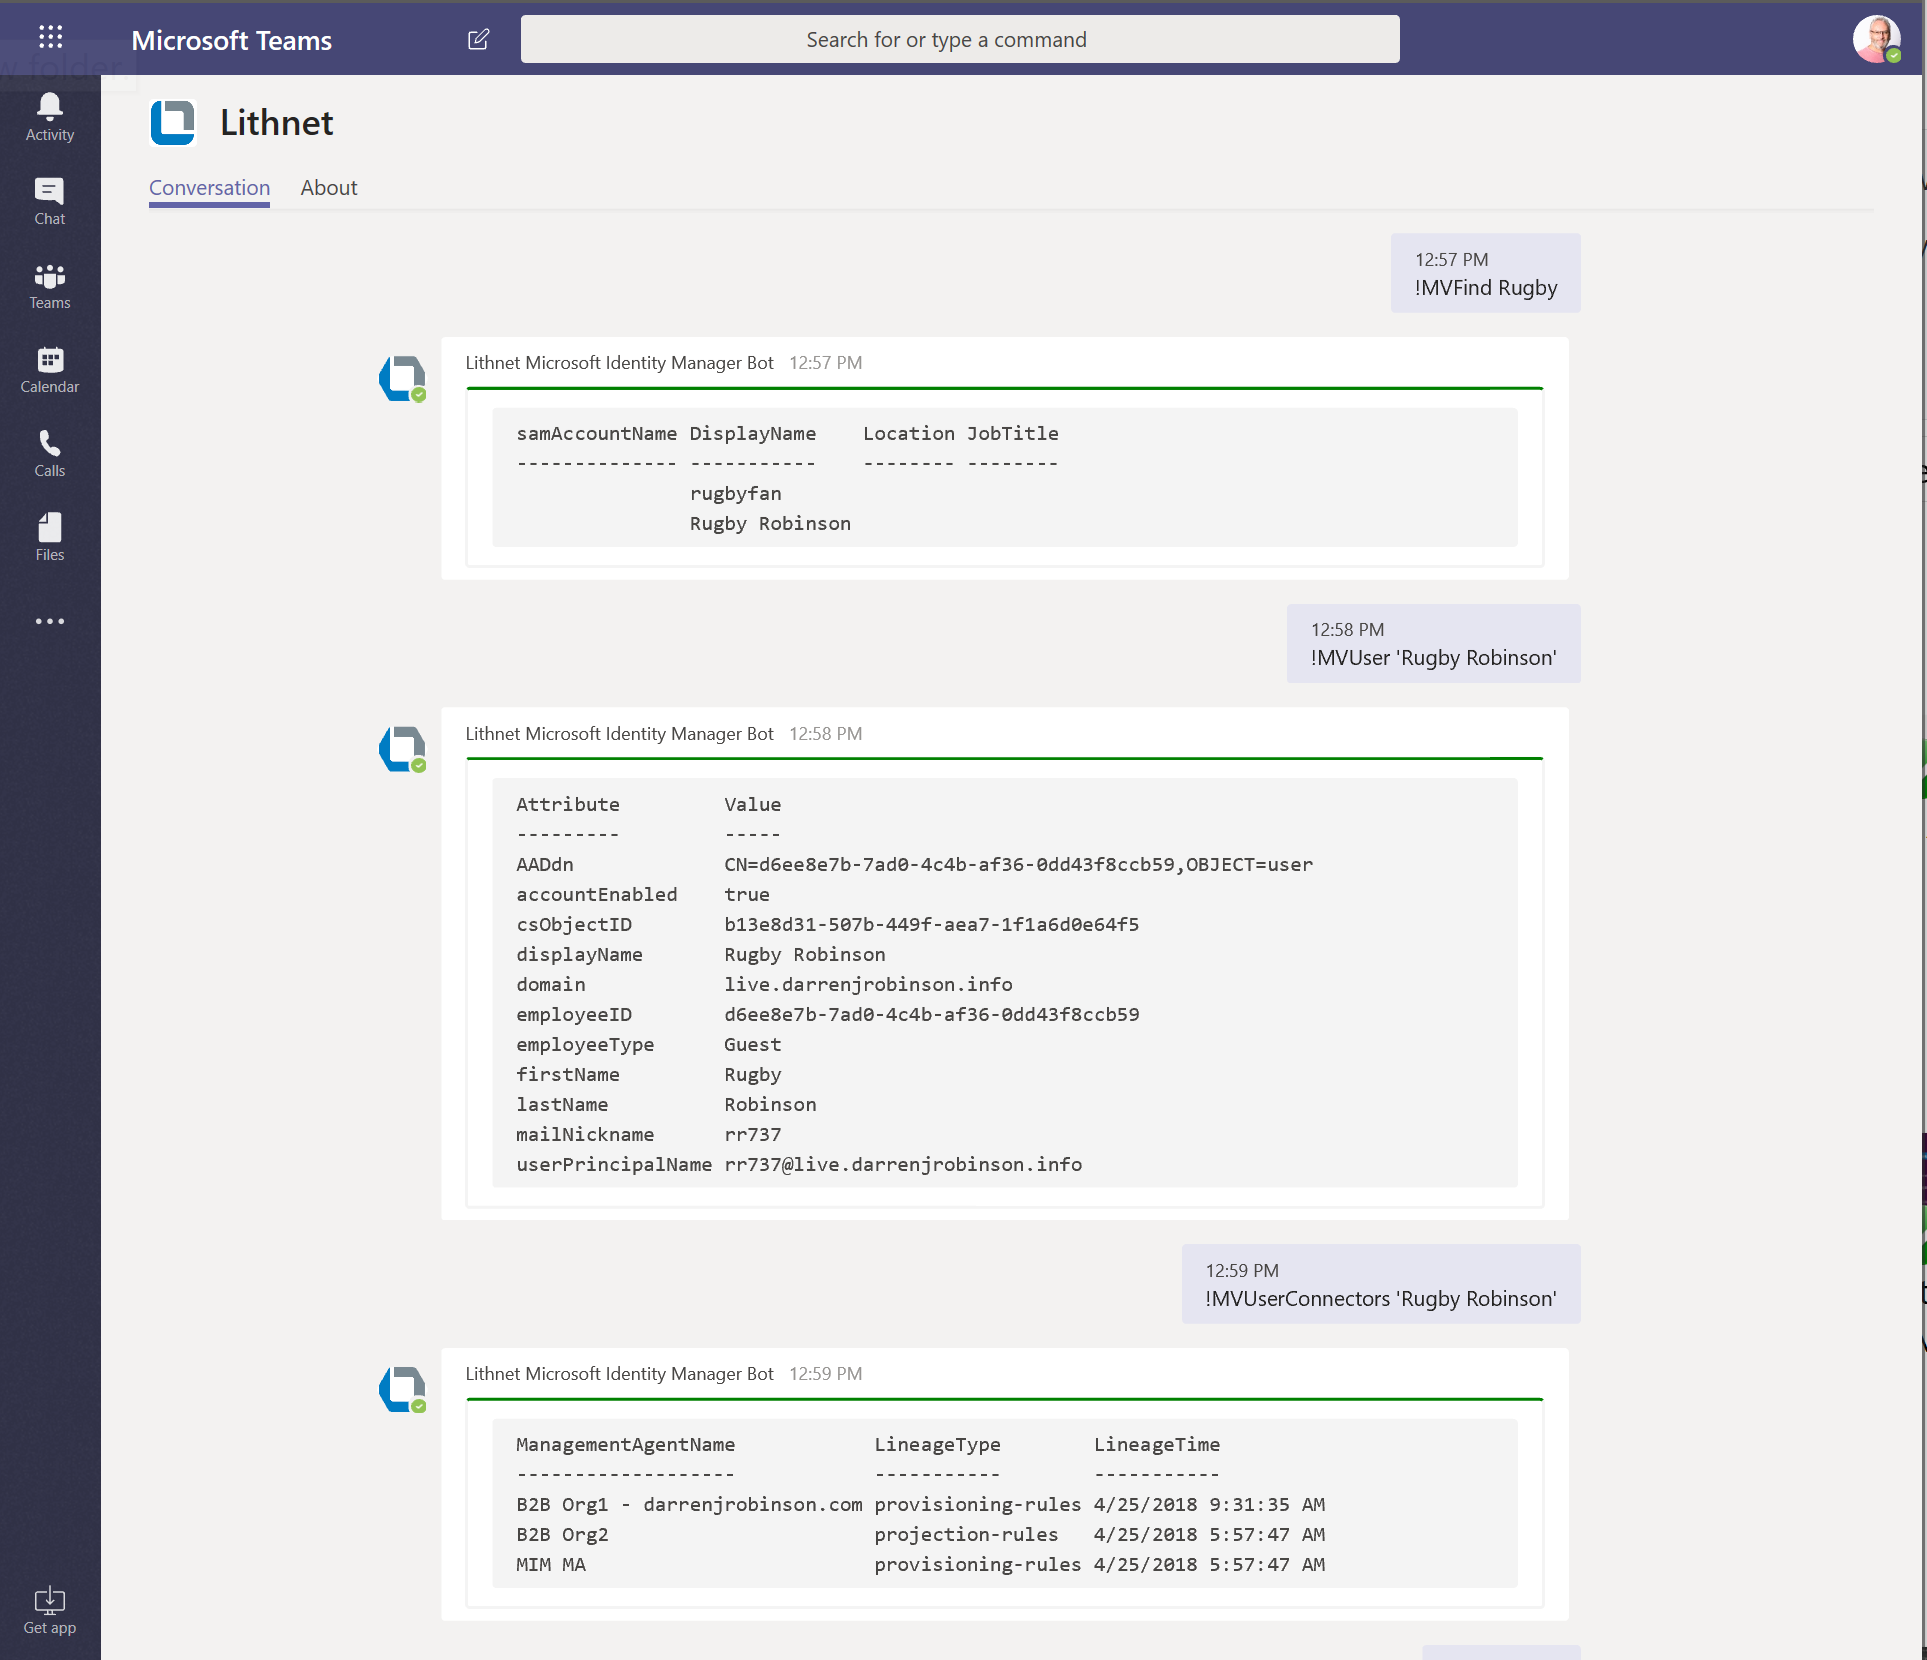
Also as shown in the overview of the modules at the beginning of this post the PoshBot.LithnetMIISAutomation Plugin currently exposes four commands, MVFind, MVUser, MVUserConnectors and MVStats and is designed to locate a MIM Sync Service Person (and Sync Service Statistics) and Get a MIM Sync MetaVerse Person Object. The LithnetMIISAutomation PowerShell module is ReadOnly so these commands will always be limited to Read functions. I may expand on these four commands with additional functions in the future with additional operators to allow for the MVFind and Get of any resource. The Get-CommandHelp as detailed earlier will show if that has been implemented (after I’ve written this post).
The MVFind command returns objects and displays their sAMAccountName, DisplayName, Location and JobTitle attributes. If your MV doens’t have these or you wish to return other attributes by default update the Find-MVPerson Function in the PoshBot.LithnetMIISAutomation module.
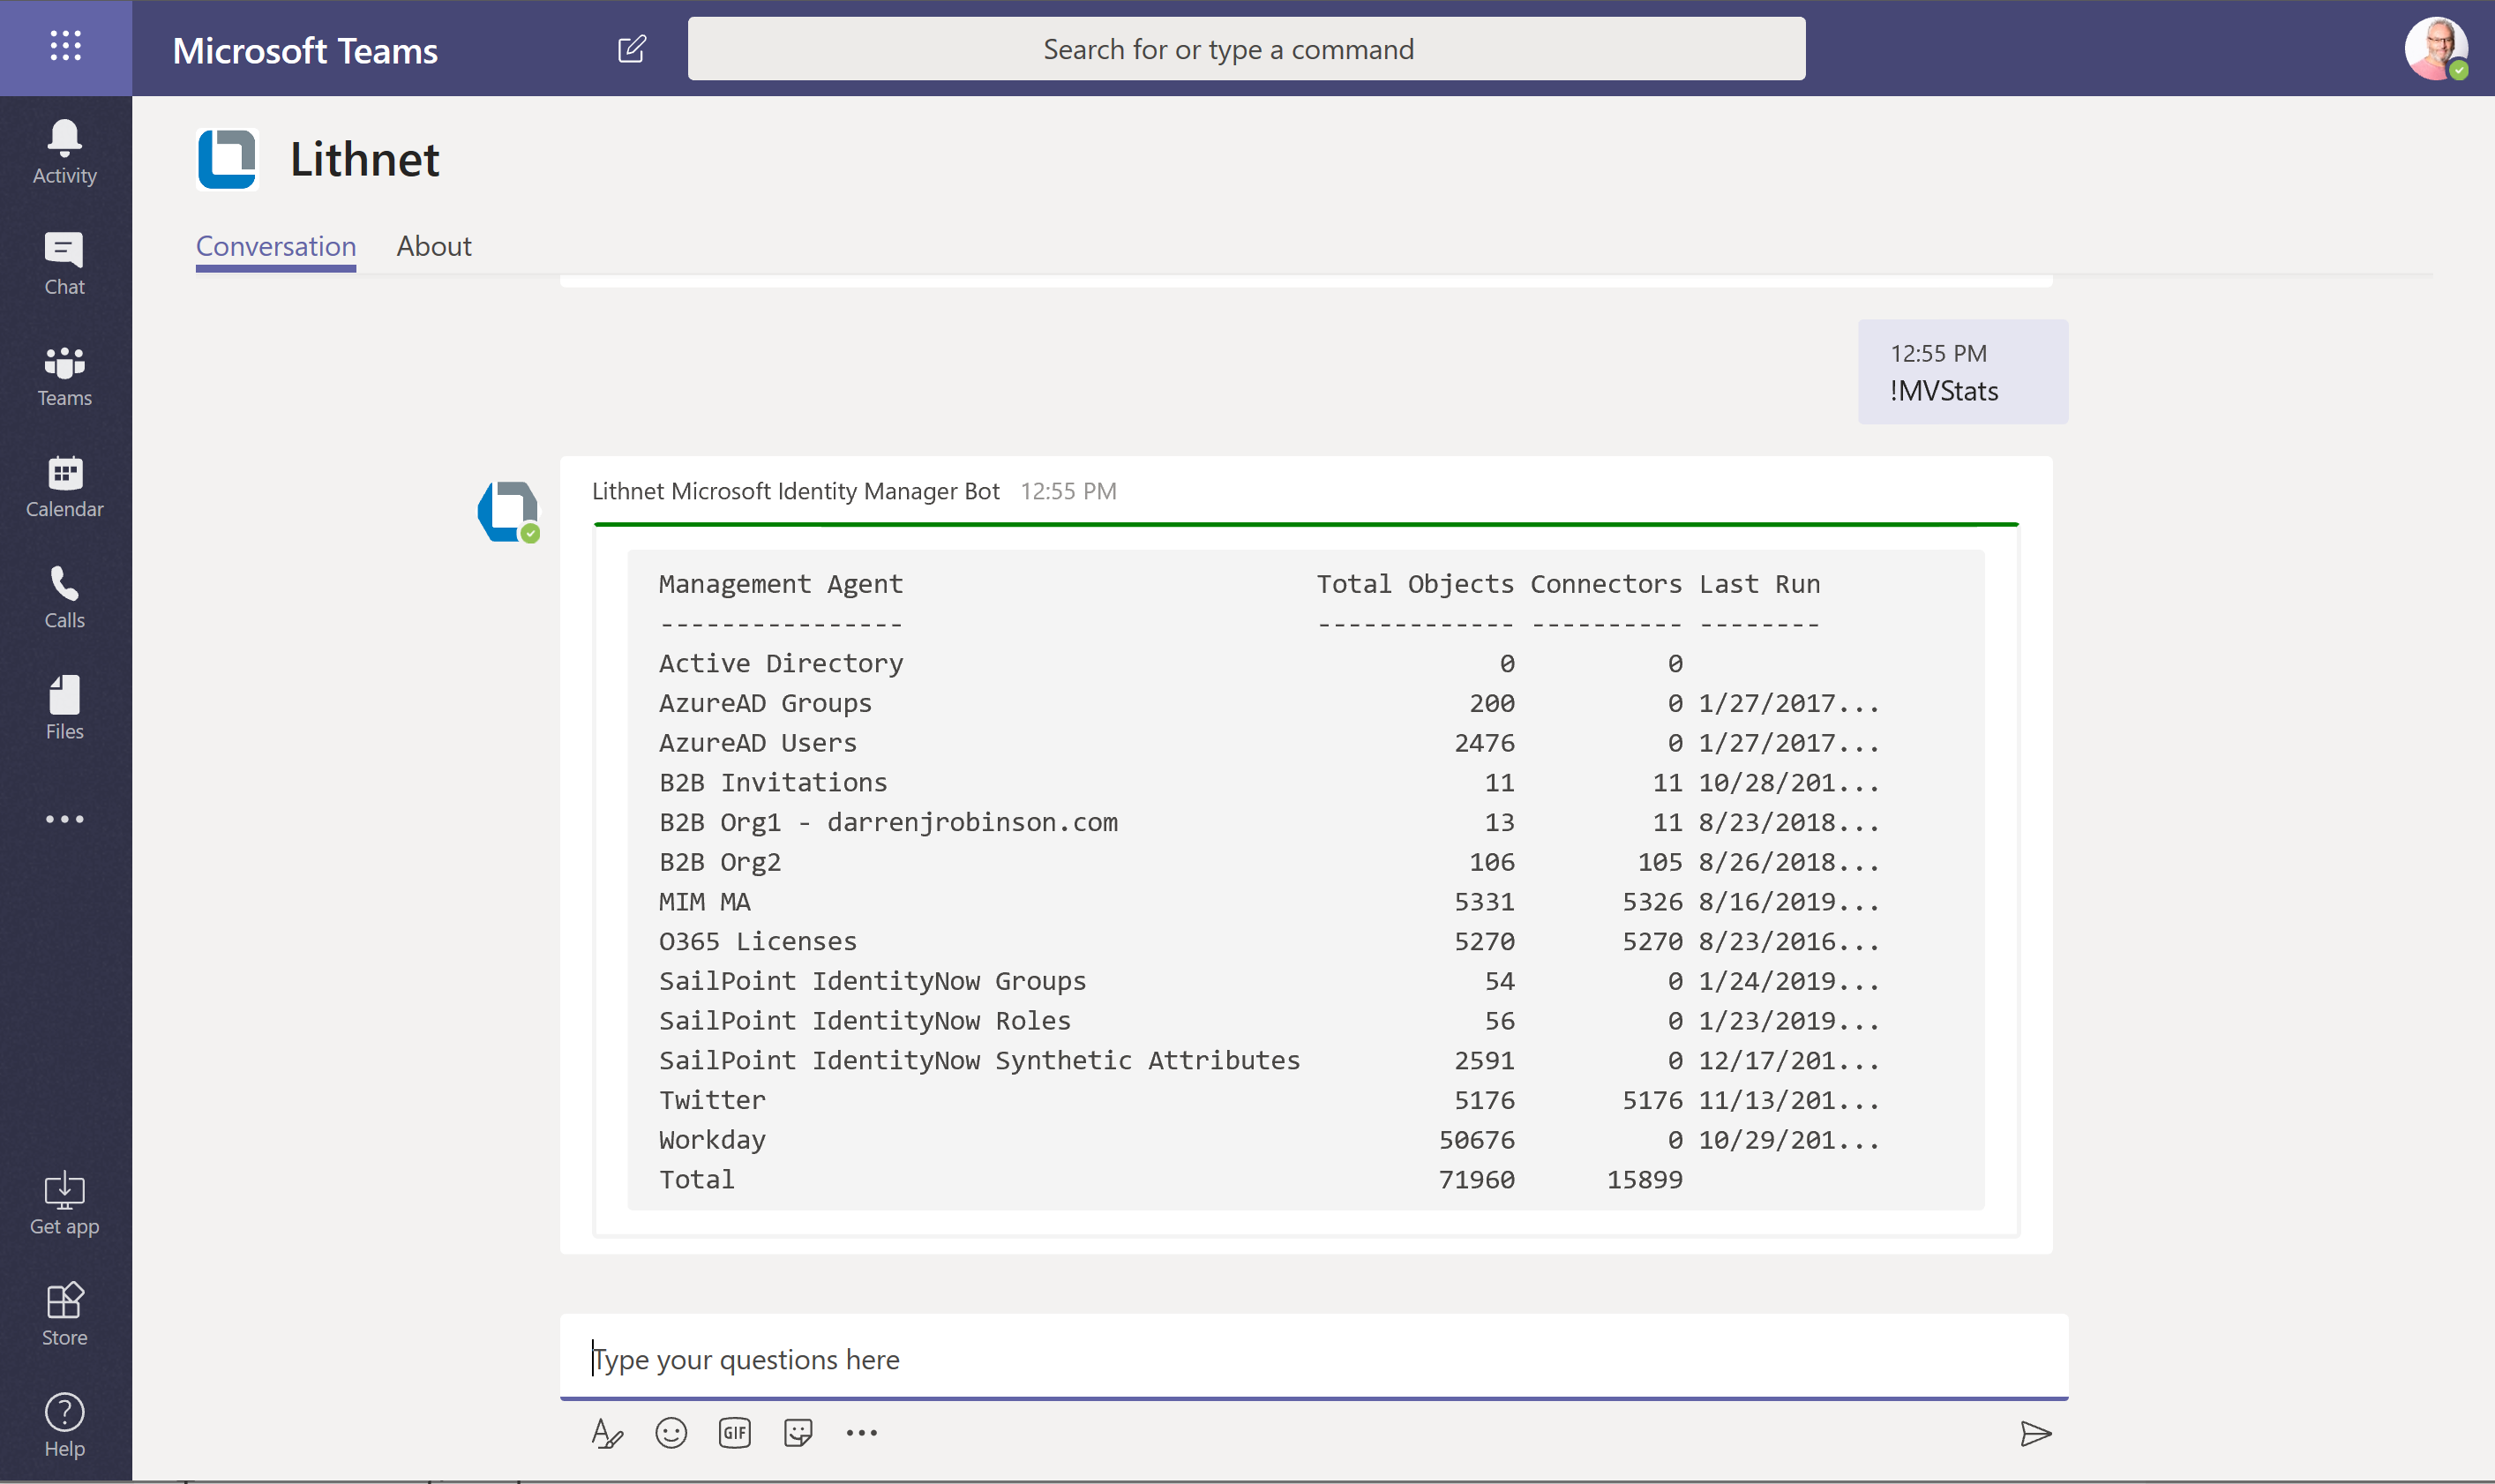
The MVStats command shows the Sync Service Statistics (yes, my Proof of Concept MIM Instance is very eclectic).
Troubleshooting
Here are a couple of items that I ran into configuration wise with Microsoft Teams integration.
Teams Start-PoshBot throws 400 Bad Request
If when starting the Teams PoshBot Backend it errors out with a 400 Bad Request, chances are you have your AuthN to the Bot configured incorrectly, or the Bot configured incorrectly.
To test, update the following script snippet with your Bot/Registered App ID and Password. This is what Start-PoshBot is doing as part of Authentication.
$authUrl = 'https://login.microsoftonline.com/botframework.com/oauth2/v2.0/token'
$payload = @{
   grant_type='client_credentials'
   client_id='f2b1a38f-0822-4ecd-a508-123456789'
   client_secret='j3*FtPRr4-OR0Q/I2oMxd-[abcd/efg'
   scope='https://api.botframework.com/.default'
}
$response = Invoke-RestMethod -Uri $authUrl -Method Post -Body $payload -Verbose:$false
If you get an error like the following the problem is likely to be the configuration of your Bot/App.

Configure your Bot App Registration for Multi Tenant/Organisation. This is required as detailed here.

Installing the PoshBot Custom App into Teams
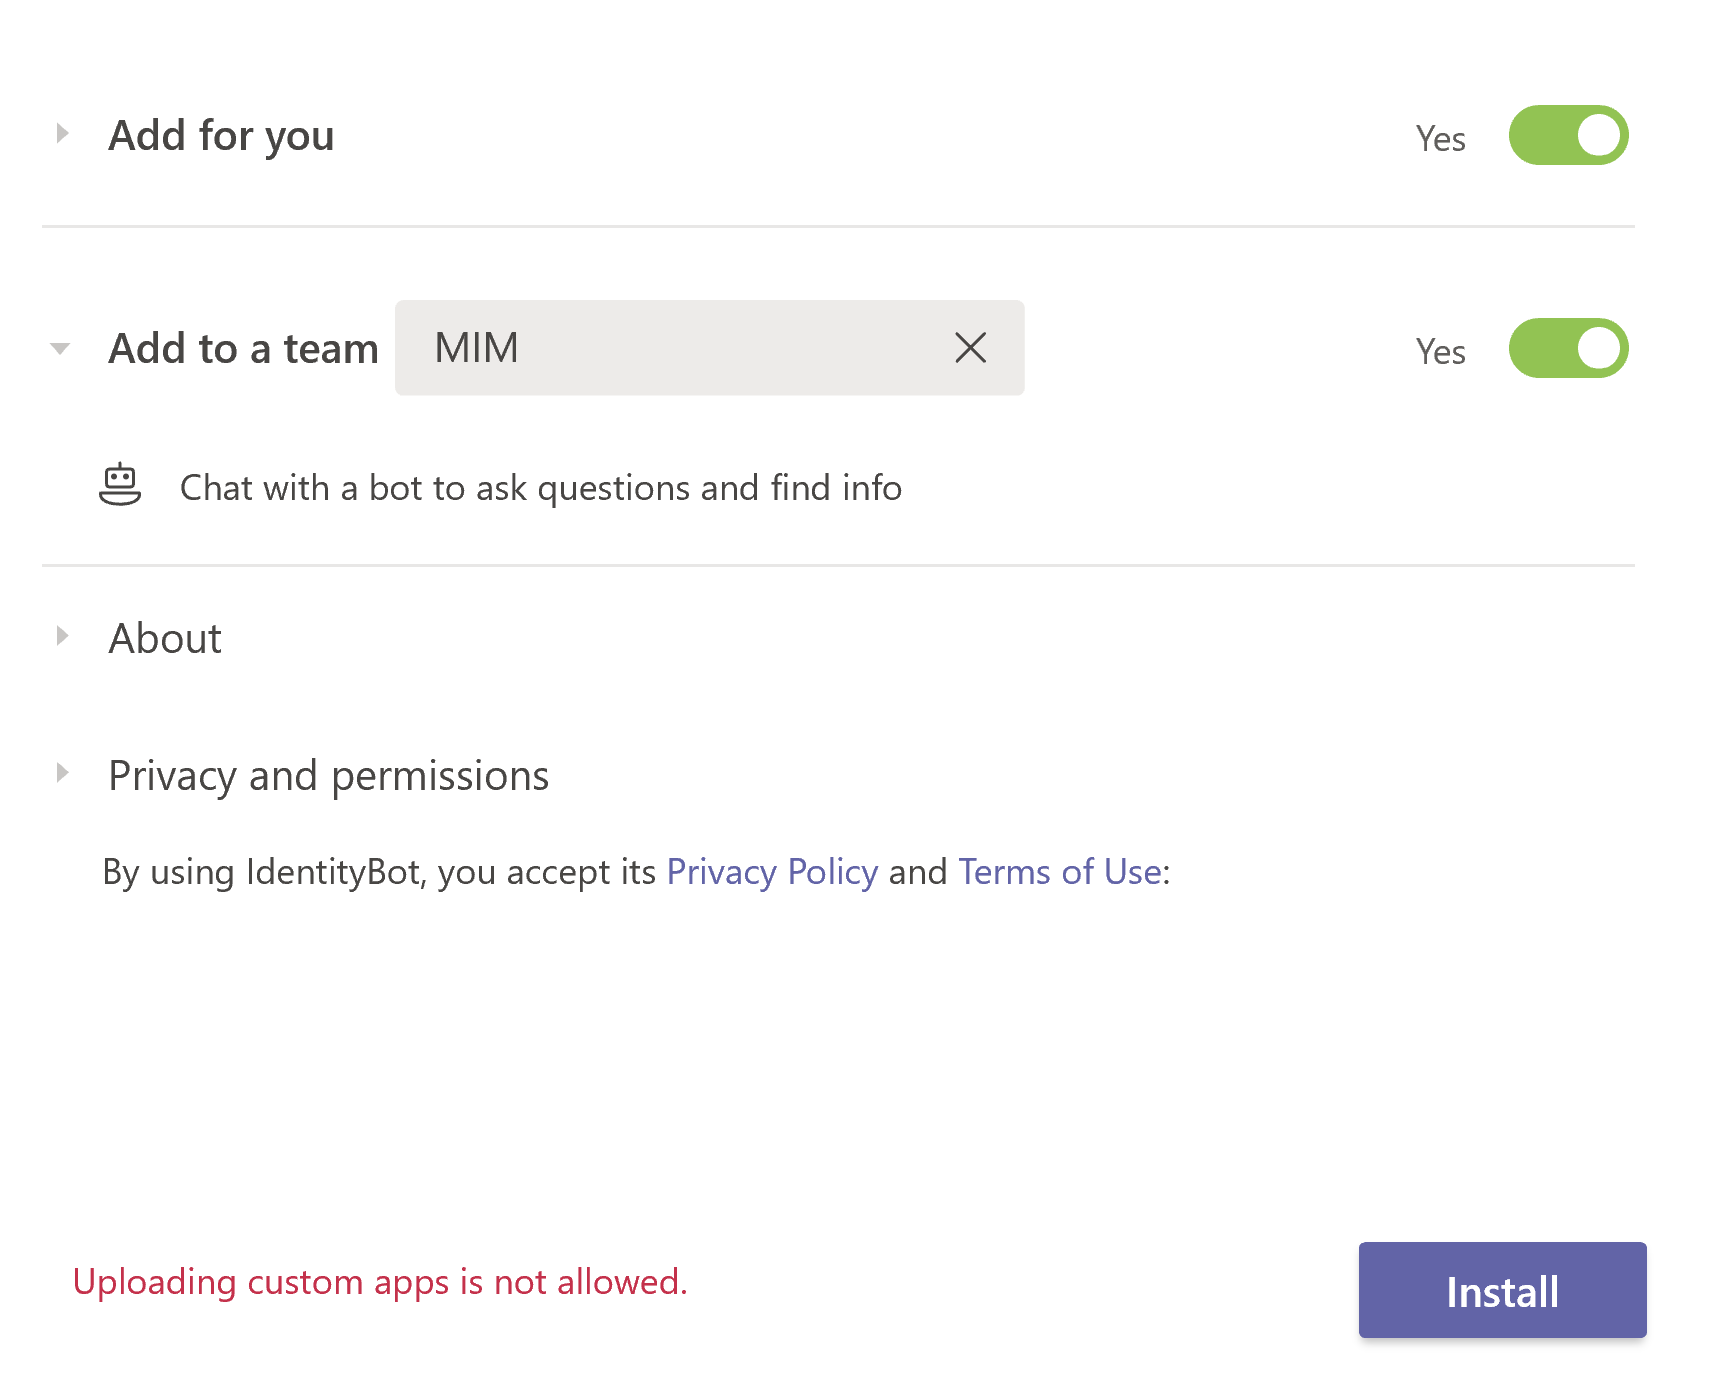
When installing the PoshBot Bot into Teams as a Custom App, you may get the “Uploading custom apps is not allowed” error message as shown below.
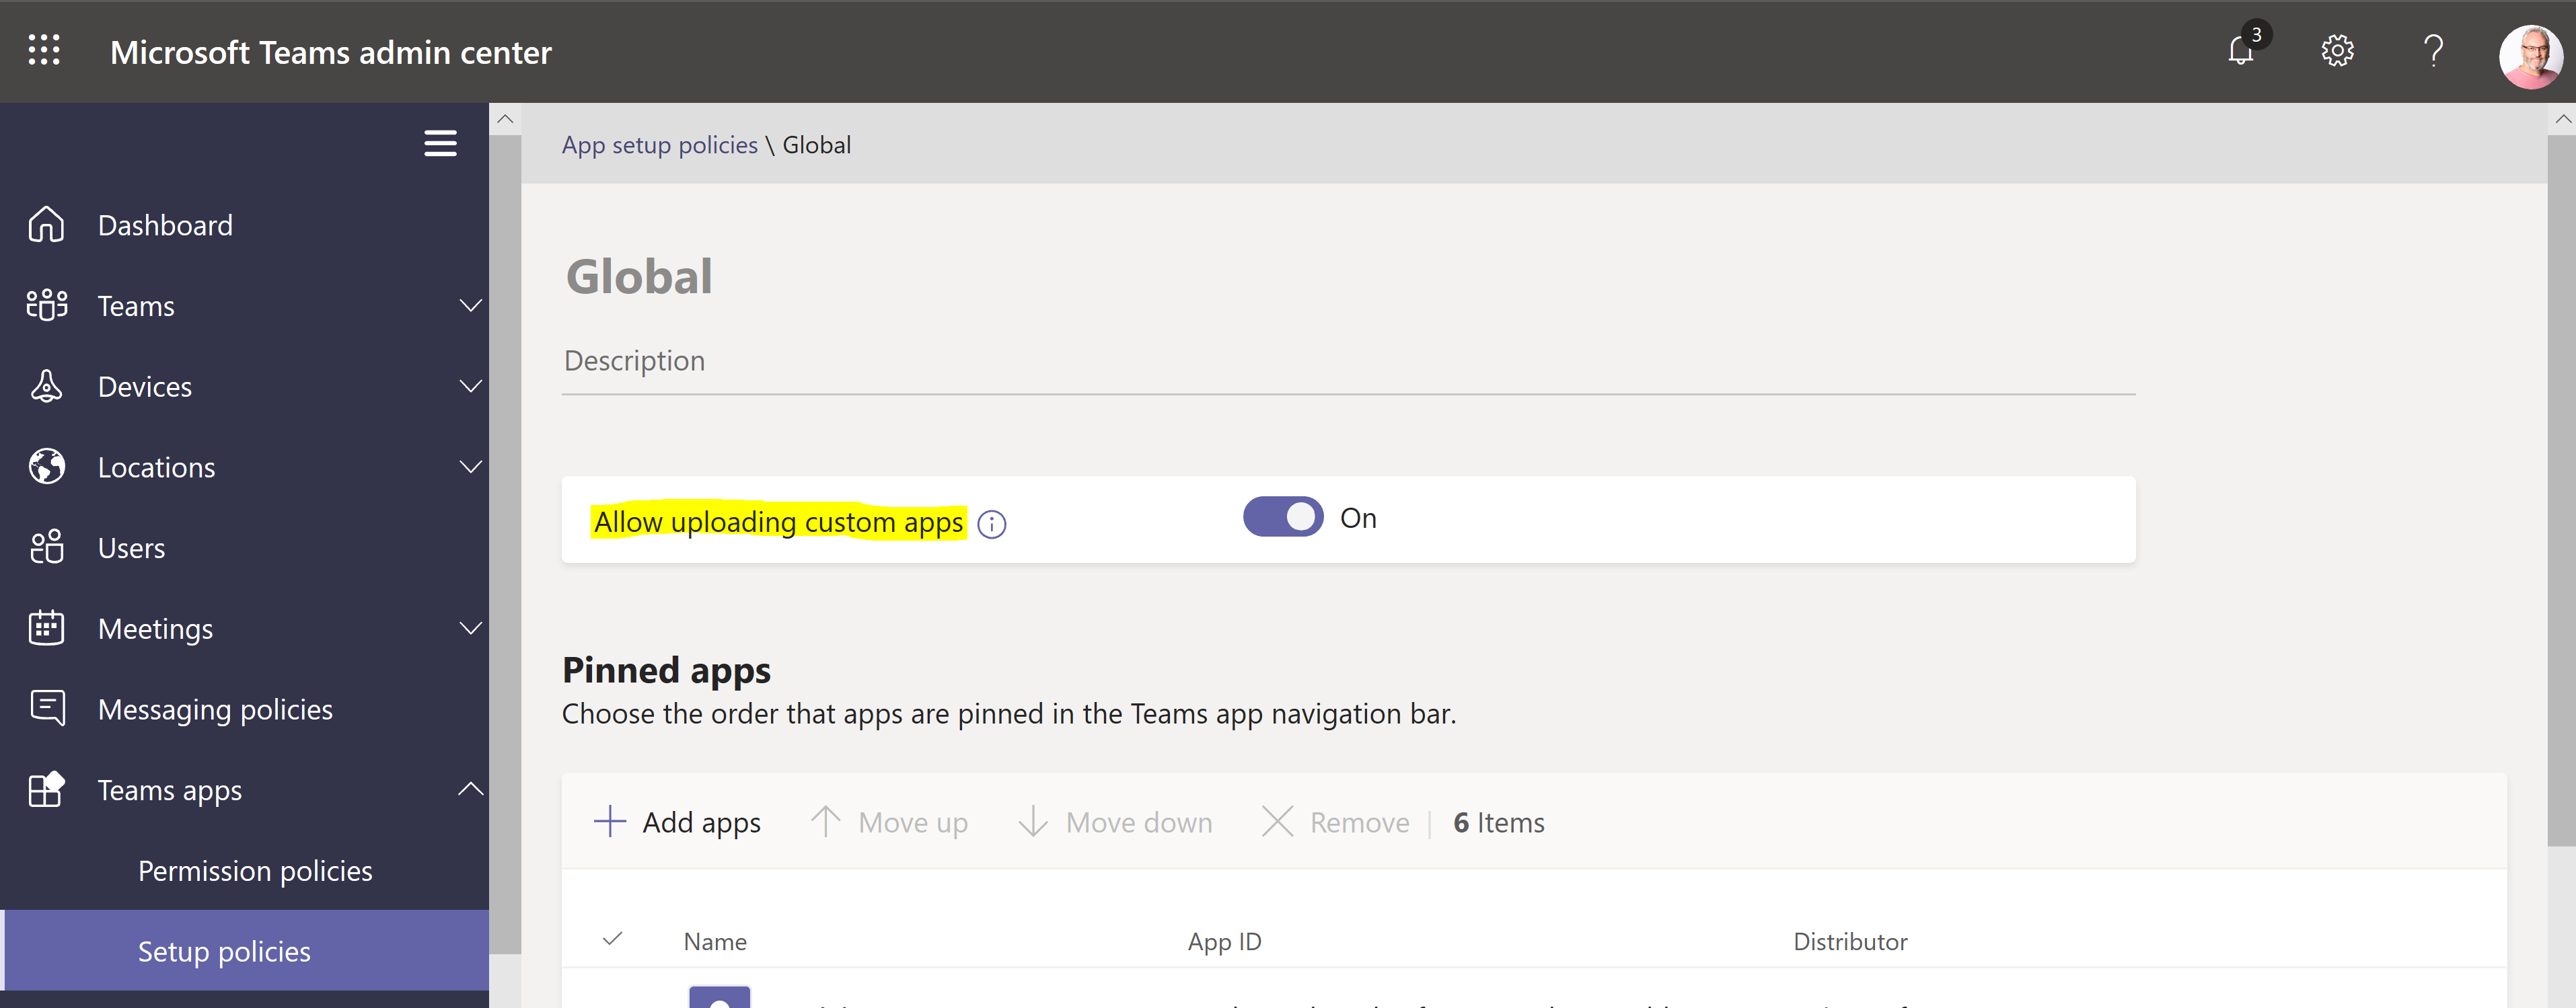
As an Admin user with the Teams Admin Role using the Microsoft Teams Admin Center edit the Teams apps => Setup Policies to Allow uploading custom apps. If you don’t what to modify a policy or the Global Policy you can also allow this permission on a per user basis.
Summary
Using ChatOps for Microsoft Identity Manager with your support teams will allow them to easily get information from Microsoft Identity Manager via Slack or Teams without needing access to Microsoft Identity Manager Servers.
The Lithnet.PoshBot modules leverage the awesome work that Brandon Olin has done with PoshBot and Ryan Newington has done with the Lithnet Tools. If you find this useful please consider a donation (PoshBot, Lithnet) to their open source projects that made ChatOps for Microsoft Identity Manager possible. And let me know how your implementation went via @darrenjrobinson

