First published on Nivlesh’s personal blog at https://nivleshc.wordpress.com.
Introduction
In this blog, we will dig a little deeper into Azure Kubernetes Service (AKS). What better way to do this than by building an AKS cluster ourselves! Just a heads-up, I will be using terminology that was introduced in part 1 of this mini-blog series. If you haven’t read it, or need a refresher, you can access it at https://blog.kloud.com.au/2019/03/04/a-scenario-based-tutorial-for-azure-kubernetes-service-part-1/
Let’s start by describing the AKS cluster architecture. The diagram below provides a great overview:
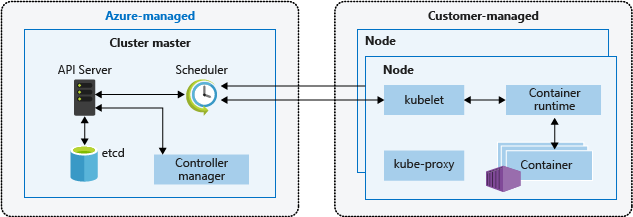
(Image copied from https://docs.microsoft.com/en-au/azure/aks/media/concepts-clusters-workloads/cluster-master-and-nodes.png)
The AKS Cluster is made up of two components. These are described below
- cluster master node– this is an Azure managed service, which takes care of the Kubernetes service and ensures all the application workloads are properly running.
- node– this is where the application workloads run.
The cluster master node is comprised of the following components
- kube-apiserver– this api server provides a way to interface with the underlying Kubernetes API. Management tools such as kubectl or Kubernetes dashboard interact with this to manage the Kubernetes cluster.
- etcd– this provides a key value store within Kubernetes, and is used for maintaining state of the Kubernetes cluster and state
- kube-scheduler– the role of this component is to decide which nodes the newly created or scaled up application workloads can run on, and then it starts these workloads on them.
- kube-controller-manager– the controller manager looks after several smaller controllers that perform actions such as replicating pods and handing node operations
The node is comprised of the following
- kubelet– this is an agent that handles the orchestration requests from the cluster master node and also takes care of scheduling the running of the requested containers
- kube-proxy– this component provides networking services on each node. It takes care of routing network traffic and managing IP addresses for services and pods
- container runtime– this allows the container application workloads to run and interact with other resources within the node.
For more information about the above, please refer to https://docs.microsoft.com/en-au/azure/aks/concepts-clusters-workloads
Now that you have a good understanding of the Kubernetes architecture, lets move on to the preparation stage, after which we will deploy our AKS cluster.
Preparation
AKS subnet size
AKS uses a subnet to host nodes, pods, and any other Kubernetes and Azure resources that are created for the AKS cluster. As such, it is extremely important that the subnet is appropriately sized, to ensure it can accommodate the resources that will be initially created, and still have enough room for any future updates.
There are two networking methods available when deploying an Azure Kubernetes Service cluster:
- Kubenet
- Azure Container Networking Interface (CNI)
AKS uses kubnet by default, and in doing so, it automatically creates a virtual network and subnets that are required to host the pods in. This is a great solution if you are learning about AKS, however if you need more control, it is better to go with Azure CNI. With Azure CNI, you get the option to use an existing virtual network and subnet or you can create a custom one. This is a much better option, especially when deploying into a production environment.
In this blog, we will use Azure CNI.
The formula below provides a good estimate on how large your subnet must be, in order to accommodate your AKS resources.
Subnet size = (number of nodes + 1) + ((number of nodes + 1) * maximum number of pods per node that you configure)
When using Azure CNI, by default each node is setup to run 30 pods. If you need to change this limit, you will have to deploy your AKS cluster using Azure CLI or Azure Resource Manager templates.
Just as an example, for a default AKS cluster deployment, using Azure CNI with 4 nodes, the subnet size at a minimum must be
IPs required = (4 + 1) + ((4+ 1) * (30 pods per node)) = 5 + (5 * 30) = 155
This means that the subnet must be at least a /24.
For this blog, create a new resource group called myAKS-resourcegroup. Within this new resource group, create a virtual network called AKSVNet with an address space of 10.1.0.0/16. Inside this virtual network, create a subnet called AKSSubnet1with an address range of 10.1.3.0/24.
Deploying an Azure Kubernetes Service Cluster
Let’s proceed on to deploying our AKS cluster.
- Login to your Azure Portal and add Kubernetes Service
- Once you click on Create, you will be presented with a screen to enter your cluster’s configuration information
- Under Basics
- Choose the subscription into which you want to deploy the AKS cluster
- Choose the resource group into which you want to deploy the AKS cluster. One thing to point out here is that the cluster master node will be deployed in this resource group, however a new resource group with a name matching the naming format MC_<AKS master node resource group name>_<AKS cluster name>_regionwill be created to host the nodes where the containers will run (if you use the values specified in this blog, your node resource group will be named )
- Provide the Kubernetes cluster name (for this blog, let’s call thismydemoAKS01)
- Choose the region you want to deploy the AKS cluster in (for this blog, we are deploying in australiaeastregion)
- Choose the Kubernetes version you want to deploy (you can choose the latest version, unless there is a reason to choose a specific version)
- DNS name prefix – for simplicity, you can set this to the same as the cluster name
- Choose the Node size. (for this blog, lets choose D2s v3 (2 vcpu, 8 GB memory)
- Set the Node count to 1 (the Node count specifies the number of nodes that will be initially created for the AKS cluster)
- Leave the virtual nodes to disabled
Under Authentication
- Leave the default option to create a service principal (you can also provide an existing service principal, however for this blog, we will let the provisioning process create a new one for us)
- RBAC allows you to control who can view the Kubernetes configuration (kubeconfig) information and to limit the permissions that they have. For now, leave RBAC turned off
Under Networking
- Leave HTTP application routingset to No
- As previously mentioned, by default AKS uses kubenet for networking. However, we will use Azure CNI. Change the Network configurationfrom Basicto Advanced
- Choose the virtual network and subnet that was created as per the prerequisites (AKSVNetand AKSSubnet1)
- Kubernetes uses a separate address range to allocate IP addresses to internal services within the cluster. This is referred to as Kubernetes service address range. This range must NOT be within the virtual network range and must not be used anywhere else. For our purposes we will use the range 10.2.4.0/24. Technically, it is possible to use IP addresses for the Kubernetes service address range from within the cluster virtual network, however this is not recommended due to potential of IP address overlaps which could potentially cause unpredictable behaviour. To read more about this, you can refer to https://docs.microsoft.com/en-au/azure/aks/configure-azure-cni.
- Leave the Kubernetes DNS service IP addressas the default 10.2.4.10 (the default is set to the tenth IP address within the Kubernetes service address range)
- Leave the Docker bridge address as the default 172.17.0.1/16. The Docker Bridge lets AKS nodes communicate with the underlying management platform. This IP address must not be within the virtual network IP address range of your cluster, and shouldn’t overlap with other address ranges in use on your network
Under Monitoring
- Leave enable container monitoring set to Yes
- Provide an existing Log Analytics workspace or create a new one
Under Tags
- Create any tags that need to be attached to this AKS cluster
While you are waiting
During the AKS cluster provisioning process, there are a number of things that are happening under the hood. I managed to track down some of them and have listed them below:
- Within the resource group that you specified for the AKS cluster to be deployed in, you will now see a new AKS cluster with the name mydemoAKS01
-
If you open the virtual network that the AKS cluster has been configured to use and click on Connected devices, you will notice that a lot of IP addresses that have been already allocated.
I have noticed that the number of IP addresses equals((number of pods per node) + 1) * number of nodes
FYI – for the AKS cluster that is being deployed in this blog, it is 31
- A new resource group with the name complying to the naming format MC_<AKS master node resource group name>_<AKS cluster name>_region will be created. In our case it will be calledMC_myAKS-resourcegroup_mydemoAKS01_australiaeast. This resource group will contain the virtual machine for the node (not the cluster master node), including all the resources that are needed for the virtual machines (availability set, disk, network card, network security group)
What will this cost me?
The cluster master node is a managed service and you are not charged for it. You only pay for the nodes on which the application workloads are run (these are those resources inside the new resource group that gets automatically created when you provision the AKS cluster).
In the next blog, we will delve deeper into the newly deployed AKS cluster, exposing its configuration using command line tools.
Happy sailing and till the next time, enjoy!