Overview
In the previous blog post (see here) we took a look at AWS Organizations, what it is, what it’s comprised of and the benefits of a multi-account strategy. In this post we will take a look at how to get started with AWS Organizations by looking at a couple of ways we might want to design our Organization Unit’s hierarchy and go through the process of setting up our First OU’s and AWS Accounts. In a future blog post we will look at how we can implement an AWS Account Vending Machine to automate this process and ensure consistency across future accounts.
Designing our Organisation hierarchy
Due to the flexibility of AWS Organizations their is an almost infinite number of ways you could decide to group your workloads among any number of AWS Accounts, so how do you decide to design your environment? unfourtunatly their is no one size fits all answer here and it depending greatly on the customer’s business and technical requirements. Their are however a number of considerations you can take into account when designing your account layout:
Security
When you think about a typical IT environment, their is typically a number of services operated and maintained by the IT department and used through the organisation. These centralised IT resources can be located within one or more accounts deployed and managed by the IT department and then shared with other business unit via cross-account permissions.
- Is their a need for centralised Account Management? Centralising your Identity Provider (and even your IAM users and groups) can allow the IT department to define a set of organisation wide policies which can then be leveraged by other accounts through the use of cross-account access permissions.
- Is their a need to isolate particular workloads? Some workloads (such as those covered by PCI or HIPPA compliance requirements) can benefit from being located within their own AWS Account. By locating these environments within their own account/s, you can define very concise rule sets around their access. This notion can be further broadened by separating Test and Production workloads into separate accounts allowing for different permissions and controls to be applied, reducing the complexity of the resulting IAM policies and groups.
- Do you have a requirement for centralised logging & Reporting? In a typical IT environment, the IT Department will monitor, secure and report on the health and operations of the devices and assets within the IT ecosystem. By locating key monitoring and auditing services (such as CloudTrail, AWS Config and VPC Flow Logs) within a single account, you can maintain a single source of record for all logs generated by the eco-system rather than having them spread across multiple locations. The configuration of these sub-accounts to leverage the centrally offered services at the time of their creation will be demonstrated in a future blog post when we look at our Account Vending machine solution.
Operations
In addition to the security considerations, there are a number of operational requirements should also be assessed.
- Does the organisation have a need for centralised artefacts publication? A lot of organisations have approved Standard Operating Environments (SOE) or applications which all consumers and services providers must use. These artefacts can be built and published from a centralised account, out to the rest of the organisation. This would enable all account users to leverage the current versions of these artefacts, while the IT team could retain centralised control of the creation, versioning and retiring of them. This solution can be further developed by publishing via the AWS Service Catalog, further enabling sub-account holders to leverage pre-approved workloads.
- Do you have a need for POC, Lab or testing environments Most organisations have some form of sandpit or lab environment used for testing new applications, upgrades or even training new staff. In a single account environment, creating an isolated space and user permissions can prove to be a complicated and time consuming process and having the individual procure their own account can cause billing and expense problems. In a multi-account environment, new accounts can be created quickly and easily while still having access to corporate artefacts (see above) and controls in place without having the ability to impact other environments or workloads. An automated way to provisioning “Sandbox environments” will be demonstrated in a future blog post.
- Does your service need to operate within certain service-limits without impacting other workloads When you have multiple workloads taking advantage of AWS services such as auto-scaling, it becomes possible to hit the AWS Service-Limits (such as EC2 instance count). A single scaling workload can consume all of the available instances which could potentially impact the scaling ability of other workloads within the same account. By isolating these workloads into separate accounts, you limit the impact workloads can have on each other.
Billing
Finally, the third area that is useful consider when designing you multi-account strategy is the financial and billing requirements.
- What Billing mechanism do you need for your accounts A key component of AWS Organizations is the consolidation of your charges onto a single monthly bill. This enables you to deploy as many AWS Accounts as required, and receive a single itemised bill and credit card charges. Some customers may require their charges to be billed to different credit cards which would require them to deploy multiple AWS Organizaations.
- What are your charge back requirements for services usage One of the more annoying issues with cloud services is that it’s not always possible to identify which workload is responsible for a particular charge. Bandwidth usage is a prime example of this where it’s very difficult to work out which workload are responsible for how much of the charge. By isolating a department or project to its own AWS account it becomes much easier to attribute the charges back to their owner. If a HR departments Employee database is the only instance running within an account to know all the bandwidth usage is attributable to the Employee Database and as such can charge the HR department accordingly.
Final Design Thoughts
When assessing your requirements and designing your multi-account strategy, it’s good to remember that your AWS Organization hierarchy does not need to remain static and can be altered, changed or updated over time. Overtime it may become necessary to further split out workloads into additional account or conversely, consolidate workloads together into fewer accounts. In addition, their is no requirement to have separate accounts for each of the considerations mentioned above. A common design choice is to locate all of the “IT services” (such as logging, Identity, publishing) within a single “Shared Services” or “Centralised IT” account as this allows the IT Team to only authenticate to a single Account for all IT services and activities. Finally, you can also implement a “Hybrid” approach. It may make sense to isolate accounts by products of some departments, cost centre for some or even by environment life cycle (Dev/Test/Prod) for others.
Implementing our new Multi-Account Design
So, now that I’ve taken a look at how we might want to split up our AWS Accounts, how do we actually go about it? Well, like most things in the world of AWS there are three ways: via the management console, via a CloudFormation template and via the AWS API’s.
In the below examples we will take a look at how to enable AWS Organizations within a new AWS Master account (I assume you already have a new AWS Account before beginning this process), setup an IT Services Organization Unit and setup a “Shared Services” AWS account. We will do all of these things via the management console, so we can step through the process. In a future blog post we will look at how this can be achieved via the usage of CloudFormation and the AWS API’s.
Enabling AWS Organization
1. Sign in to AWS as you Master Account and open the AWS Organizations console either by browsing to https://console.aws.amazon.com/organizations/ or by clicking on your account name in the navigation bar and then selecting “My Organization” as shown in the screenshot below:
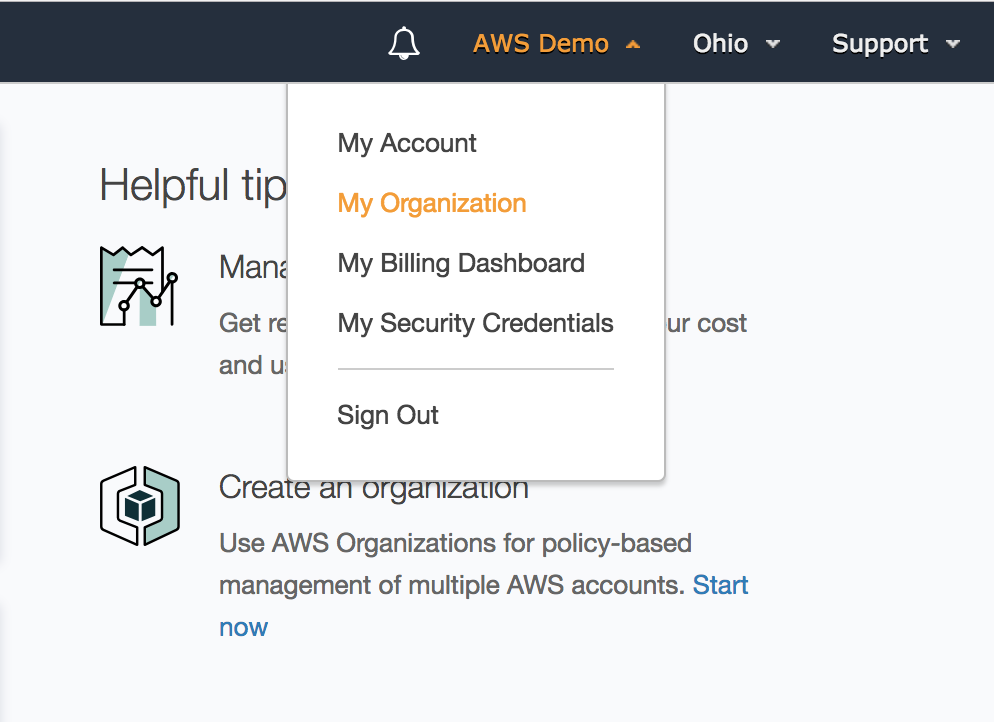
Figure 1. “My Organization” Menu Option
2. Once at the “My Organization” screen, select “Create Organization” from the main pane.
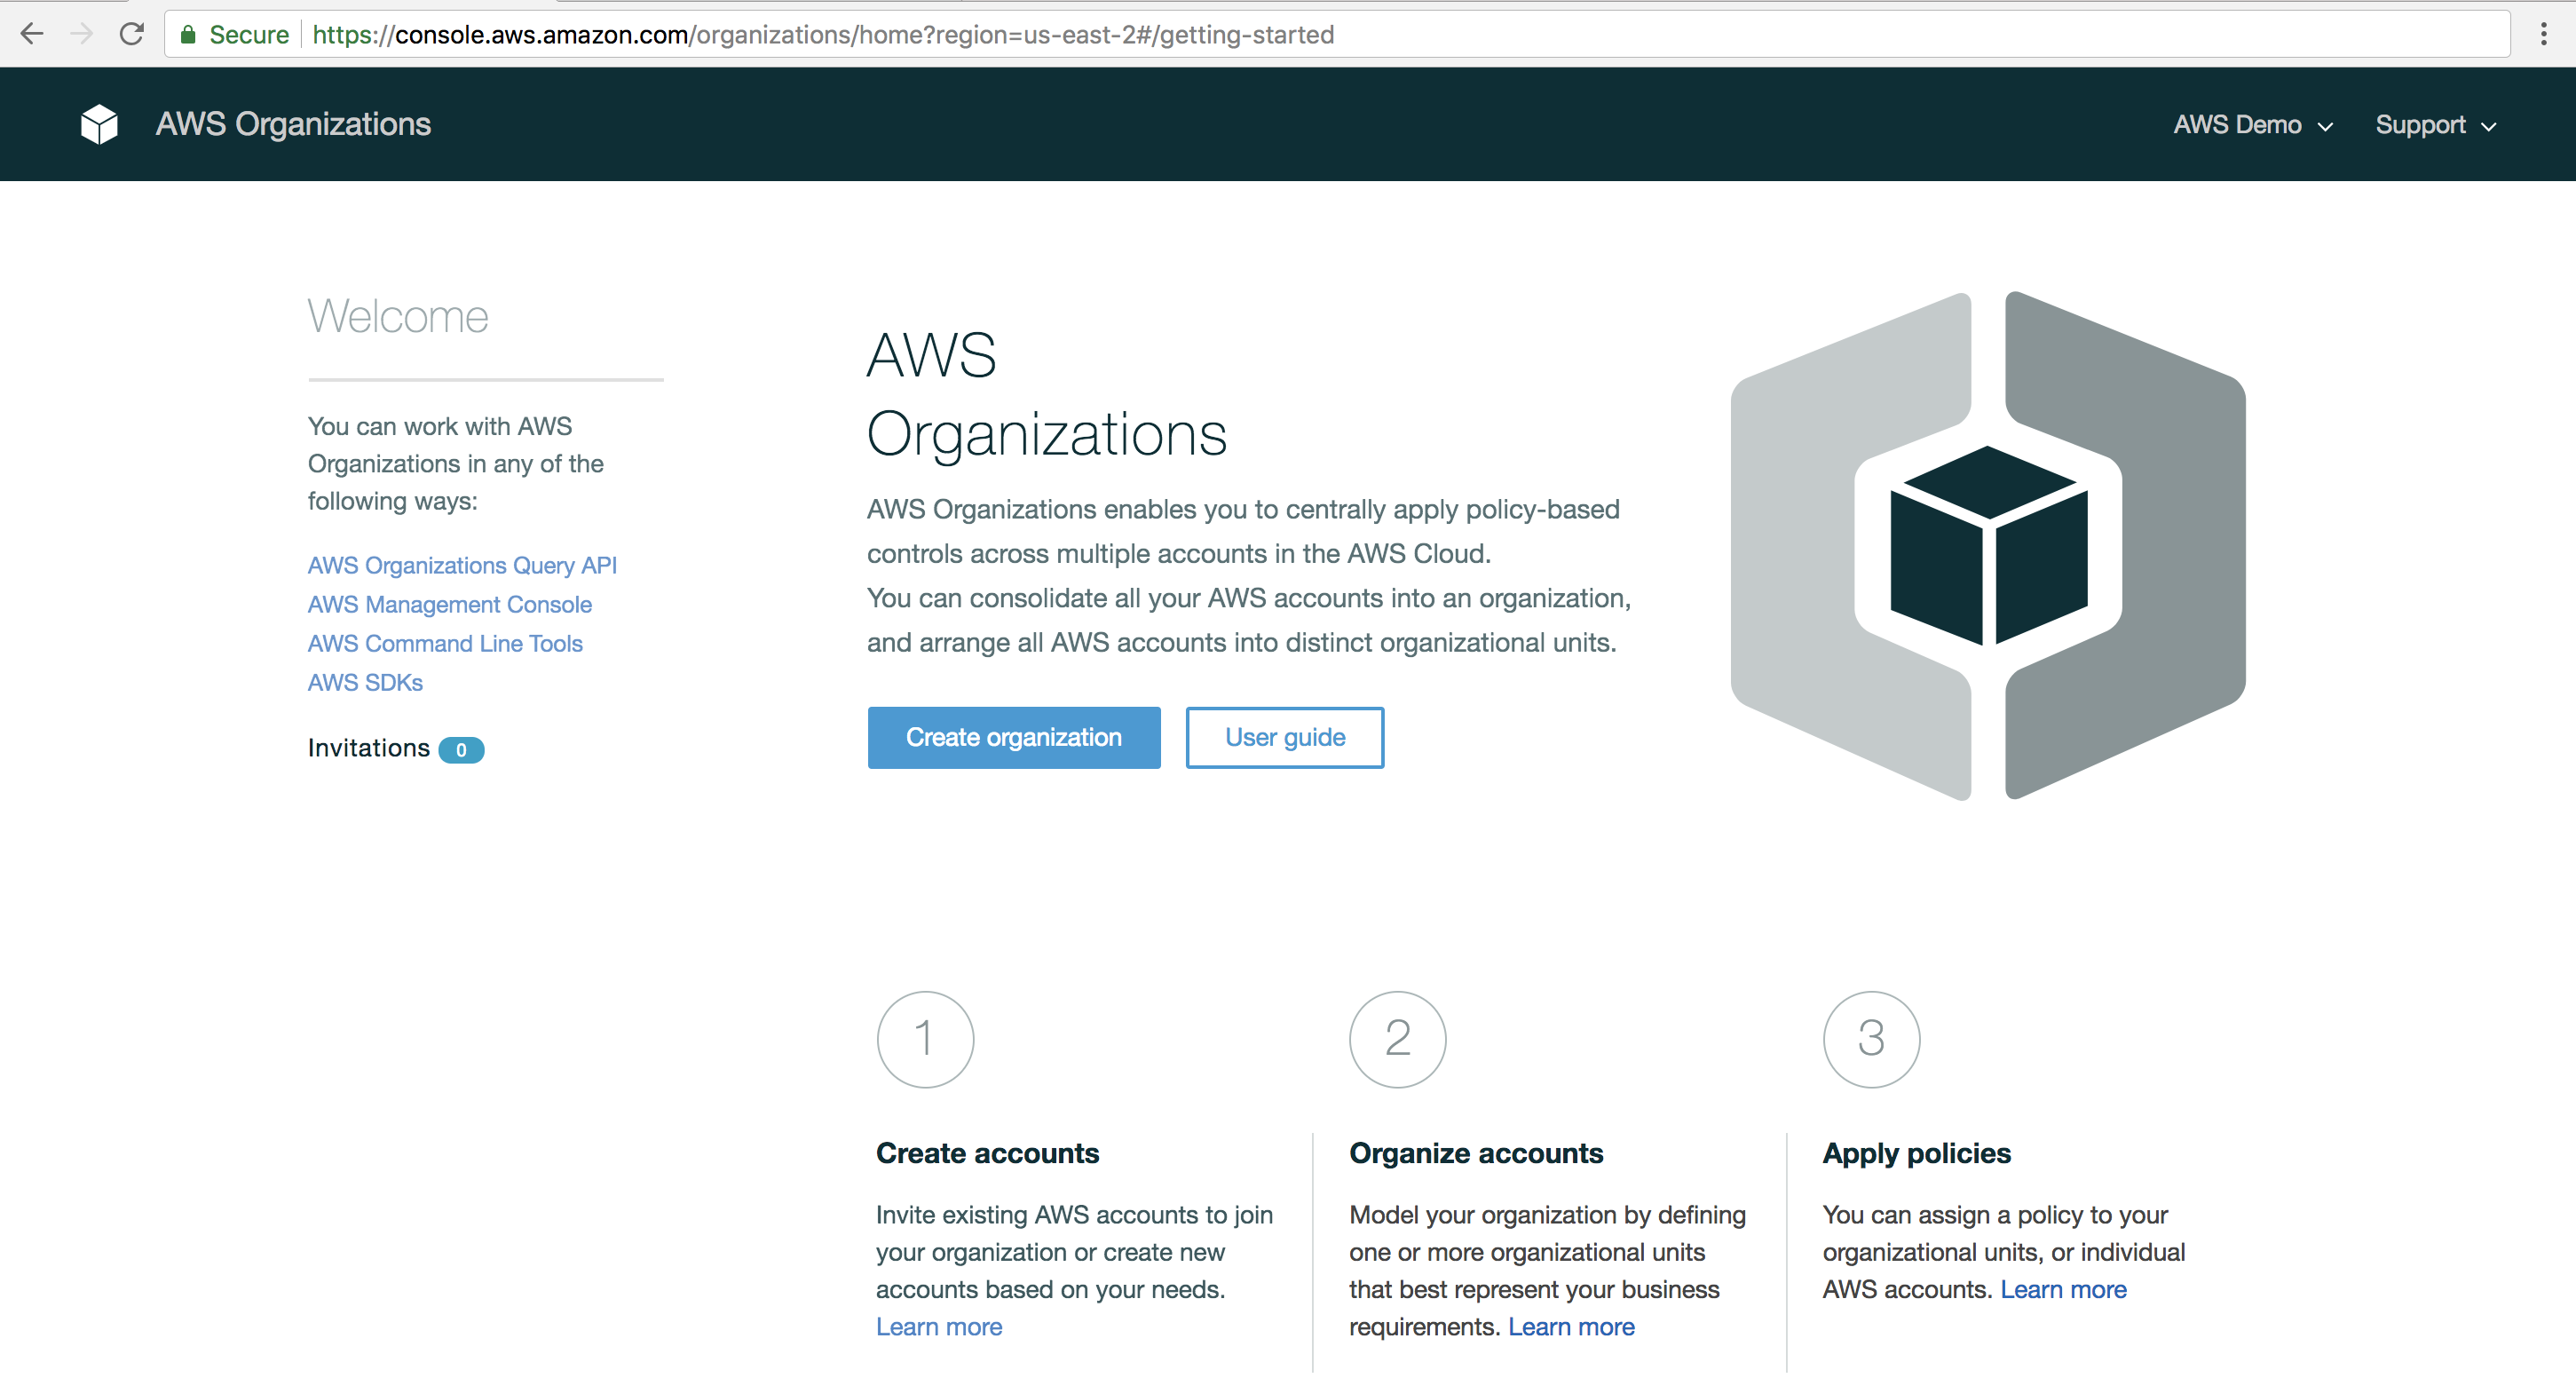
Figure 2. Create Organization
3. Next we are presented with the “Create New Organization” window which gives us two options. To take advantage of all the “AWS Organization” feature, select “Enable All Features” option and click “Create Organization”.
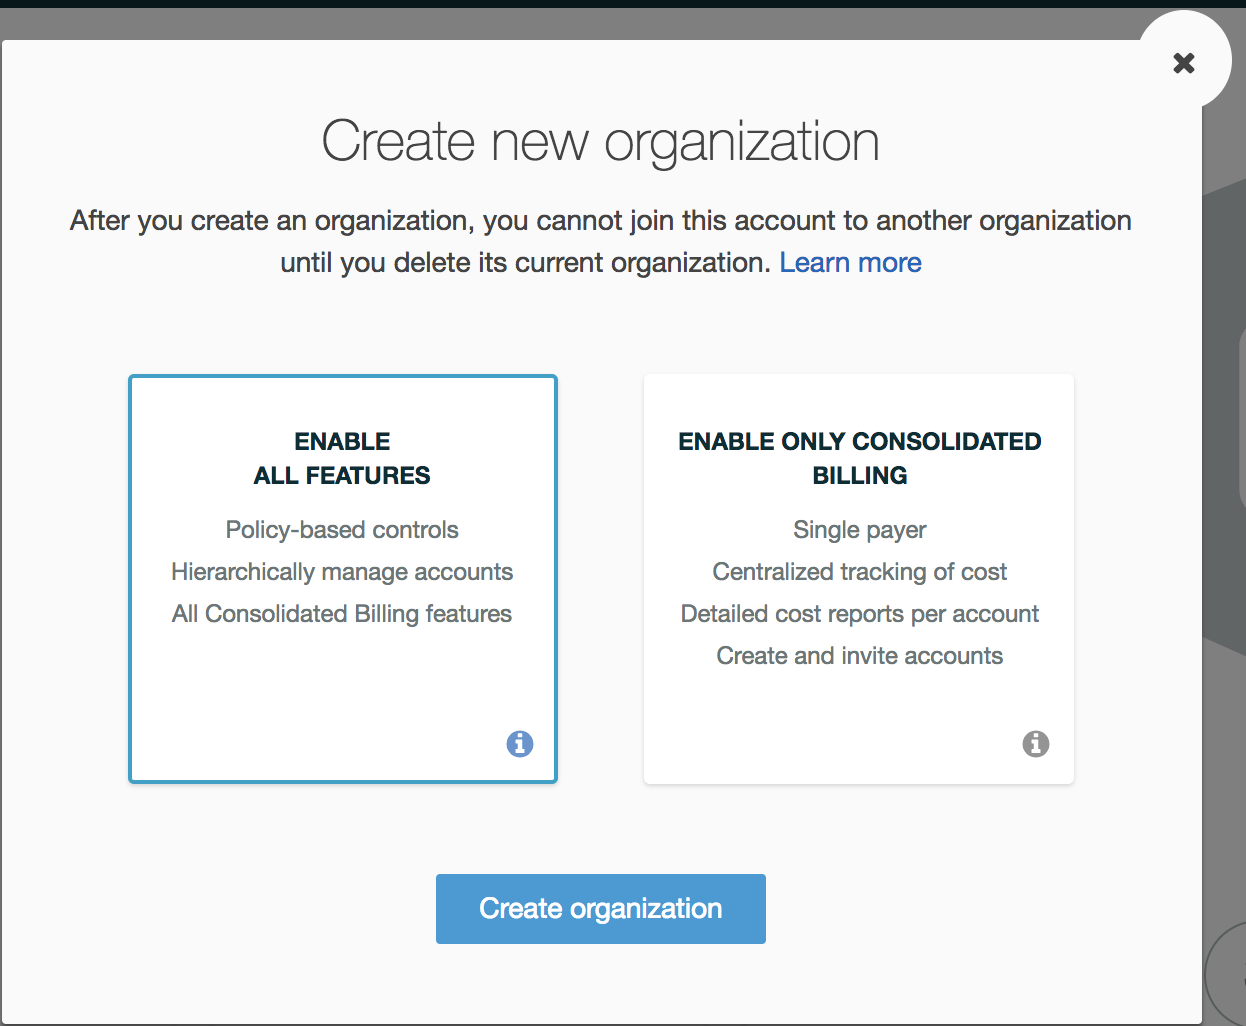
Figure 3. Create New Organization window
4. Once the process is complete, you will be presented with the “AWS Organization Account page” which shows a list of all the AWS Account associated with your organization. Currently this will only be your existing account. In the next section we will create a new AWS account which will be associated with our organization.
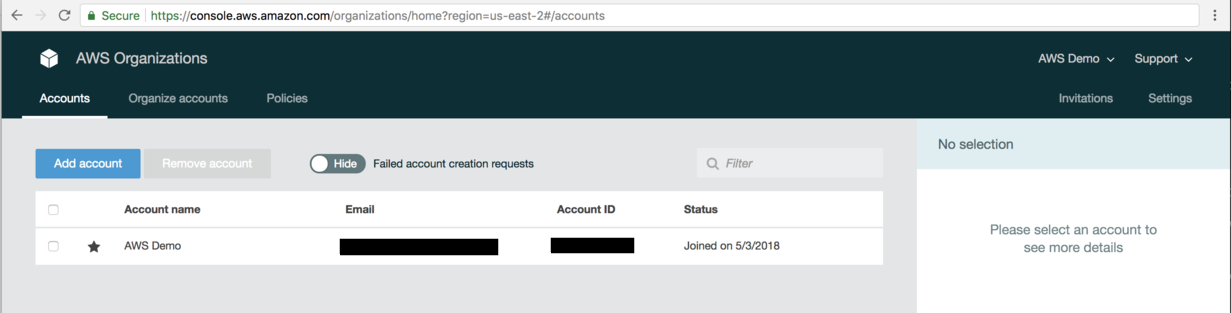
Figure 4. AWS Organization Account Page
Adding new Account to an AWS Organization
Now that we have our organisation created, the next step is to add a new account to it.
1. The first step while still on the “AWS Organization Account Page” is to select the “Add Account” button on the main pane.
2. Next is to select whether you’d like to invite an existing AWS Account to join the organization or create a new Account from scratch which is what we’ll be doing. Select “Create Account” from the main pane.
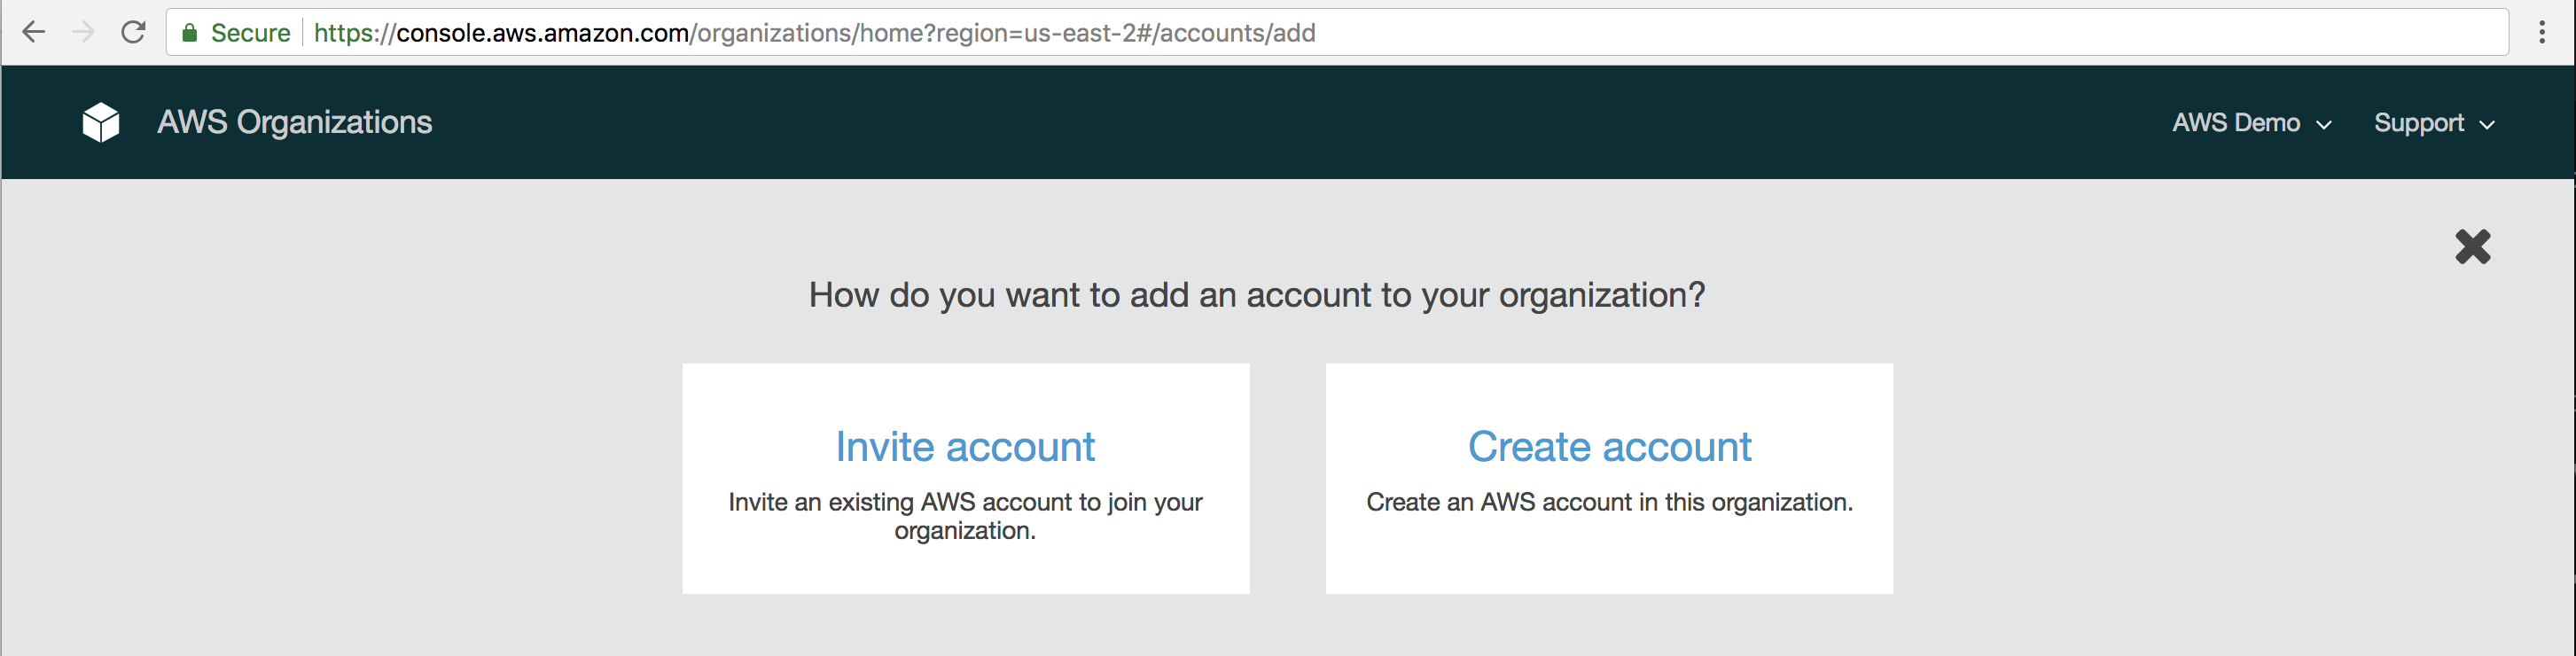
Figure 5. Add new Account Page
3. This will open a new pane asking for your full name, an “email address” and an “IAM role name”. Once these details are populated, click the “Create” button at the bottom of the window.
- Full Name is simply the name of the new account to be made. For our example, this will simply be “Shared Services”.
- Email Address is any email address which you can receive email on. It is suggested to make the email address a distribution group to allow multiple people to receive any email’s from AWS regarding this account.
- IAM User Role is the role in the new account that “AWS Organization” will create as a part of deploying the new account. This role will be allocated “AdministrativeAccess” permissions and can be assumed by users within the master account. For our example we will enter “OrganizationAccountAccessRole”.
Once you’ve completed populating the fields, click the “Create” button to submit the request.
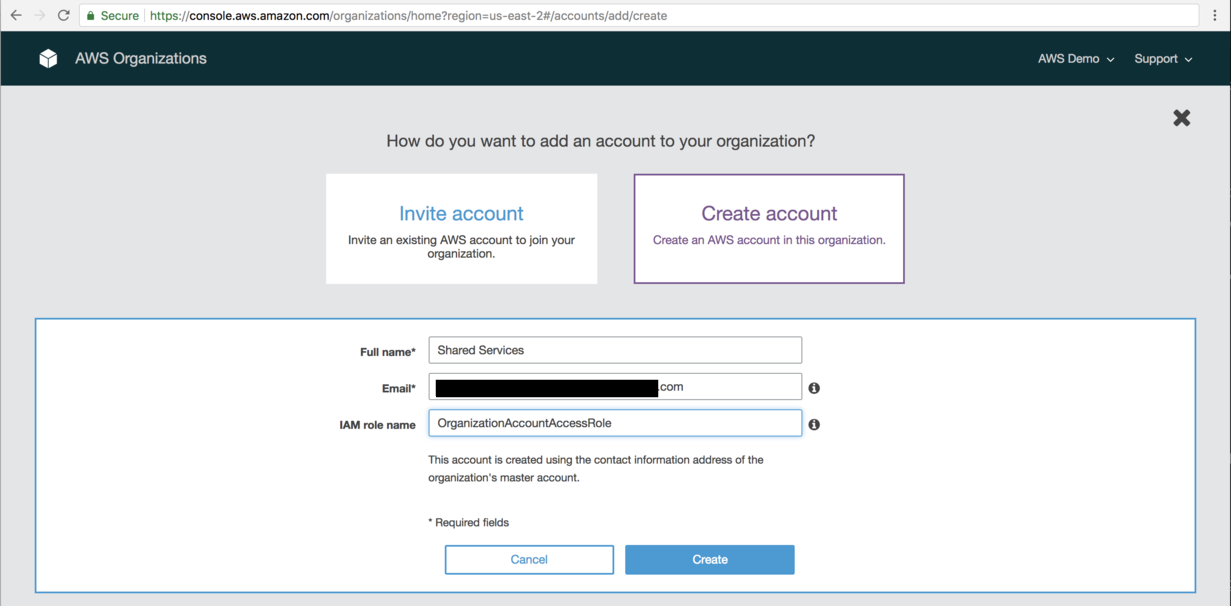
Figure 6. New Account Details Window
4. This will return you back to the “AWS Organization Accounts” page and show that the new account is being created. After a couple of minutes, the remaining details of the new account will populate and you can proceed with creating a new “Organization Unit” and re-locating the account into it.
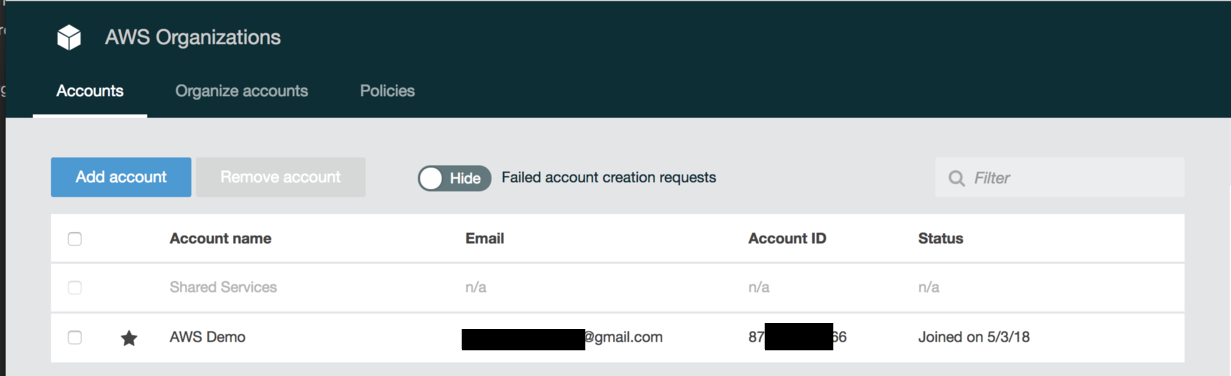
Figure 7. New Account Creation in Progress

Figure 8. New Account Creation Completed
Adding Organization Units
The Final step in getting our new organziation up and running is to create a new Organizaiton Unit to hold our “Shared Services” account.
1. To start off with we need to click on the “Organize accounts” button from the “AWS Organizations” window.
2. We are now presented with our single “Root” of our organisation. Double click on the “Root” button under “Roots” to expand the tree.
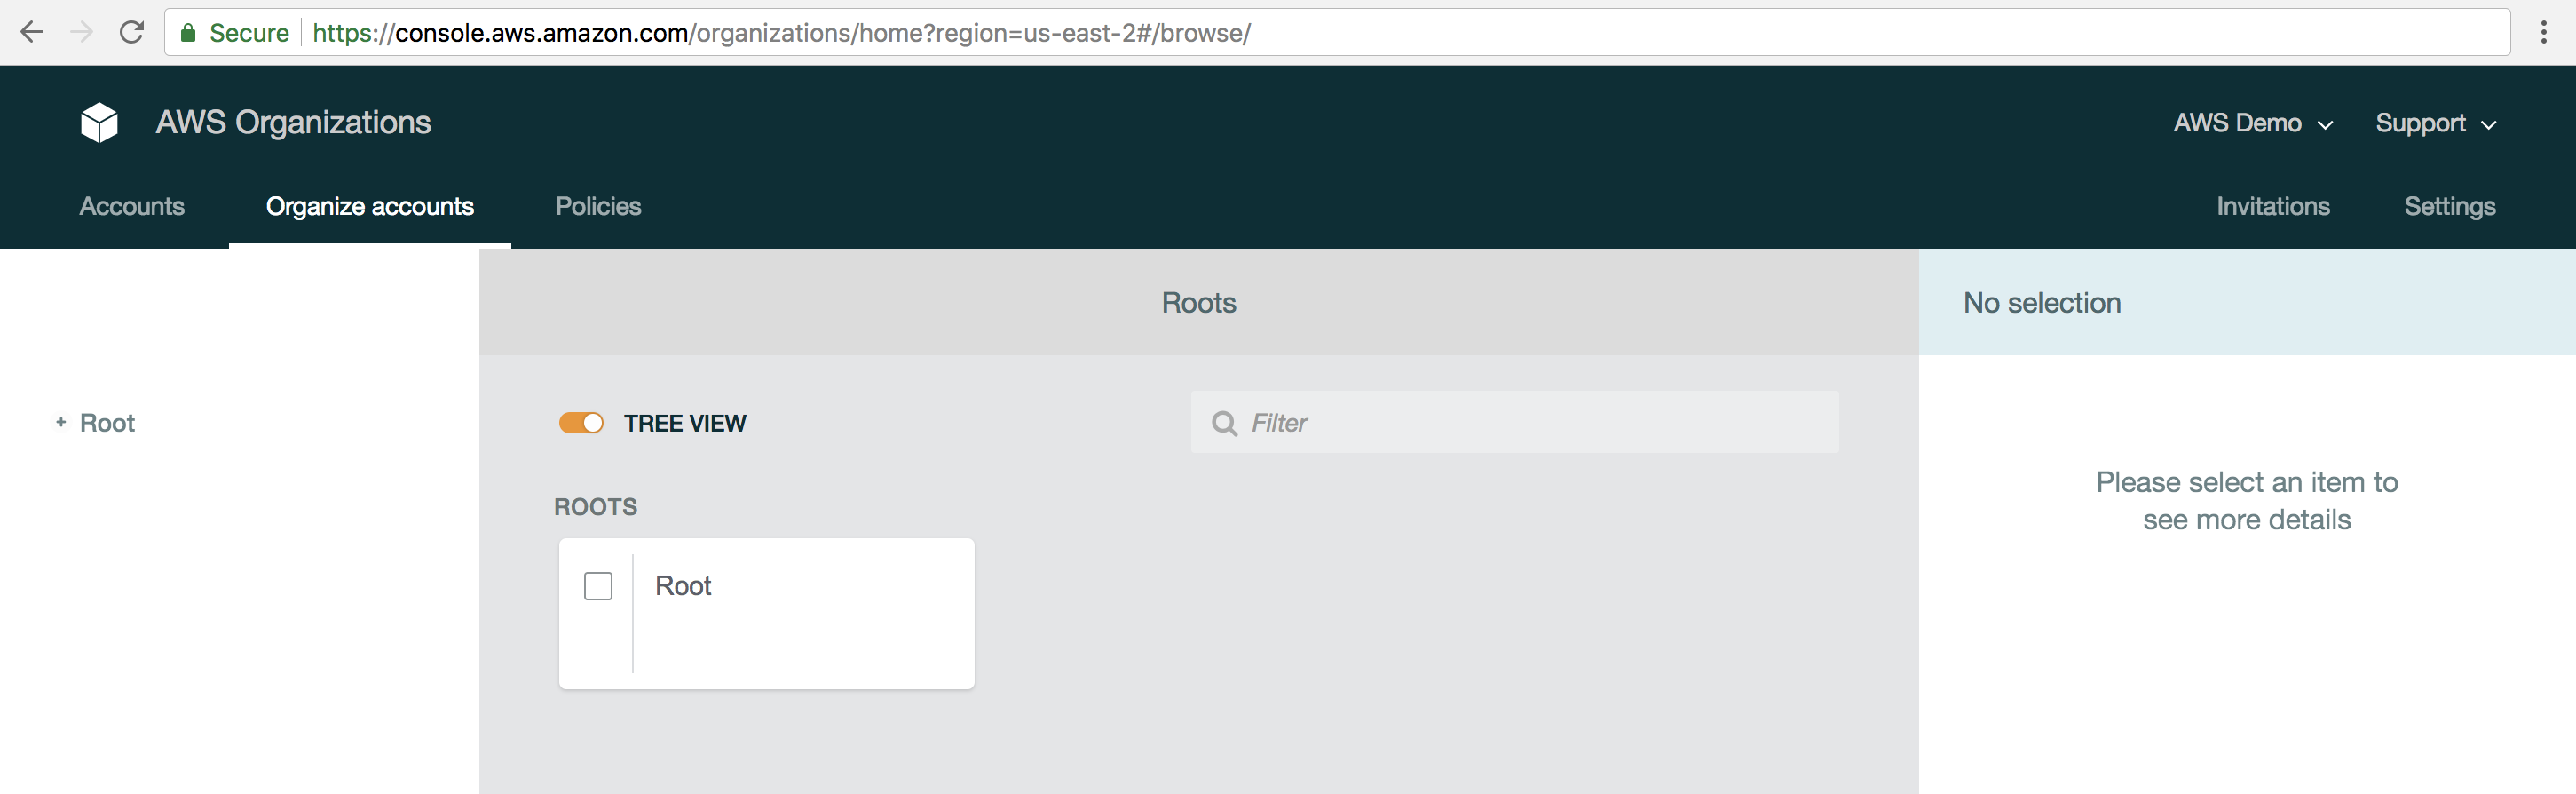
Figure 9. Organize Accounts Root View
3. Next we need to click on the “+ New Organizational Unit” button from with main pane.
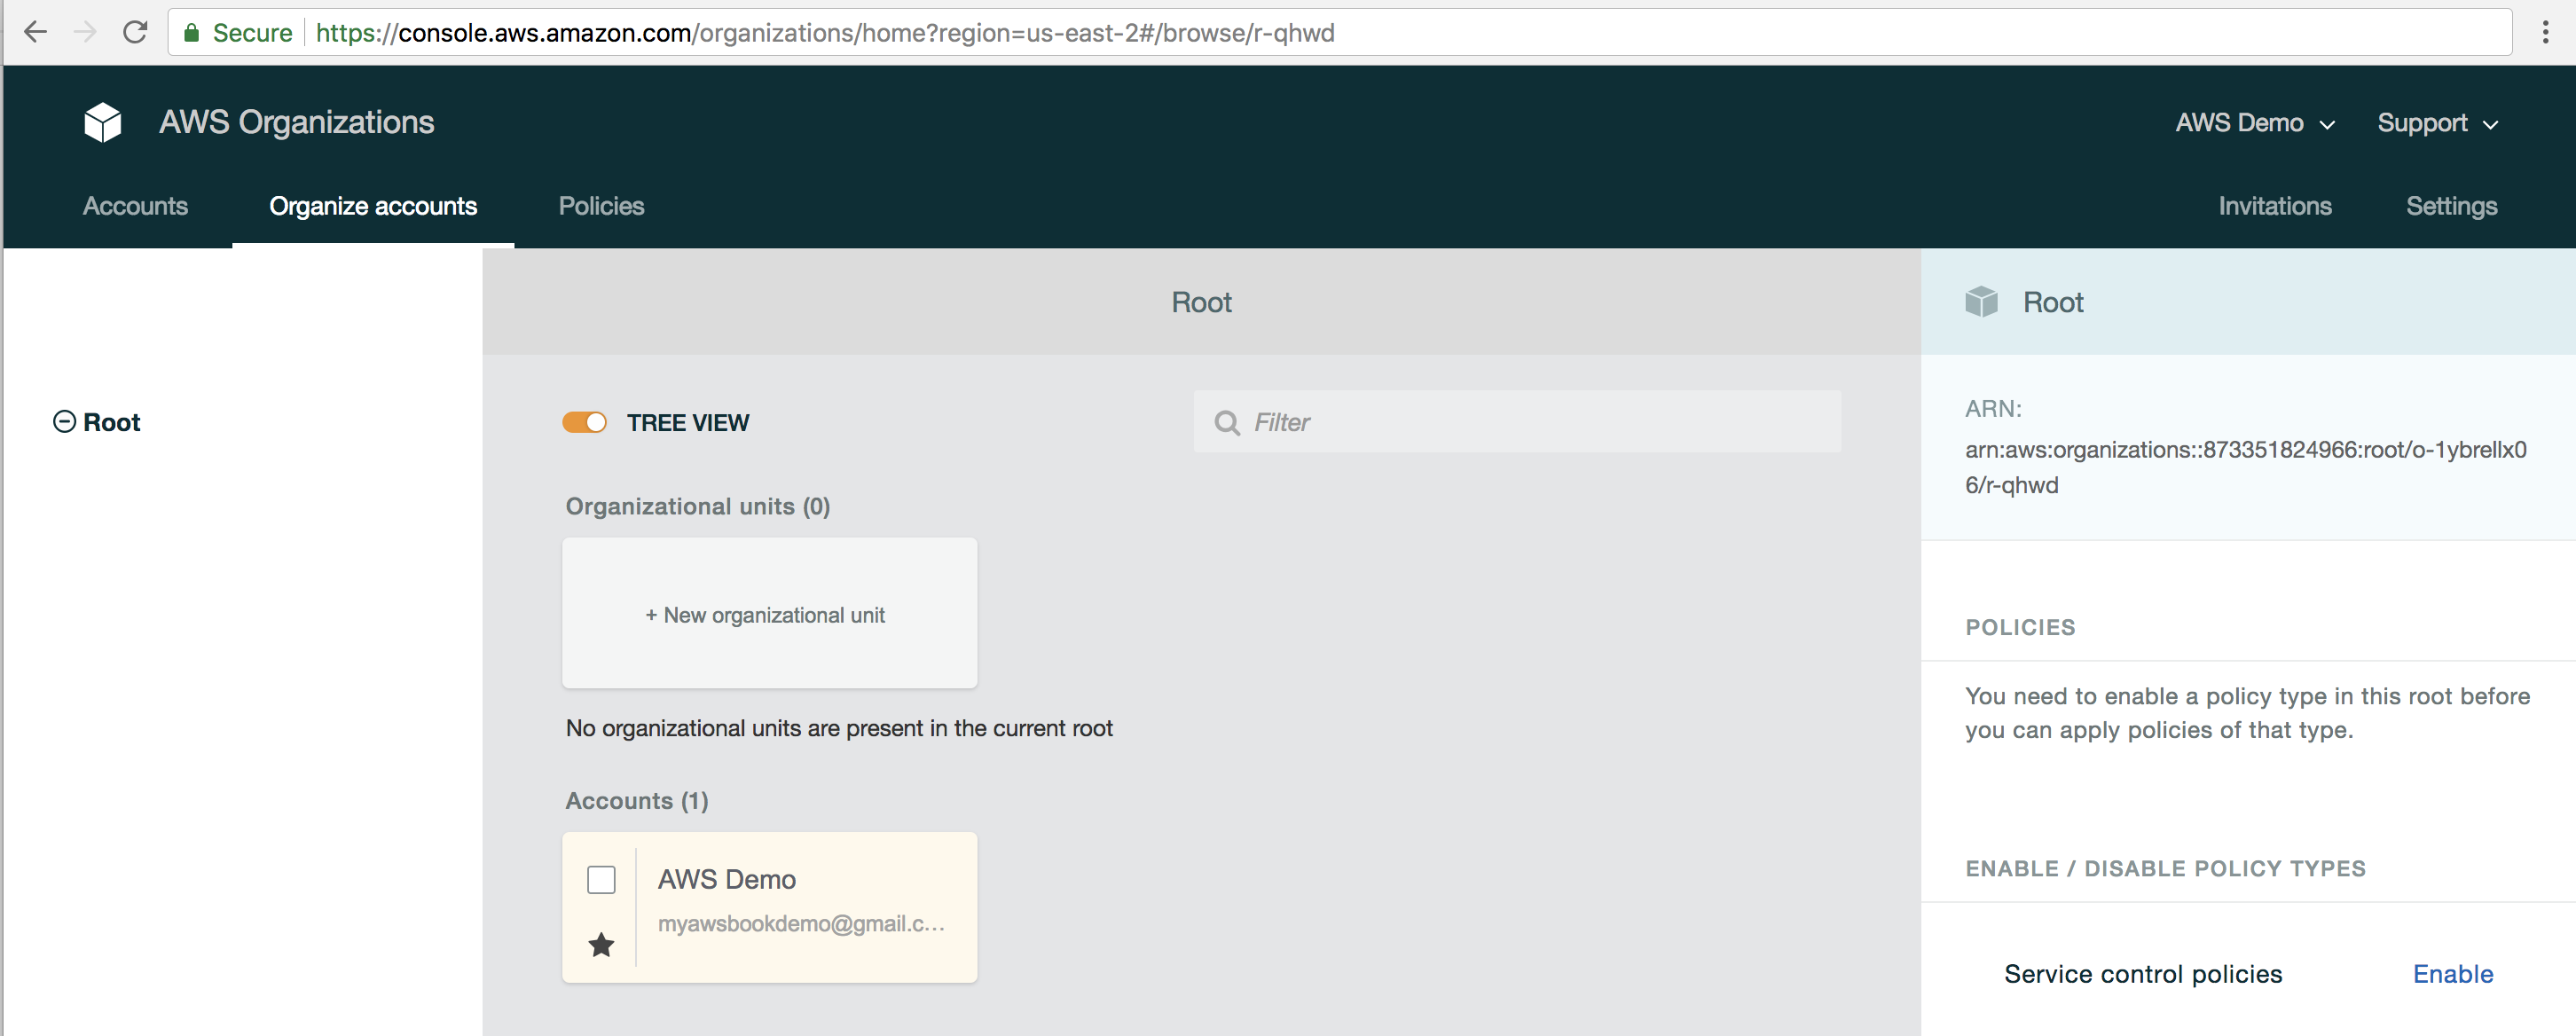
Figure 10. Organize accounts page
4. We are now presented with the “Create Organizational Unit” Window. For our example we are going to create an organization unit for the IT department, so enter “IT Department” under “Name of Organizational Unit” and click “Create Organizational Unit”.

Figure 11. Create Organizational Unit Window
5. Our Organizational Unit is now created and ready for us to put our “Shared Services” account into. to do this, select the “Shared Services” account from the list of available AWS Accounts (there should be two, the master account and the new “Shared Services account) and click the “Move” link that appears.
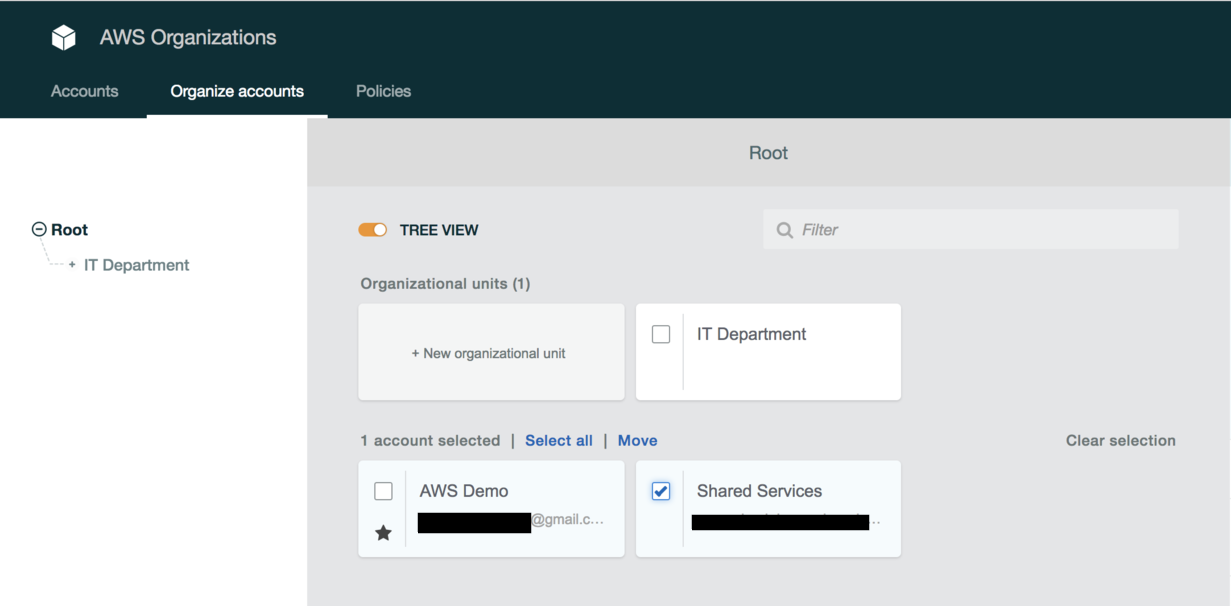
Figure 12. Move AWS Account
6. Finally, select “IT Department” from the hierarchy of available Organizational units and click “Move”.

Figure 13. Select New OU for AWS Account
Conclusion
In this article we have taken a look at some design decisions to take into consideration when designing your Multi-Account strategy, we’ve configured and setup our new “AWS Organziation” and create a new “AWS account” and “Organization Unit” to house it. In the next Article, we will take a look at how we can automate these activities and present an Automated Account Provisioning Service Catalog to our users to enable them to create accounts themselves.