Azure ‘Business to Business’ (or the catchy acronym ‘B2B’) has been an area of significant development in the last 12 months when it comes to providing access to Azure based applications and services to identities outside an organisation’s tenancy.
Recently, Ryan Murphy (who has contributed to this blog) and I have been tasked to provide an identity based architecture to share Dynamics 365 services within a large organisation, but across two ‘internal’ Azure AD tenancies.
Dynamics 365 takes its identity store from Azure AD; if you’re assigned a license for Dynamics 365 in the Azure Portal, including in a ‘B2B’ scenario, you’re granted access to the Dynamics 365 application (as outlined here). Further information about how Dynamic 365 concepts integrate with a single or multiple Azure tenancies is outlined here.
Microsoft provide extensive guidance in completing a typical ‘invitation’ based scenario using the Azure portal (using the links above). Essentially this involves inviting users using an email which relies on that person manually clicking on the embedded link inside the email to complete the acceptance (and the ‘guest account’ creation in the Dynamics 365 service linked to that Azure AD).
However, this obviously won’t scale when you’re requiring on inviting thousands of new users, initially, but then also having to repeatedly invite new users as part of a Business-As-Usual (BAU) process as they join the organisation (or ‘identity churn’ as we say).
Therefore, to automate the creation of new Guest Users Azure AD accounts, without involving the user at all, this process can be followed:
- Create a ‘service account’ Guest User from the invited Azure AD (has to have the same UPN suffix as the users you’re inviting) to be a member of the resource Azure AD.
- Assign the ‘service account’ Guest User to be a member of the ‘Guest Inviter’ role of the resource Azure AD.
- Use PowerShell to auto. provision new Guest User accounts using the credentials of the ‘service account’ Guest User.
In this blog, we’ll use the terms ‘Resource Azure AD’ or ‘Resource Tenancy’ which is the location where you’re trying to share the sources out to another Azure AD called ‘Invited Azure AD’ or ‘Invited Tenancy’ where the user accounts (including usernames & passwords) you’re inviting reside. The invited users only ever use their credentials in their own Azure AD or tenancy – never credentials of the ‘Resource Azure AD or tenancy’. The ‘Guest User’ object created in the ‘Resource Tenancy’ are essentially just linking objects without any stored password.
A ‘Service Account’ Azure AD account dedicated solely to the automatic creation of Guest Users in the Resource Tenancy will need to be created first in the ‘Invited Azure AD’ – for this blog, we used an existing Azure AD account sourced using a synchronised local Active Directory. This account did not have any ‘special’ permissions in the ‘Invited Azure AD’ but according to some blogs, it requires at least ‘read’ access to the user store in the ‘Invited Azure AD’ at least (which is default).
This ‘Service Account’ Azure AD account should have a mailbox associated with it, i.e. either an Exchange Online (Office 365) mailbox, or a mail value that has a valid SMTP address for a remote mailbox. This mailbox is needed to approve the creation of a Guest User account in the Resource Tenancy (only needed for this individual Service Account).
It is strongly recommended that this ‘Service Account’ user in the ‘Invited Azure AD’ has a very strong & complex password, and that any credential used for that account within a PowerShell script be encrypted using David Lee’s blog.
The PowerShell scripts listed below to create these Guest Accounts accounts could then be actioned by an identity management system e.g. Microsoft Identity Manager (MIM) or a ‘Runbook’ or workflow system (e.g. SharePoint).
Task 1: Create the ‘Service Account’ Guest User using PowerShell
Step 1: Sign into the Azure AD Resource Tenancy’s web portal: ‘portal.azure.com’, using a Global Admin credential.
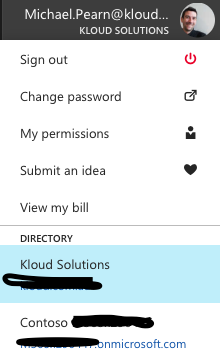
Step 2: When you’re signed in, click on the account profile picture on the top right of the screen and select the correct ‘Resource Tenancy’ (There could be more than one tenant associated with the account you’re using):
Step 3: Once the tenancy is selected, click on the ‘Azure Active Directory’ link on the left pane.
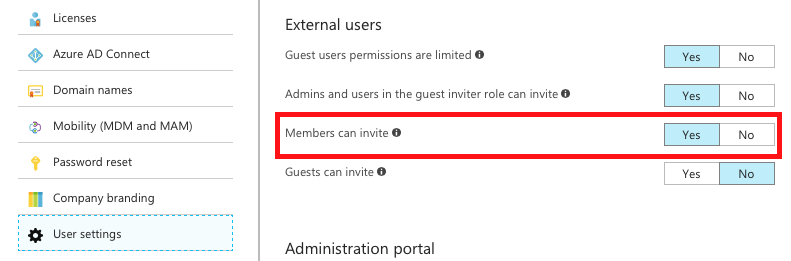
Step 4: Click ‘User Settings’ and verify the setting (which is set by default for new Azure AD tenancies): ‘Members can invite’.
Step 5: Using a new PowerShell session, connect and authenticate to the Azure AD tenancy where the Guest User accounts are required to be created into (i.e. the ‘Resource Azure AD’).
Be sure to specify the correct ‘Tenant ID’ of the ‘Resource Azure AD’ using the PowerShell switch ‘-TenantId‘ followed by the GUID value of your tenancy (to find that Tenant ID, follow the instructions here).
$Creds = Get-Credential
Connect-AzureAD -Credential $creds -TenantId “aaaaa-bbbbb-ccccc-ddddd”
Step 6: The following PowerShell command should be executed under a ‘Global Admin’ to create the ‘Service Account’ e.g. ‘serviceaccount@invitedtenancy.com’.
New-AzureADMSInvitation -InvitedUserDisplayName “Service Account Guest Inviter” -InvitedUserEmailAddress “serviceaccount@invitedtenancy.com” -SendInvitationMessage $true -InviteRedirectUrl “http://myapps.microsoft.com“ -InvitedUserType member
Step 7: The ‘Service Account’ user account will then need to locate the email invitation sent out but his command and click on the link embedded within to authorise the creation of the Guest User object in the ‘Resource Tenancy’.
Task 2: Assign the ‘Service Account’ Guest Inviter Role using Azure Portal
Step 1: Sign into the Azure web portal: ‘portal.azure.com’ with the same ‘Global Admin’ (or lower permission account) credential used in Task 1 (or re-use the same ‘Global Admin’ session from Task 1).
Step 2: Click on the ‘Azure Active Directory’ shortcut on the left pane of the Azure Portal.
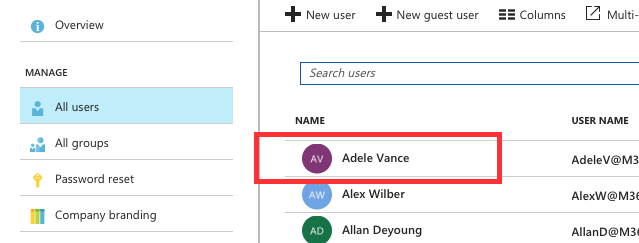
Step 3: Click on the ‘All Users’ tab and select the ‘Service Account’ Guest User.
(I’m using ‘demo.microsoft.com’ pre-canned identities in the screen shot below, any names similar to real persons is purely coincidental – an image for ‘serviceaccount@invitedtenancy’ used as the example in Task 1 could not be reproduced)
Step 4: Once the ‘Service Account’ user is selected, click on the ‘Directory Role’ on the left pane. Click to change their ‘Directory Role’ type to ‘Limited administrator’ and select ‘Guest Inviter’ below that radio button. Click the ‘Save’ button.

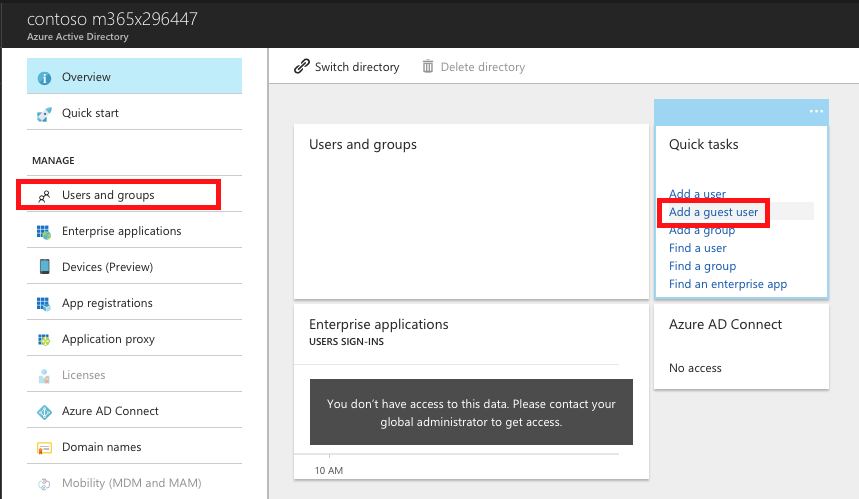
Step 5: The next step is to test to ensure that ‘Service Account’ Guest User account can invite users from the same ‘UPN/Domain suffix’. Click on the ‘Azure Active Directory’ link on the left pane off the main Azure Portal.
Step 6: Click ‘User and groups’ and click ‘Add a guest user’ on the right:
Step 7: On the ‘Invite a guest’ screen, send an email invitation to a user from the same Azure AD as the ‘Service Account’ Guest User. For example, if your ‘Service Account’ Guest user UPN / Domain Suffix is: ‘serviceaccount@remotetenant.com’, then invite a user from the same UPN/domain suffix e.g. ‘jim@remotetenant.com’ (again, only an example – any coincidence to current or future email address is purely coincidental).

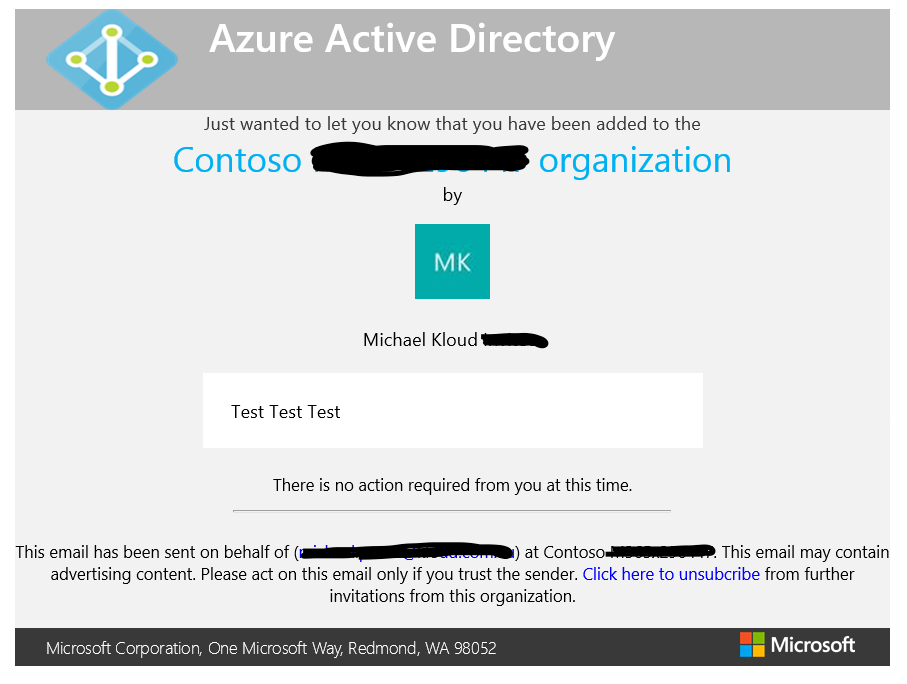
Step 8: When the user receives the invitation email, ensure that the following text appears at the bottom of the email: ‘There is no action required from you at this time’:

Step 9: If that works, then PowerShell can now automate that invitation process bypassing the need for emails to be sent out. Automatic Guest Account creation can now leverage the ‘Service Account’ Guest User.
NOTE: If you try to invite a user from with UPN/Domain suffix that does not match the ‘Service Account’ Guest User, the invitation will still be sent but it will appear requesting the user accept the invitation. The invitation will be in a ‘pending acceptance’ state until that is done, and the Guest User object will not be created until that is completed.
Task 3: Auto. Provision new Guest User accounts using PowerShell
Step 1: Open Windows PowerShell (or re-use an existing PowerShell session that has rights to the ‘Resource Tenancy’).
Step 2: Type the following example PowerShell command to send invitation out, and authenticate when prompted using the ‘Invited Tenancy’ credentials of the ‘Service Account’ Guest User.
In the script, again be sure to specify the ‘TenantID’ for the switch –TenantID of the ‘Resource Tenancy’, not the ‘Invited Tenancy’.
#Connect to Azure AD
$Creds = Get-Credential
Connect-AzureAD -Credential $creds -TenantId “aaaaa-bbbbb-ccccc-ddddd”
$messageInfo = New-Object Microsoft.Open.MSGraph.Model.InvitedUserMessageInfo
$messageInfo.customizedMessageBody = “Hey there! Check this out. I created and approved my own invitation through PowerShell”
New-AzureADMSInvitation -InvitedUserEmailAddress “ted@invitedtenancy.com” -InvitedUserDisplayName “Ted at Invited Tenancy” -InviteRedirectUrl https://myapps.microsoft.com -InvitedUserMessageInfo $messageInfo -SendInvitationMessage $false
Compared to using the Azure portal, this time no email will be sent (the display name and message body will never be seen by the invited user, it’s just required for the command complete). To send a confirmation email to the user, you can change the switch -SendInvitationMessage to: $True.
Step 3: The output of the PowerShell command should have at the end of the text next to ‘Status’ as ‘Accepted’:

This means the Guest User object has automatically been created and approved by the ‘Resource Tenancy’. That Guest User object created will be associated with the actual Azure AD user object from the ‘Invited Tenancy’.
The next steps for this invited Guest User will be then to assign them a Dynamics 365 license and then a Dynamics 365 role in the ‘Resource Tenancy’ (which might be topics of future blogs).
Hope this blog has proven useful.
Thanks for the guide!
I am unable to get to the point of an initial status of “accepted”. Even though my service account is a guest inviter in the resource AAD and the upn-suffix domains of invited accounts are the same, the status remains “pendingacceptance”.
Do you have any troubleshooting tips for me?
Helge, Microsoft changed how things work adding in a new consent behavior for GDPR- this blog explains the new workflow: https://justidm.wordpress.com/2018/06/13/azure-ad-b2b-invitation-redemption-updates/ . The pendingAcceptance state is prior to acceptance of the new consent page.
Thank you!
How will it be to “uninvite” a guest using a script?