In a previous blog, we discussed Site Delivery with AWS CloudFront CDN, one aspect in that blog was not covered and that was WAF (Web Application Firewall).
What is Web Application Firewall?
AWS WAF is a web application firewall that helps protect your web applications from common web exploits that could affect application availability, compromise security, or consume excessive resources. AWS WAF gives you control over which traffic to allow or block to your web applications by defining customizable web security rules. You can use AWS WAF to create custom rules that block common attack patterns, such as SQL injection or cross-site scripting, and rules that are designed for your specific application. New rules can be deployed within minutes, letting you respond quickly to changing traffic patterns. Also, AWS WAF includes a full-featured API that you can use to automate the creation, deployment, and maintenance of web security rules.
When to create your WAF?
Since this blog is related to CloudFront, and the fact that WAF is tightly integrated with CloudFront, our focus will be on that. Your WAF rules will run and be applied in all Edge Locations you specify during your CloudFront configuration.
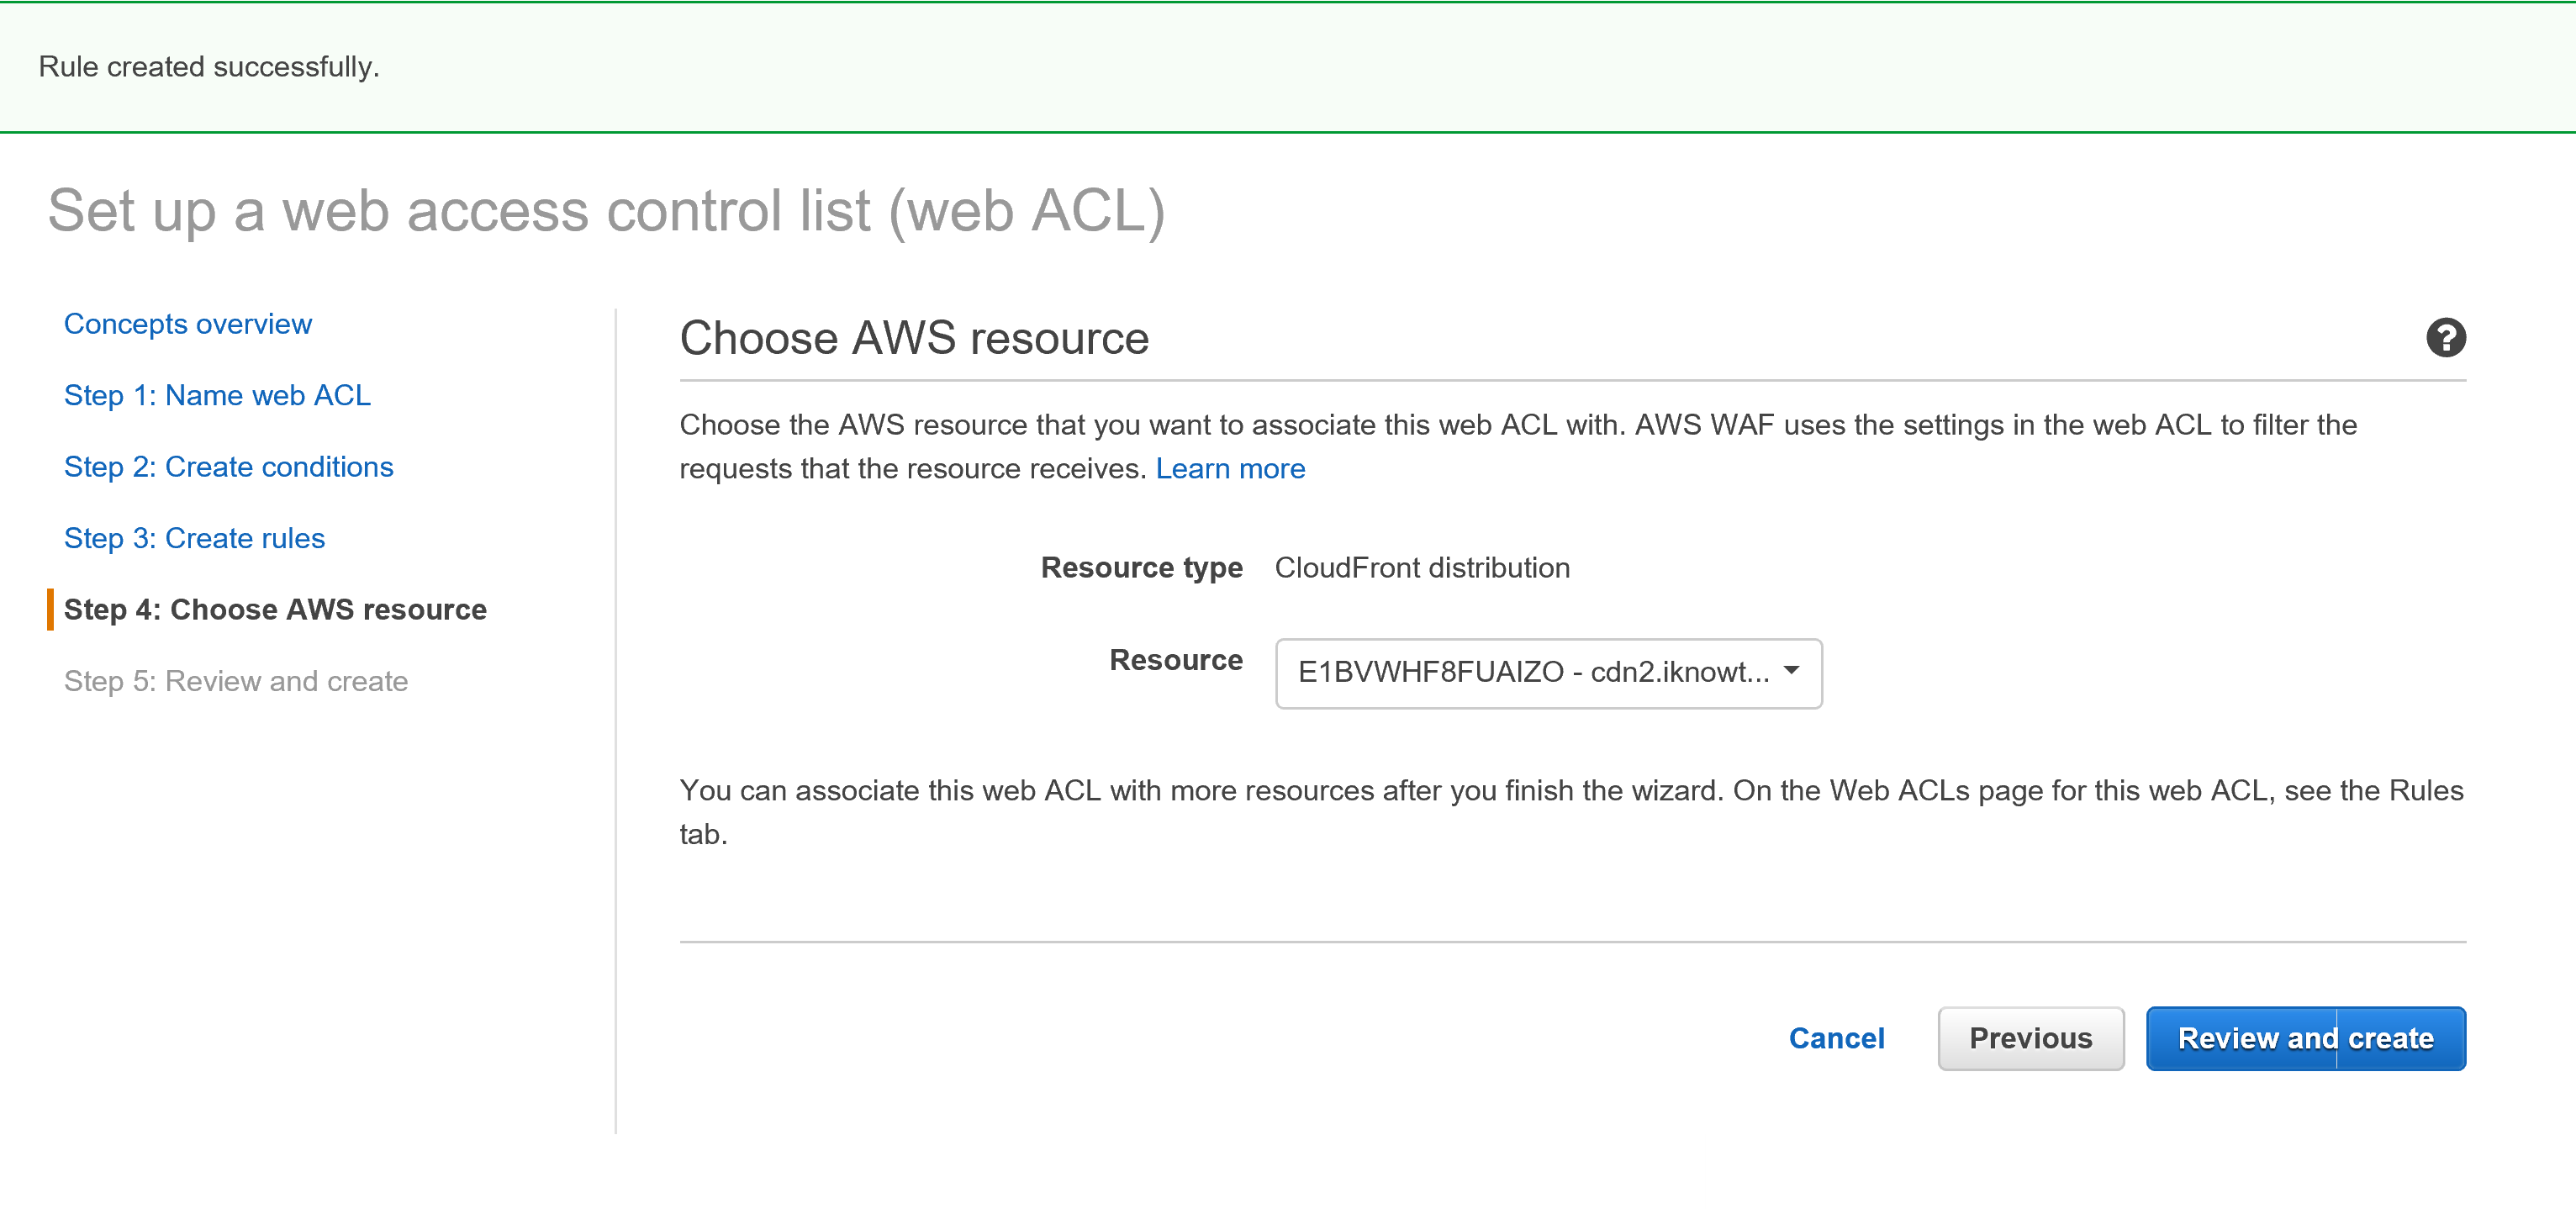
It is recommended that you create your WAF before deploying your CloudFront Distribution, since CloudFront takes a while to be deployed, any changes applied after its deployment will take equal time to be updated. Even after you attach the WAF to the CloudFront Distribution (this is done in “Choose Resource” during WAF configuration – shown below).
Although there is no general rule here, it is up to the organisation or administrator to apply WAF rules before or after the deployment of CloudFront distribution.
Main WAF Features
In terms of security, WAF protects your applications from the following attacks:
- SQL Injection
- DDoS attacks
- Cross Site Scripting
In terms of visibility, WAF gives you the ability to monitor requests and attacks through CloudWatch integration (excluded from this blog). It gives you raw data on location, IP Addresses and so on.
How to setup WAF?
Setting up WAF can be done in few ways, you could either use CloudFormation template, or configure the setting on the WAF page.
Since each organisation is different, and requirements change based on applications, and websites, the configuration present on this blog are considered general practice and recommendation. However, you will still need to tailor the WAF rules according to your own needs.
WAF Conditions
For the rules to function, you need to setup filter conditions for your application or website ACL.
I already have WAF setup in my AWS Account, and here’s a sample on how conditions will look.
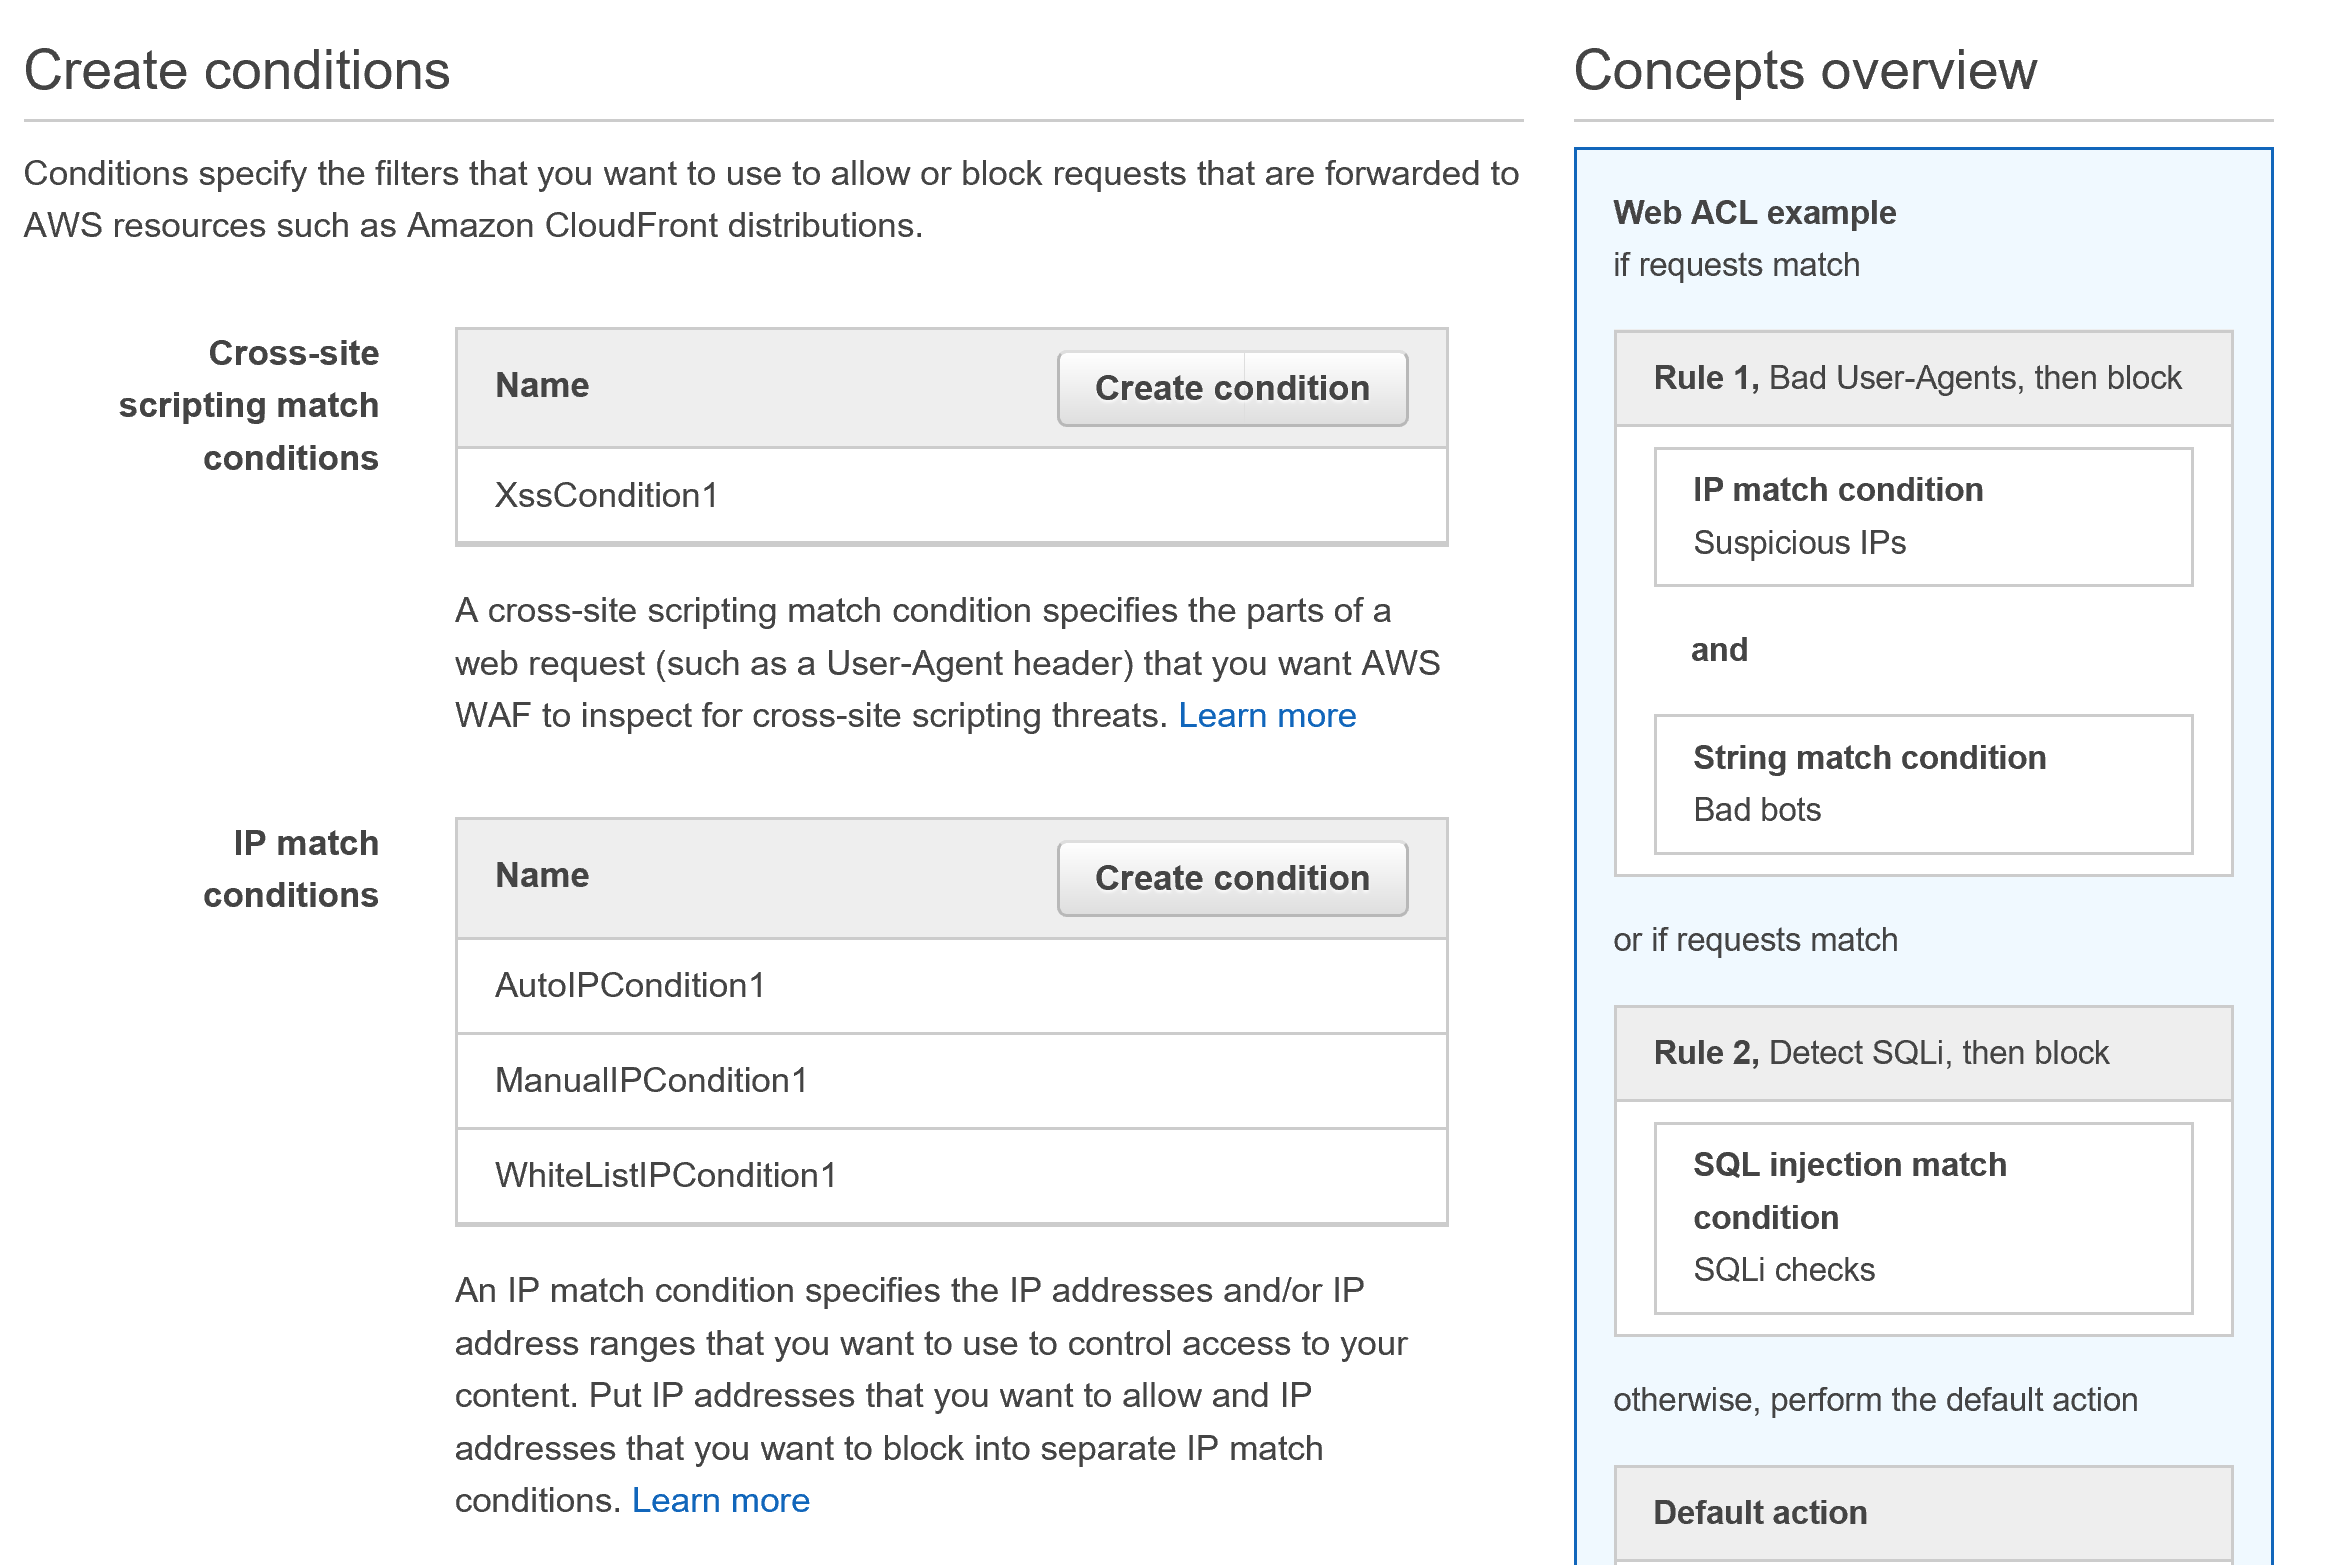
If you have no Conditions already setup, you will see something like “There is no IP Match conditions, please create one”.
To Create a condition, have a look at the following images:
In here, we’re creating a filter that an HTTP method contains a threat after HTML decoding.
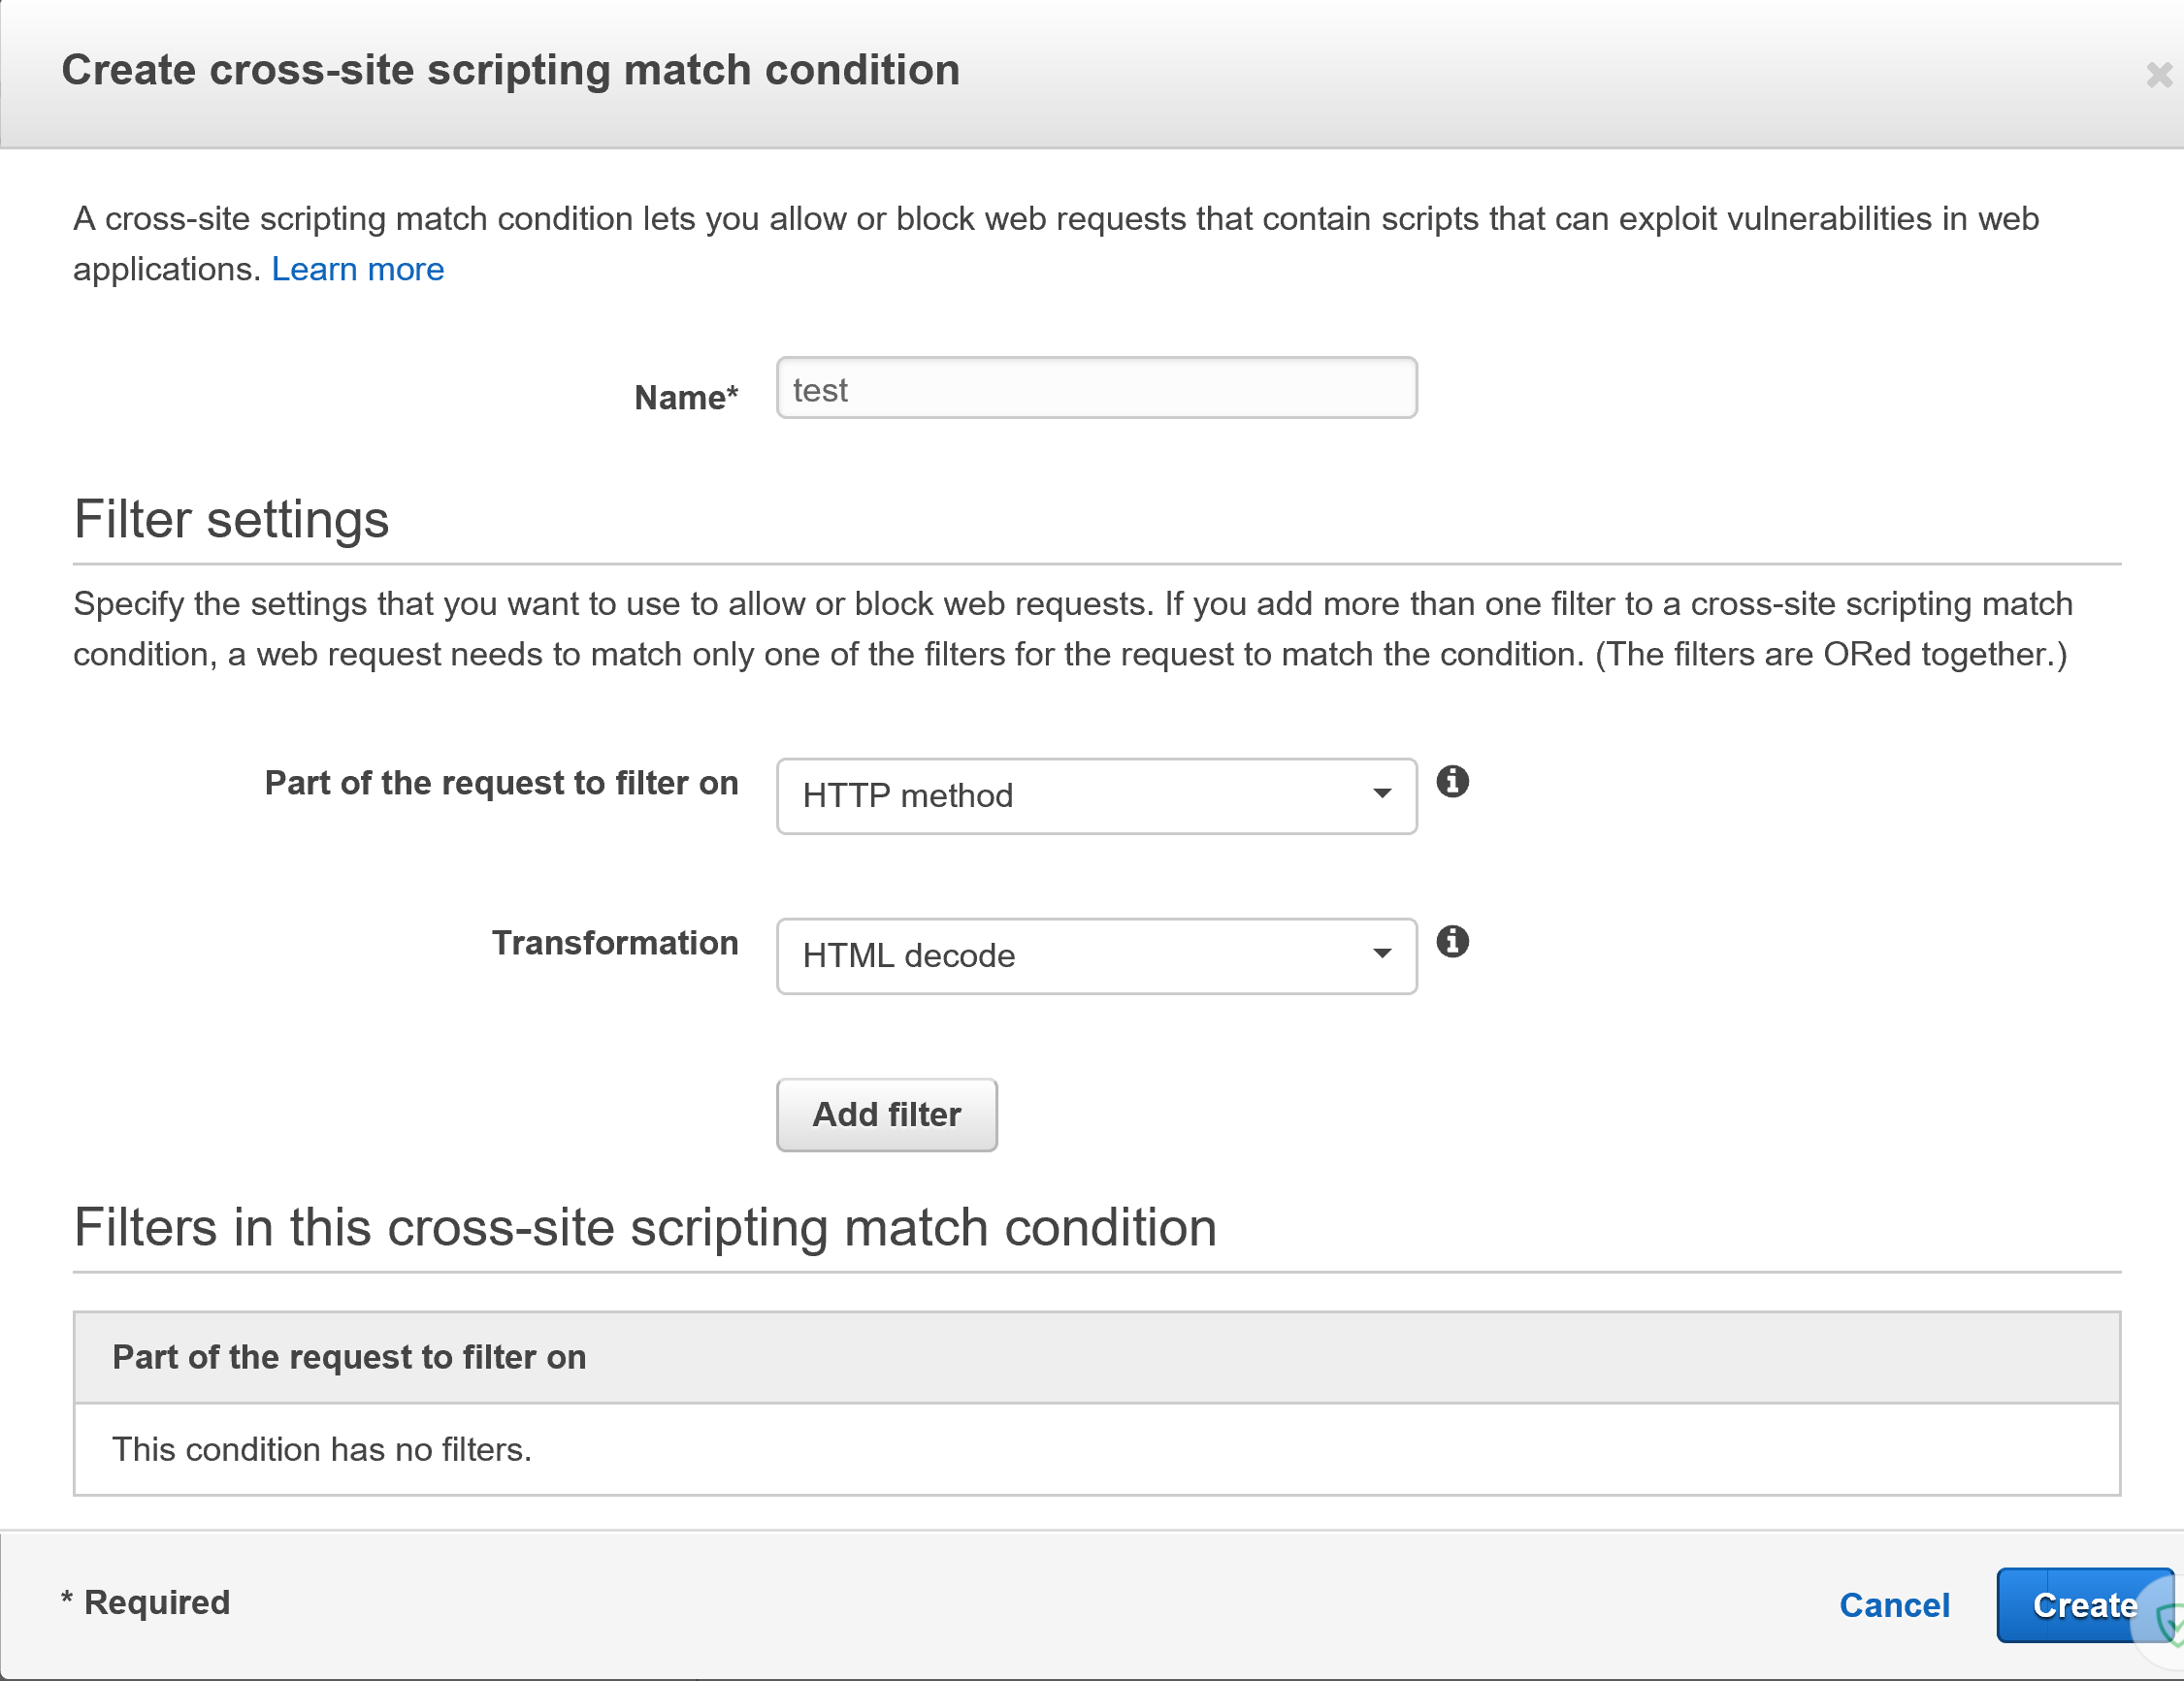
Once you’ve selected your filters, click on “Add Filter”. The filter will be added to the list of filters, and once you’re done adding all your filters, create your condition.
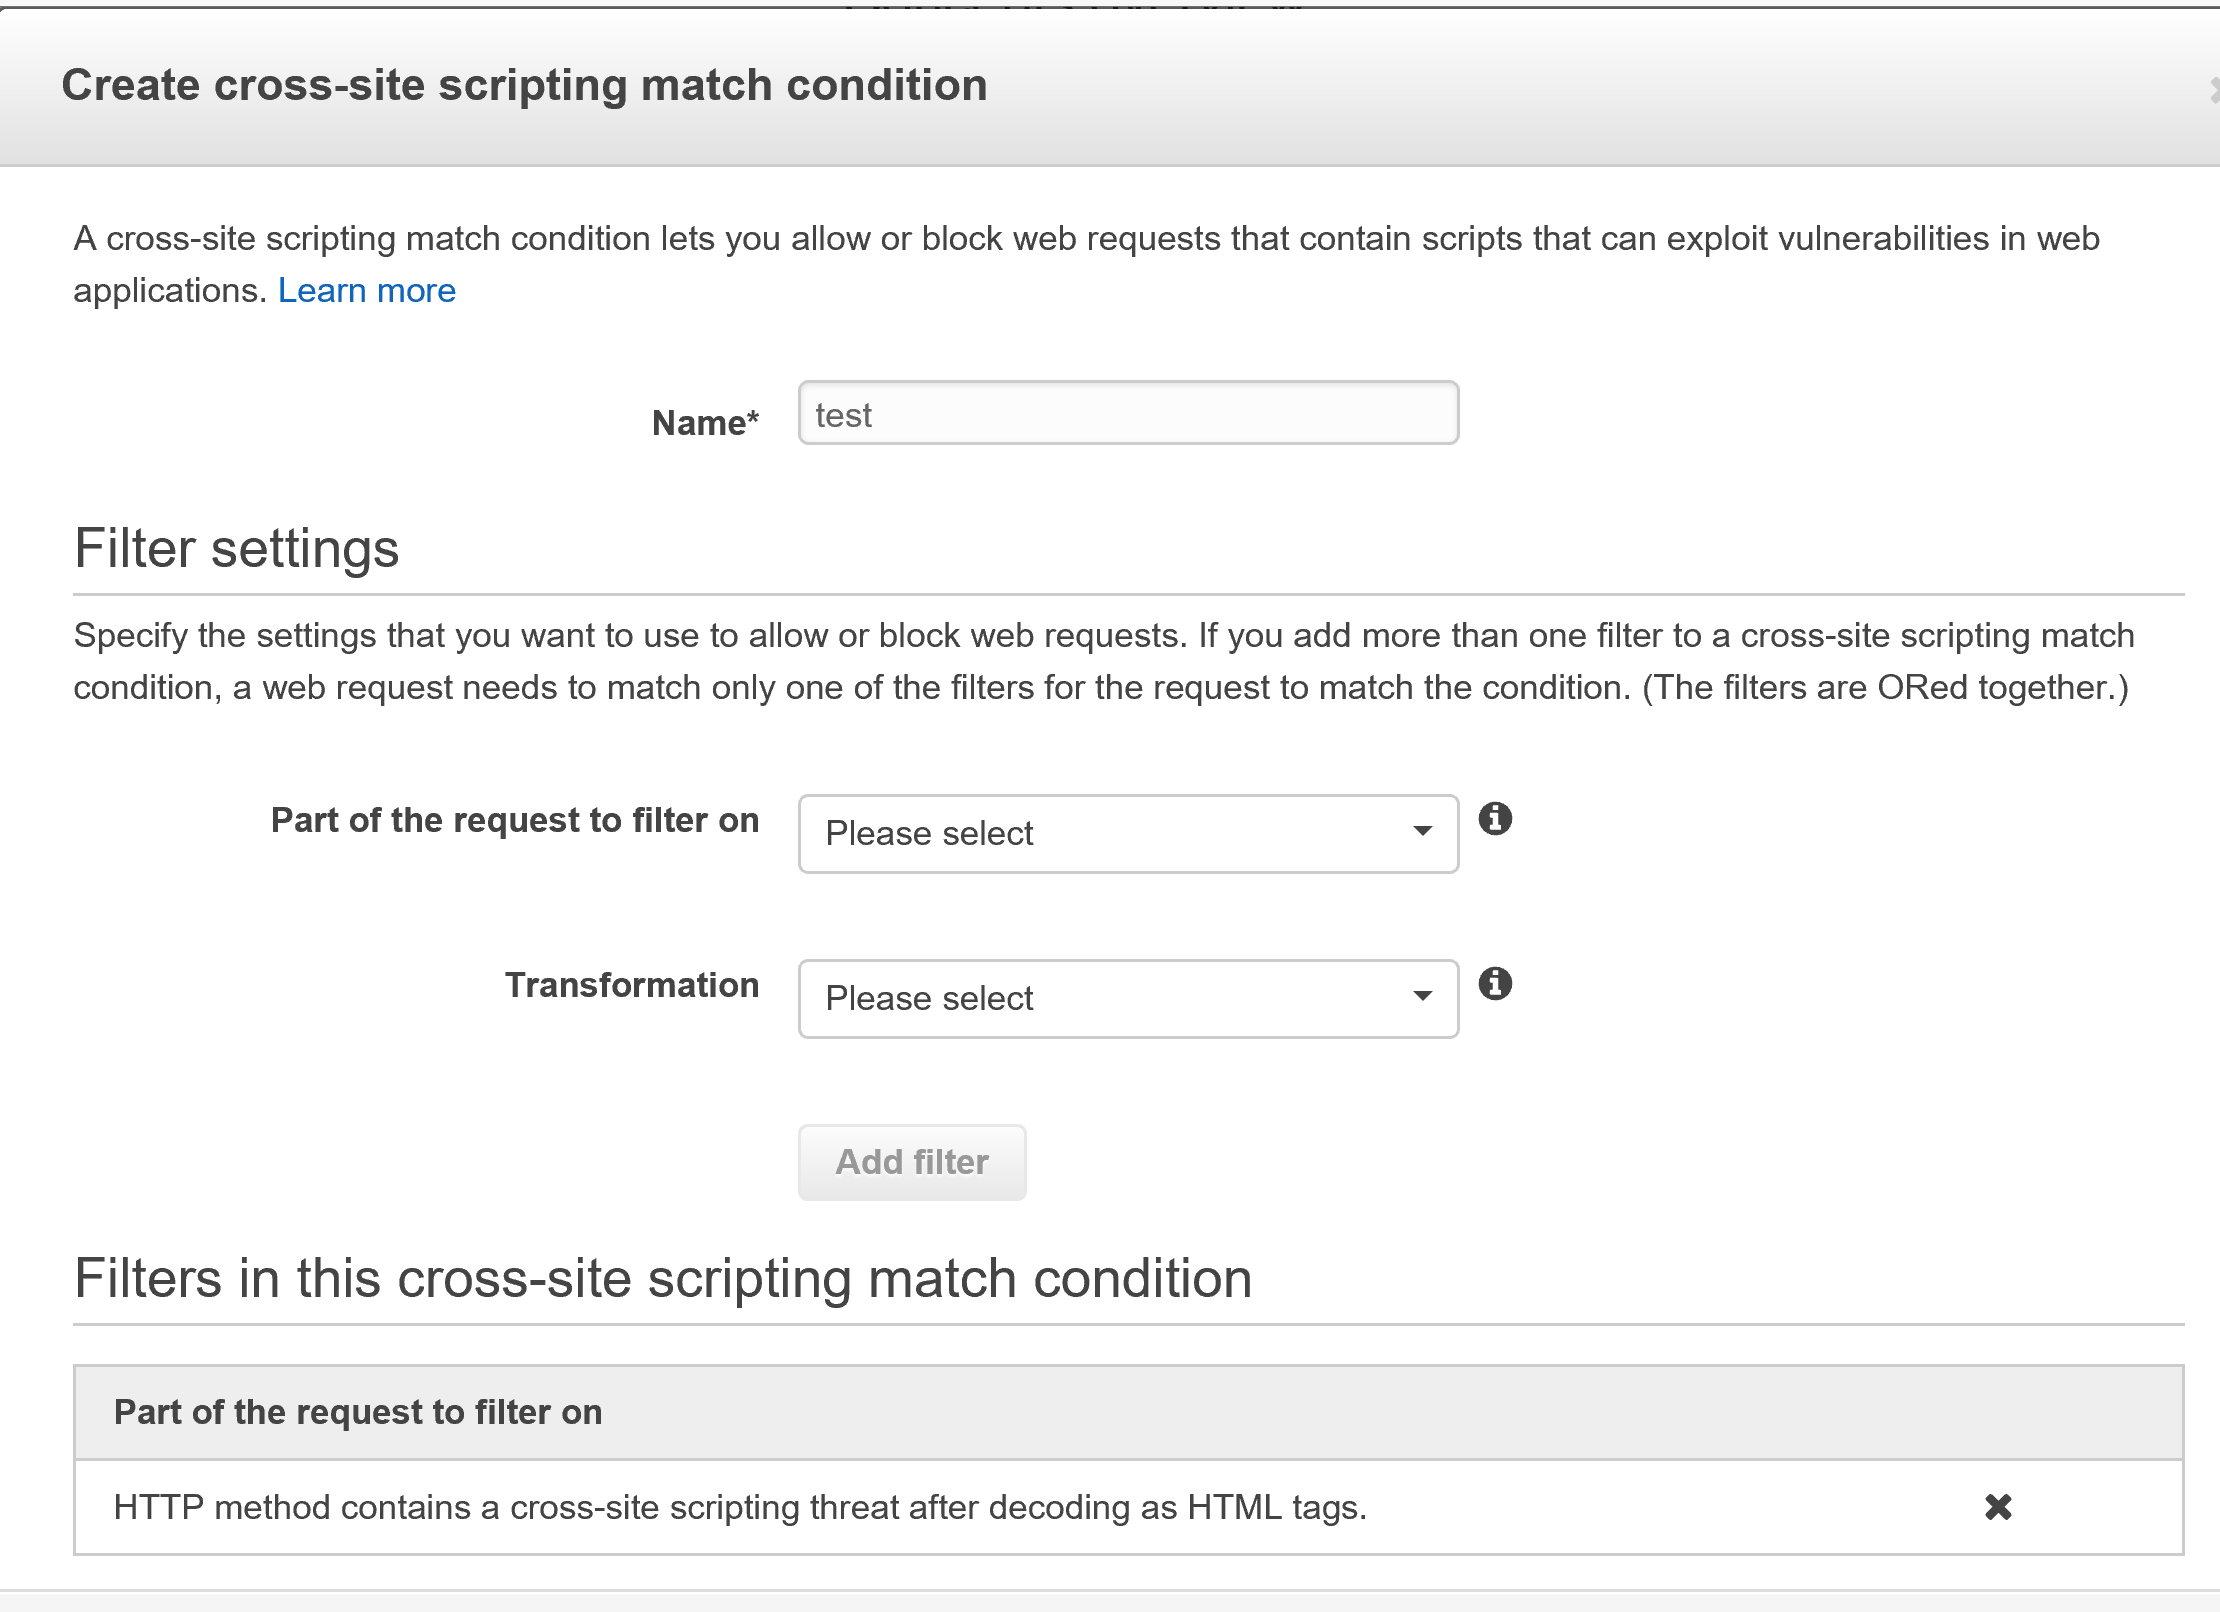
You need to follow the same procedure to create your conditions for SQL Injection for example.
WAF Rules
When you are done with configuring conditions, you can create a rule and attach it to your web ACL. You can attach multiple rules to an ACL.
Creating a rule – Here’s where you specify the conditions you have created in a previous step.
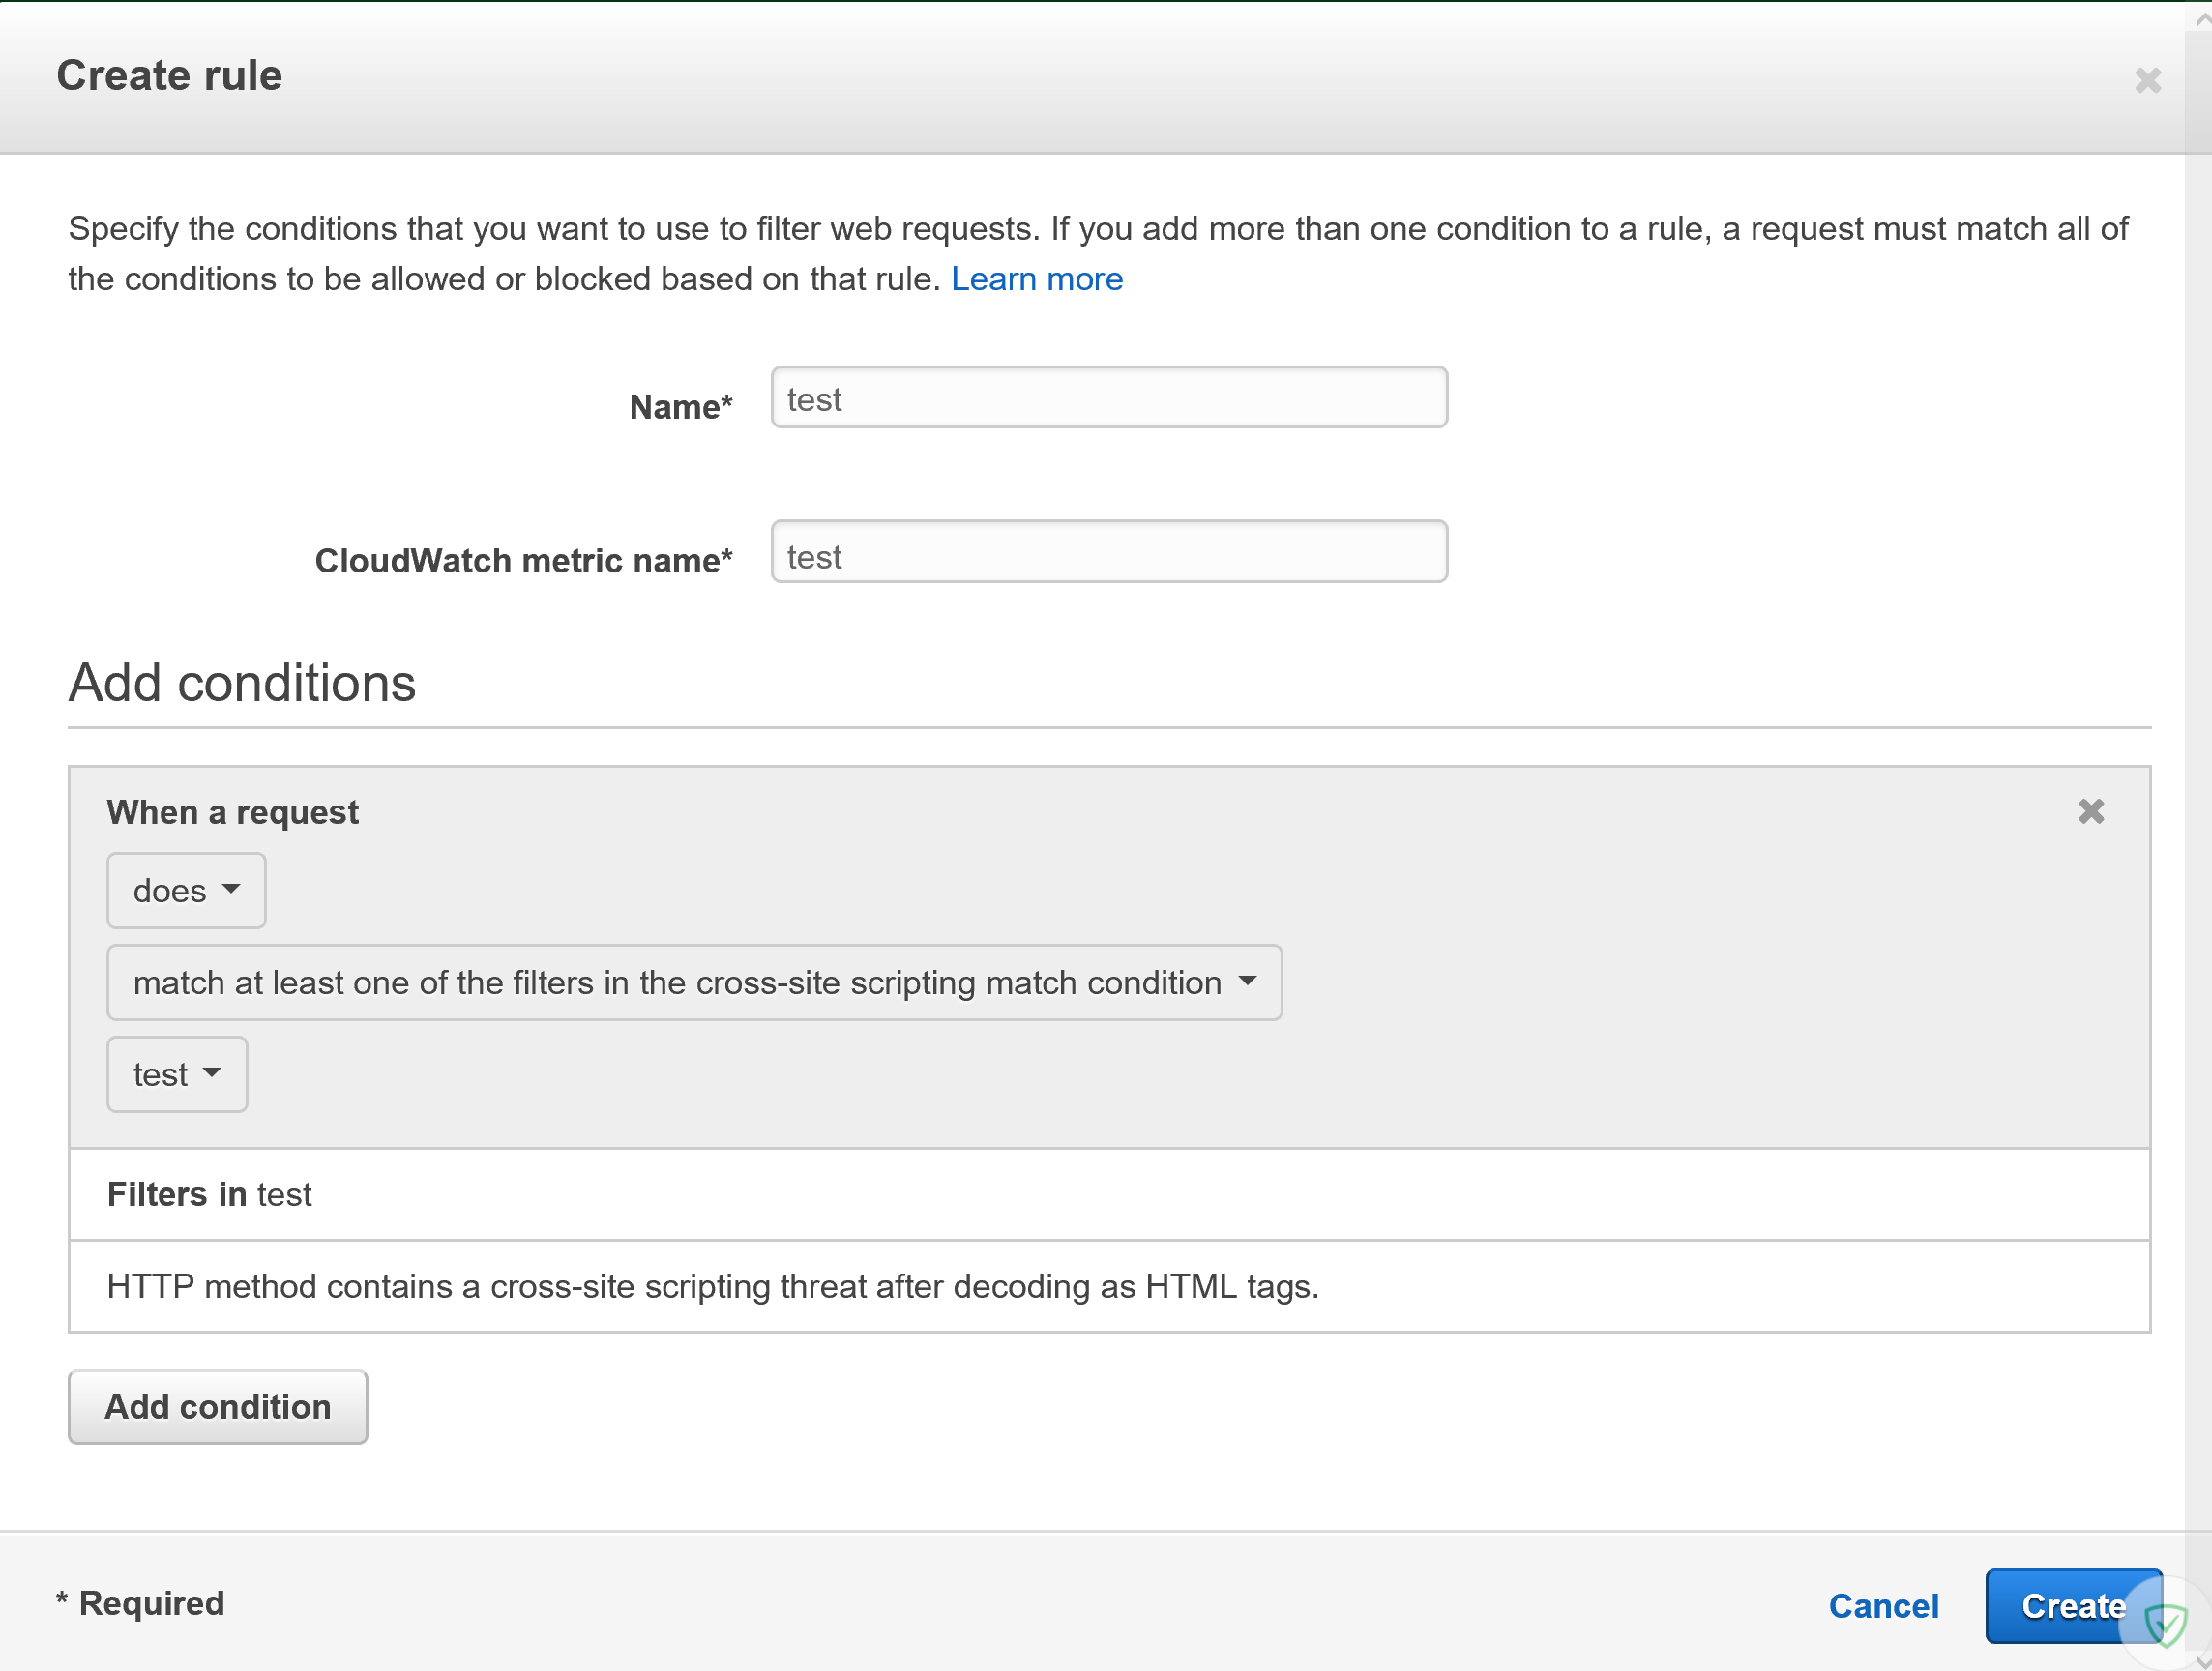
From the list of rules, select the rule you have created from the drop down menu, and attach it to the ACL.
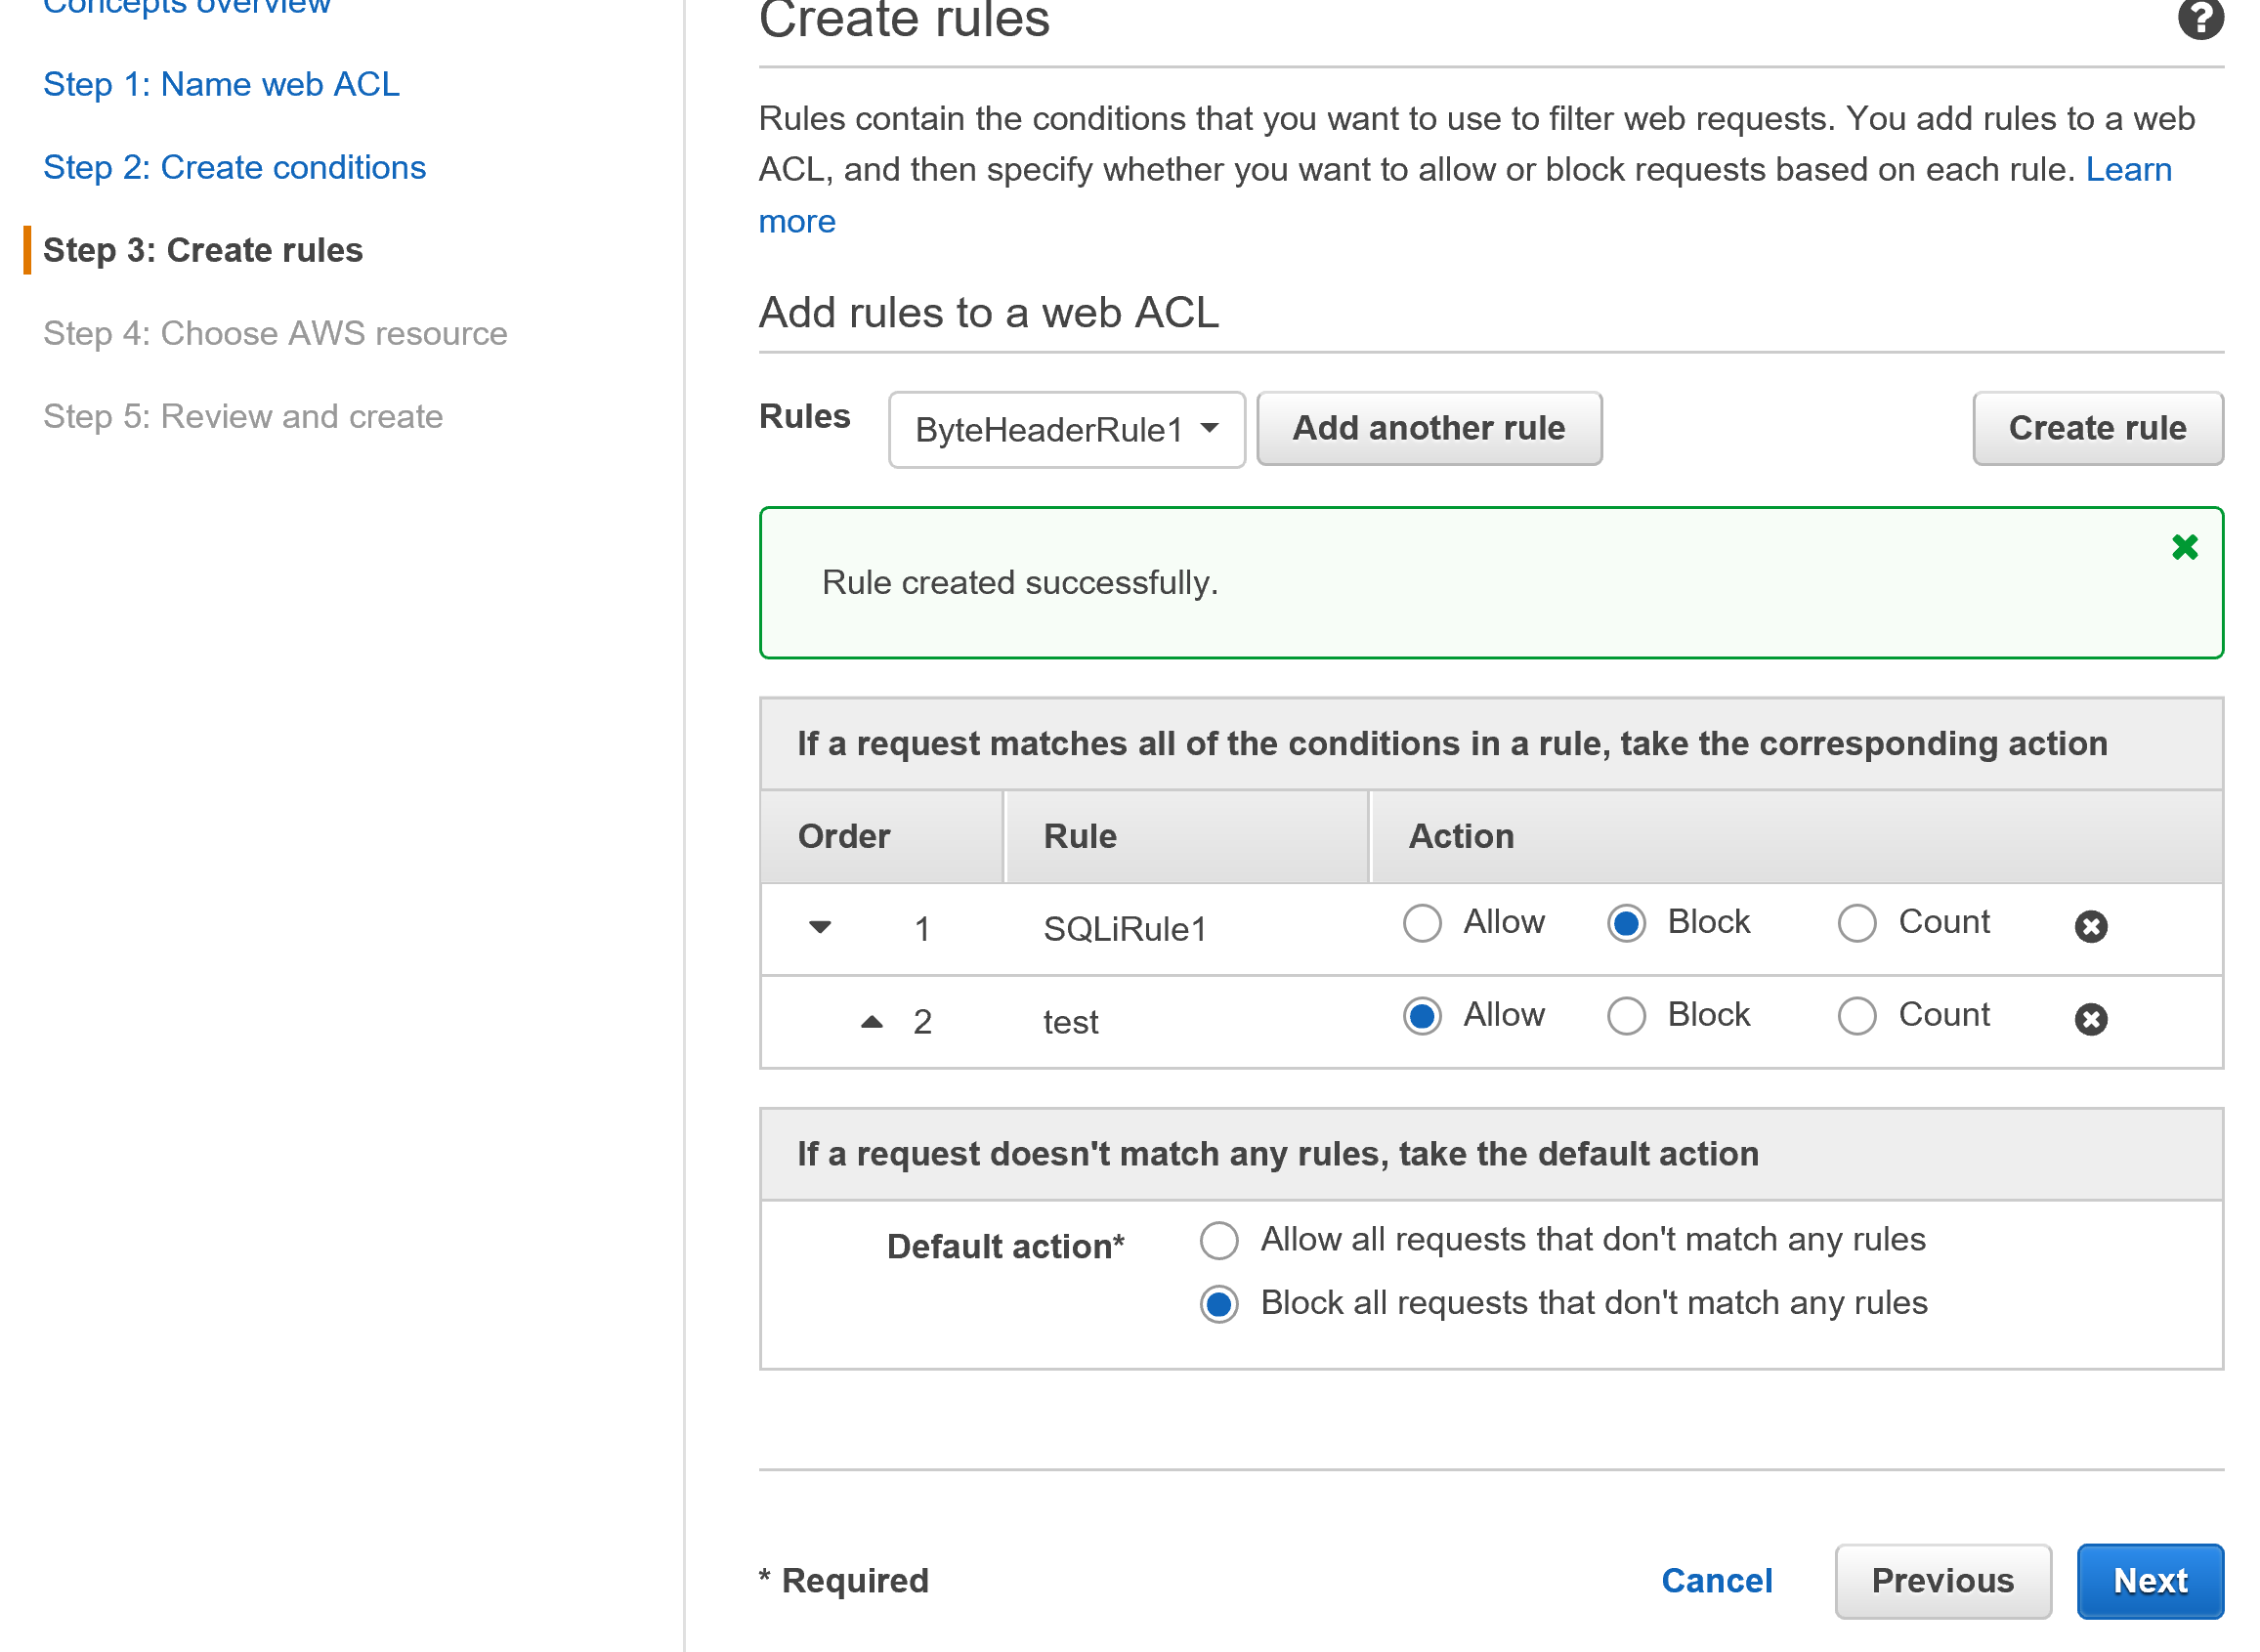
In the next steps you will have the option to choose your AWS Resource, in this case one of my CloudFront Distributions. Review and create your Web ACL.
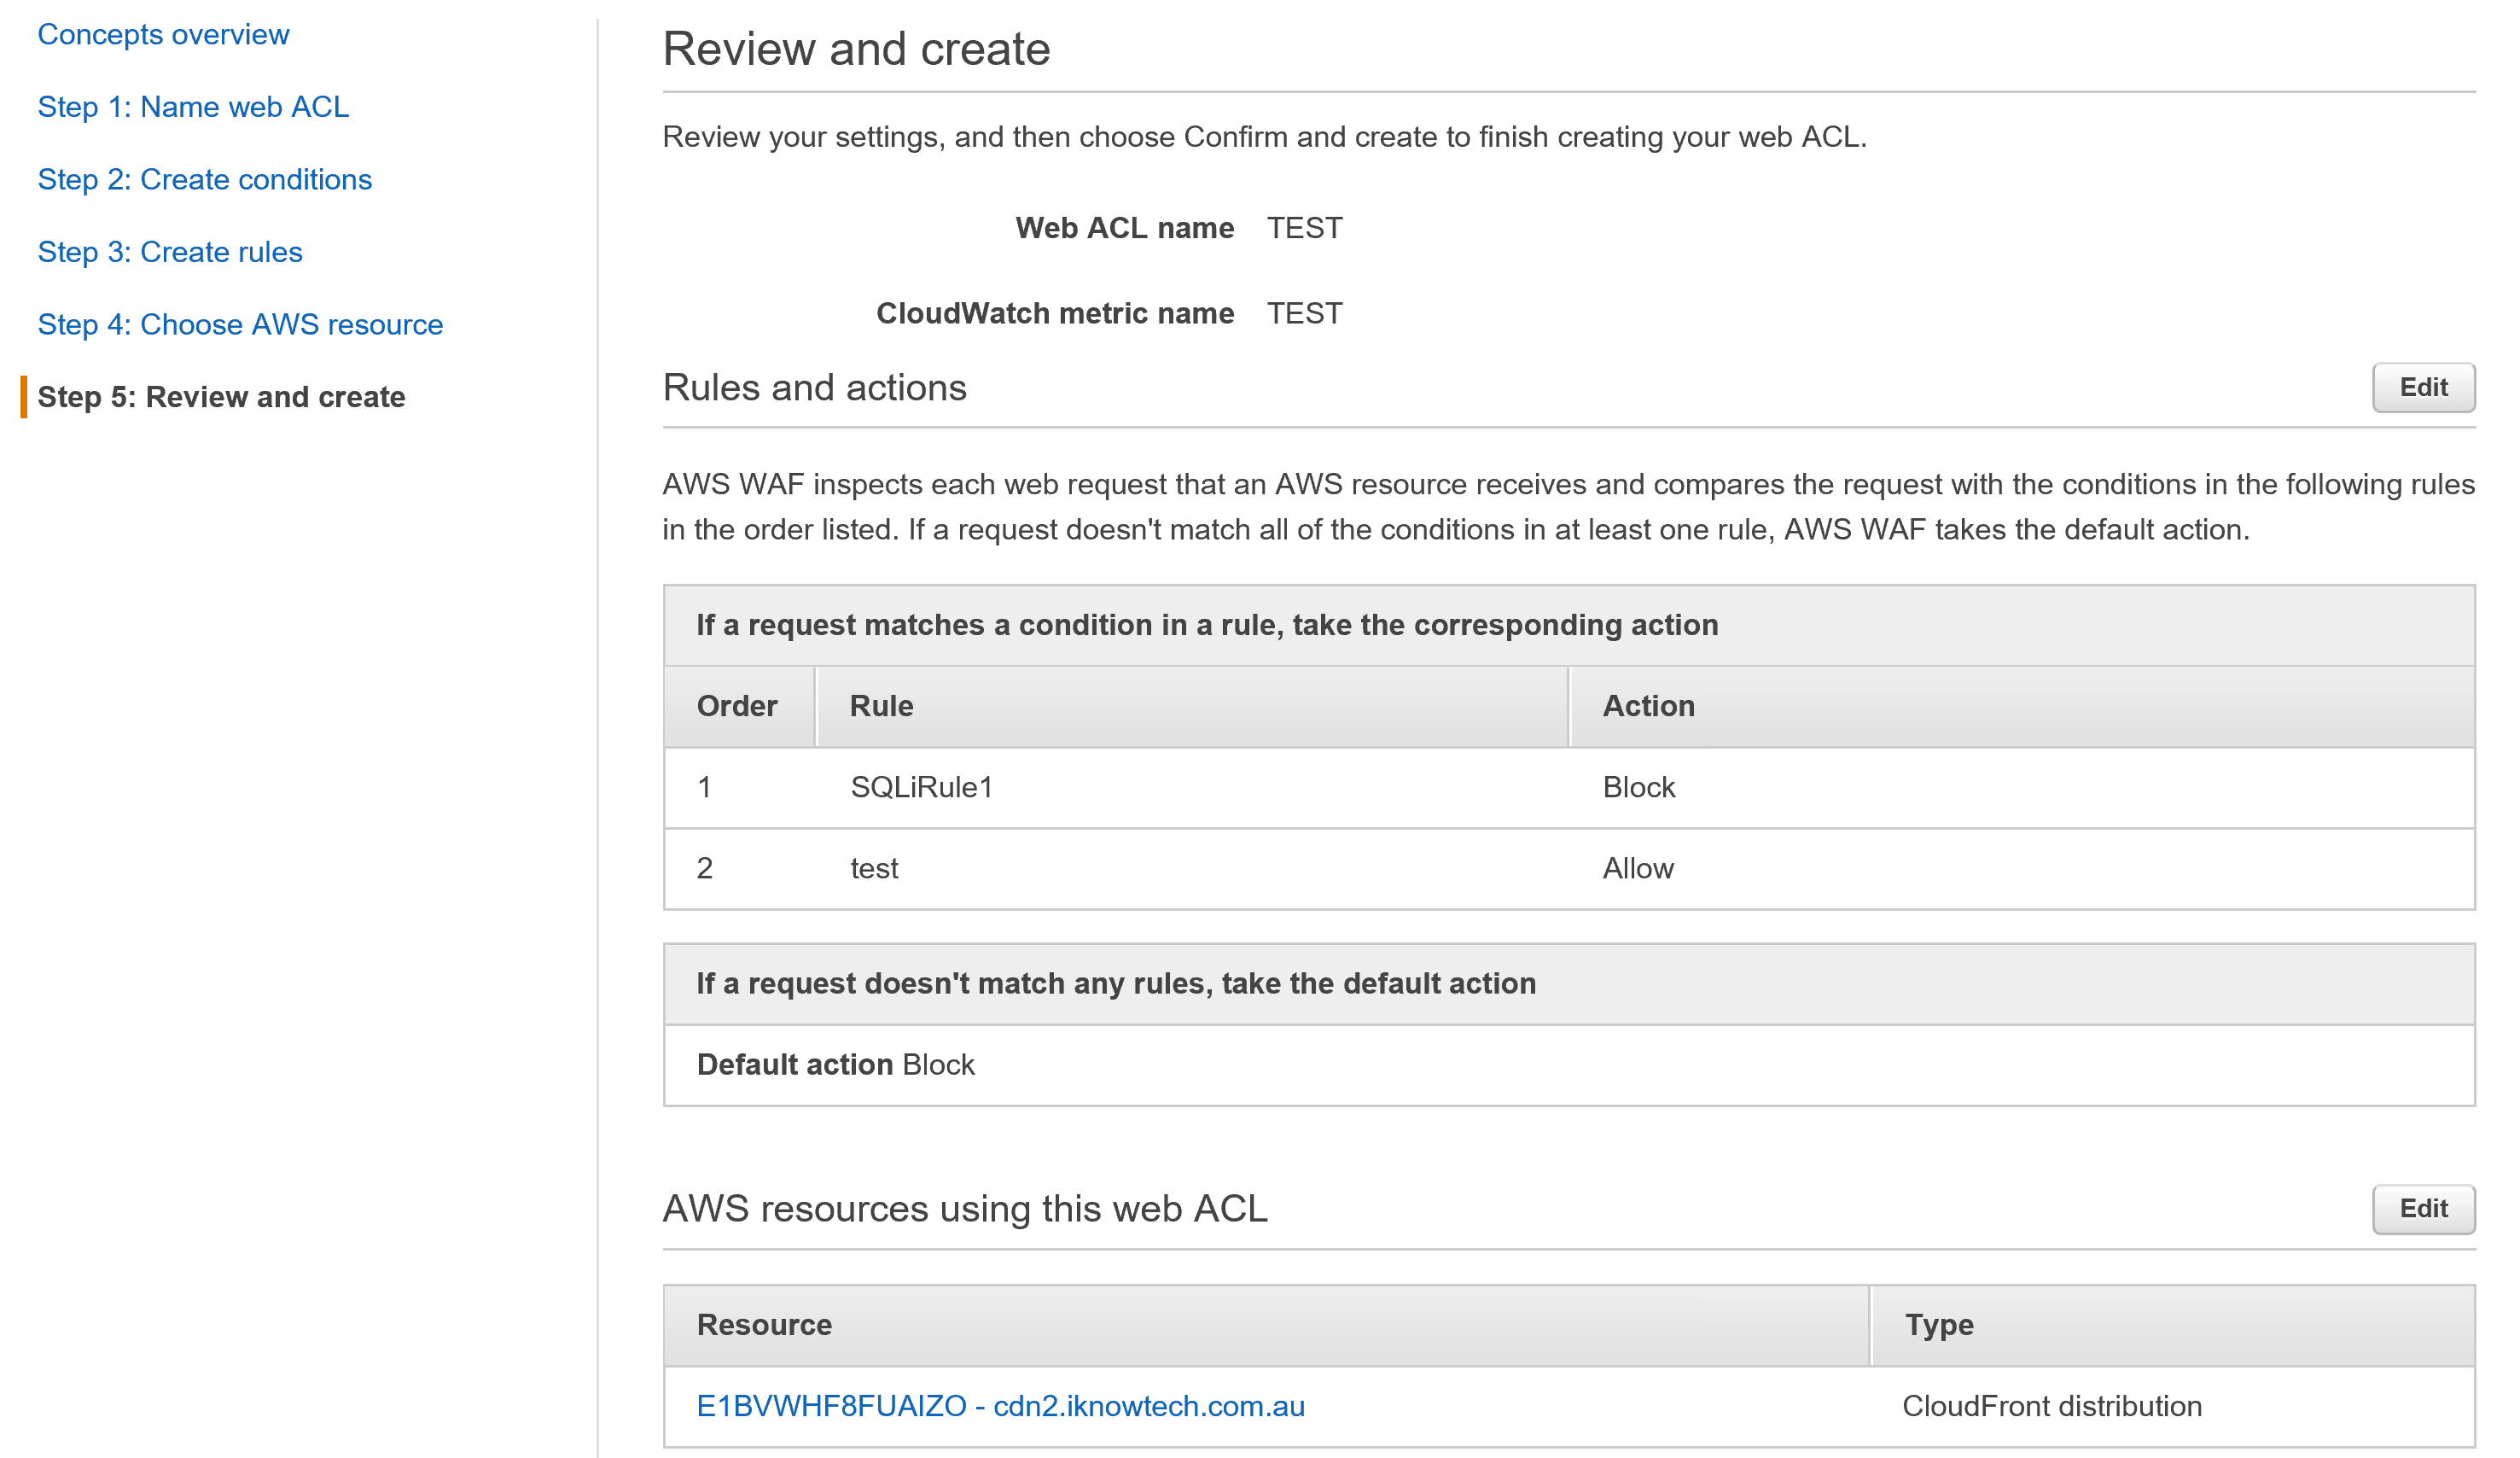
Once you click on create, go to your CloudFront distribution and check its status, it should show “In progress”.
WAF Sample
Since there isn’t a one way for creating a WAF rule, and if you’re not sure where to begin, AWS gives you a good way to start with a CloudFormation template that will create WAF sample rules for you.
This sample WAF rule will include the following found here:
- A manual IP rule that contains an empty IP match set that must be updated manually with IP addresses to be blocked.
- An auto IP rule that contains an empty IP match condition for optionally implementing an automated AWS Lambda function, such as is shown in How to Import IP Address Reputation Lists to Automatically Update AWS WAF IP Blacklists and How to Use AWS WAF to Block IP Addresses That Generate Bad Requests.
- A SQL injection rule and condition to match SQL injection-like patterns in URI, query string, and body.
- A cross-site scripting rule and condition to match Xss-like patterns in URI and query string.
- A size-constraint rule and condition to match requests with URI or query string >= 8192 bytes which may assist in mitigating against buffer overflow type attacks.
- ByteHeader rules and conditions (split into two sets) to match user agents that include spiders for non–English-speaking countries that are commonly blocked in a robots.txt file, such as sogou, baidu, and etaospider, and tools that you might choose to monitor use of, such as wget and cURL. Note that the WordPress user agent is included because it is used commonly by compromised systems in reflective attacks against non–WordPress sites.
- ByteUri rules and conditions (split into two sets) to match request strings containing install, update.php, wp-config.php, and internal functions including $password, $user_id, and $session.
- A whitelist IP condition (empty) is included and added as an exception to the ByteURIRule2 rule as an example of how to block unwanted user agents, unless they match a list of known good IP addresses
Follow this link to create a stack in the Sydney region.
I recommend that you review the filters, conditions, and rules created with this Web ACL sample. If anything, you could easily update and edit the conditions as you desire according to your applications and websites.
Conclusion
In conclusion, there are certain aspects of WAF that need to be considered, like choosing an appropriate WAF solution and managing its availability, and you have to be sure that your WAF solution can keep up with your applications.
The best feature of WAF, and since it is integrated with CloudFront it can be used to protect websites even if they’re not hosted in AWS.
I hope you found this blog informative. Please feel free to add your comments below.
Thanks for reading.
