This blog post is the first in a series that cover Azure Active Directory Single Sign On (SSO) Authentication in native mobile applications.
- Authenticating iOS app users with Azure Active Directory (this post)
- How to Best handle AAD access tokens in native mobile apps
- Using Azure SSO access token for multiple AAD resources from native mobile apps
- Sharing Azure SSO access token across multiple native mobile apps.
Brief Start
Two weeks ago the Azure AD (AAD) team released the Active Directory Authentication Library (ADAL) to enable developers to implement SSO functionality leveraging AAD. This was great news for me as I have few clients who are keen on having this feature in their apps and in this blog post I will share my experience in implementing Azure AD SSO in Xamarin.iOS apps.
Mobile Service vs AAD Authentication
First things first, if you are using Azure Mobile Services, then authentication could be handled for you by Azure Mobile Services itself. All you need to do is to pass a reference of your RootViewController to the library and call LoginAsync() as follows:
[code language=”csharp” gutter=”false”]
// Initialize the Mobile Service client with your URL and key
client = new MobileServiceClient (applicationURL, applicationKey, this);
user = client.LoginAsync (_controller, MobileServiceAuthenticationProvider.WindowsAzureActiveDirectory);
[/code]
This will return a User object that you can use for future calls. This is slightly different from what we are going to talk about in this blog post. For further details on handling Azure Mobile Services authentication, you can check out this tutorial from the MSDN library.
Azure Active Directory Authentication
This blog post is to show you how you could authenticate users against Azure AD which can be useful in many cases. You may have a mobile app and only want users in Active Directory (on-prem or Azure) to use this app or you might have an API or a website and you share some functionality with your mobile users using a native mobile app. In both cases, you could use ADAL to enable Azure AD to handle the user authentication for you. This is quite handy for the following reasons:
- Less code development and maintenance for you as Azure handles it by itself
- Guaranteed functionality and less bugs as it is a well structured/tested library from a trusted source (Azure team)
- No need to further update your APIs when Azure API/SDKs are changed
- Extra features like token caching and token refresh operations.
Lack of Documentation
I have had few issues with the documentation on Azure when trying to implement SSO on Xamarin.iOS – the Azure documentation refers to classes and methods that do not exist in the ADAL. As another example, this tutorial seems to be taken from the native iOS implementation of Azure SSO without any update to match the release of ADAL. Anyway, enough complaining, for this reason we have this blog post. 🙂
Implementation
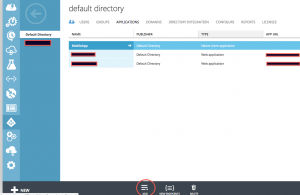
To implement SSO, I will assume that I have a native app, and I want to authenticate users against my AAD before they can use this app. For that, I would need to first register my native app in Azure AD so it shows as below.
- Click Add at the bottom of the screen to open the Add Application dialog
- Provide a name for your application registration so you can find it later. Click Next
- Provide a unique Redirect URI for your Application. Click the Finish (tick) button. Note that this must be a valid URI and is how Azure AD will identify your application during authentication requests.
Once we have created our application, let’s get the following details:
Authority
This represents the authority of your AAD, and it follows the format of https://login.windows.net/your-tenant-name.
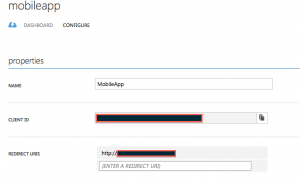
ClientId
This is the unique client identifier of the native mobile app that we just created. See the screenshot below.
Redirect Uri
This is the unique redirect Id of the app that we just created as shown in the screenshot above.
Resource Id
This represents the resource URI of the app that we are trying to access. So if we are trying to access some functionality of a web API that is also registered with AAD, then this web app Id in Azure AD.
Once we have all the info above all we need to do is to write few lines of code. First we should install the ADAL Nuget Package in our solution. At the time of writing, the Nuget package version is 3.0.1102… and is in pre-release which means you need to allow pre-release packages in your Nuget settings.
Time to write some code. The small snippet below shows how to authenticate the user and get a token.
For the sake of this blog post, we only need to authenticate the user to azure. We will get the token and save it for future use, I have another post that talks about using this token. You can find it here.
[code language=”csharp” gutter=”false”]
const string authority = "https://login.windows.net/your-tenant-name";
const string resourceId = "your-resource-id";
const string clientId = "your-native-app-client-id-on-AAD";
const string redirectUrl = "your-awsome-app-redirect-url-as-on-AAD";
QSTodoService ()
{
// this line if very important as it enables the ADAL library to do all
// IoC injection and other magic based on the platform that you are in.
AdalInitializer.Initialize ();
}
public async Task AsyncInit(UIViewController controller, MySimpleStorage storage)
{
_storage = storage;
_controller = controller;
_authContext = new AuthenticationContext (authority);
}
public async Task<string> RefreshTokens()
{
var refreshToken = _storage.Get<string> (Constants.CacheKeys.RefreshToken);
AuthenticationResult authResult = null;
var result = "Acquired a new Token";
if (string.IsNullOrEmpty (refreshToken))
{
authResult = await _authContext.AcquireTokenAsync (
resourceId, clientId, new Uri (redirectUrl), new AuthorizationParameters (_controller), UserIdentifier.AnyUser, null);
} else {
authResult = await _authContext.AcquireTokenByRefreshTokenAsync (refreshToken, clientId);
result = "Refreshed an existing Token";
}
if (authResult.UserInfo != null)
_storage.Save<string> (Constants.CacheKeys.Email, authResult.UserInfo.DisplayableId);
_storage.Save<string> (Constants.CacheKeys.Token, authResult.AccessToken);
_storage.Save<string> (Constants.CacheKeys.RefreshToken, authResult.RefreshToken);
return result;
}
[/code]
As you can see, it is very simple. You could keep a reference to your AuthenticationContext in your app. In fact, it is recommended that you do so, for later use as the aggressive GC on Monotouch might dispose of it quickly.
Note that I am storing the token and the refresh token as I mentioned above, but you do not need to do that if you only using the library to authenticate once. In the next blog post, I will show how you could manage these tokens for further interaction with another app that is also using AAD for authentication.
I hope you found this series of posts useful, and as usual, if there is something not clear or you need some help with similar projects that you are undertaking, then get in touch, and we will do our best to help. I have pushed the sample code from this posts series to GitHub, and can be found here
This blog post is the first in a series that cover Azure Active Directory Single Sign On (SSO) Authentication in native mobile applications.
- Authenticating iOS app users with Azure Active Directory (this post)
- How to Best handle AAD access tokens in native mobile apps
- Using Azure SSO access token for multiple AAD resources from native mobile apps
- Sharing Azure SSO access token across multiple native mobile apps.


Spot on with this write-up, I honestly feel this web site needs much
more attention. I’ll probably be back again to read through more,
thanks for the information!
Thanks