tl;dr
- Originally posted on Lucian’s Blog at Lucian.Blog – Office 365 URLs and IP address updates for firewall and proxy configuration, using Flow and Azure Automation
- Brief overview of Office 365 URLs and IP address information
- Changes coming to process on getting the information
- How to access the new information programmatically
- Using Azure Automation and Flow to streamline the process
- Sample Powershell script and Flow
- #WorkSmarterNotHarder
To use Microsoft Office 365, an organisation must allow traffic to [and sometimes from] the respective cloud services via the internet on specific ports and protocols to various URLs and/or IP addresses, or if you meet the requirements via Azure ExpressRoute. Oh duh?!
To further expand on that, connections to trusted networks (which we assume Office 365 falls into this category) that are also high in volume (since most communication and collaborative infrastructure resides there) should be via a low latency egress that is as close to the end user as possible.
As more and more customers use the service, as more and more services and functionality is added, so to will the URLs and IP addresses need to change over time. Firewalls and proxies need to be kept up to date with the destination details of Office 365 services. This is an evergreen solution, lets not forget. So, it’s important to put the processes in-place to correctly optimise connectivity to Office 365. It’s also very important to note that these processes, around change management, if left ignored, will result in services being blocked or delivering inconsistent experiences for end users.
Change is afoot
Come October 2nd 2018, Microsoft will change the way customers can keep up to date with these changes to these URLs and IP addresses. A new web service is coming online that publishes Office 365 endpoints, making it easier for you to evaluate, configure, and stay up to date with changes.
Updated publishing for web pages showing Office 365 IP Addresses and URLs https://t.co/MCWsVfYN2f
— Paul Andrew (@pndrw) August 21, 2018
Furthermore, the holistic overview of these URLs and IP addresses is being broken down into three new key categories: OPTIMISE, ALLOW and DEFAULT.
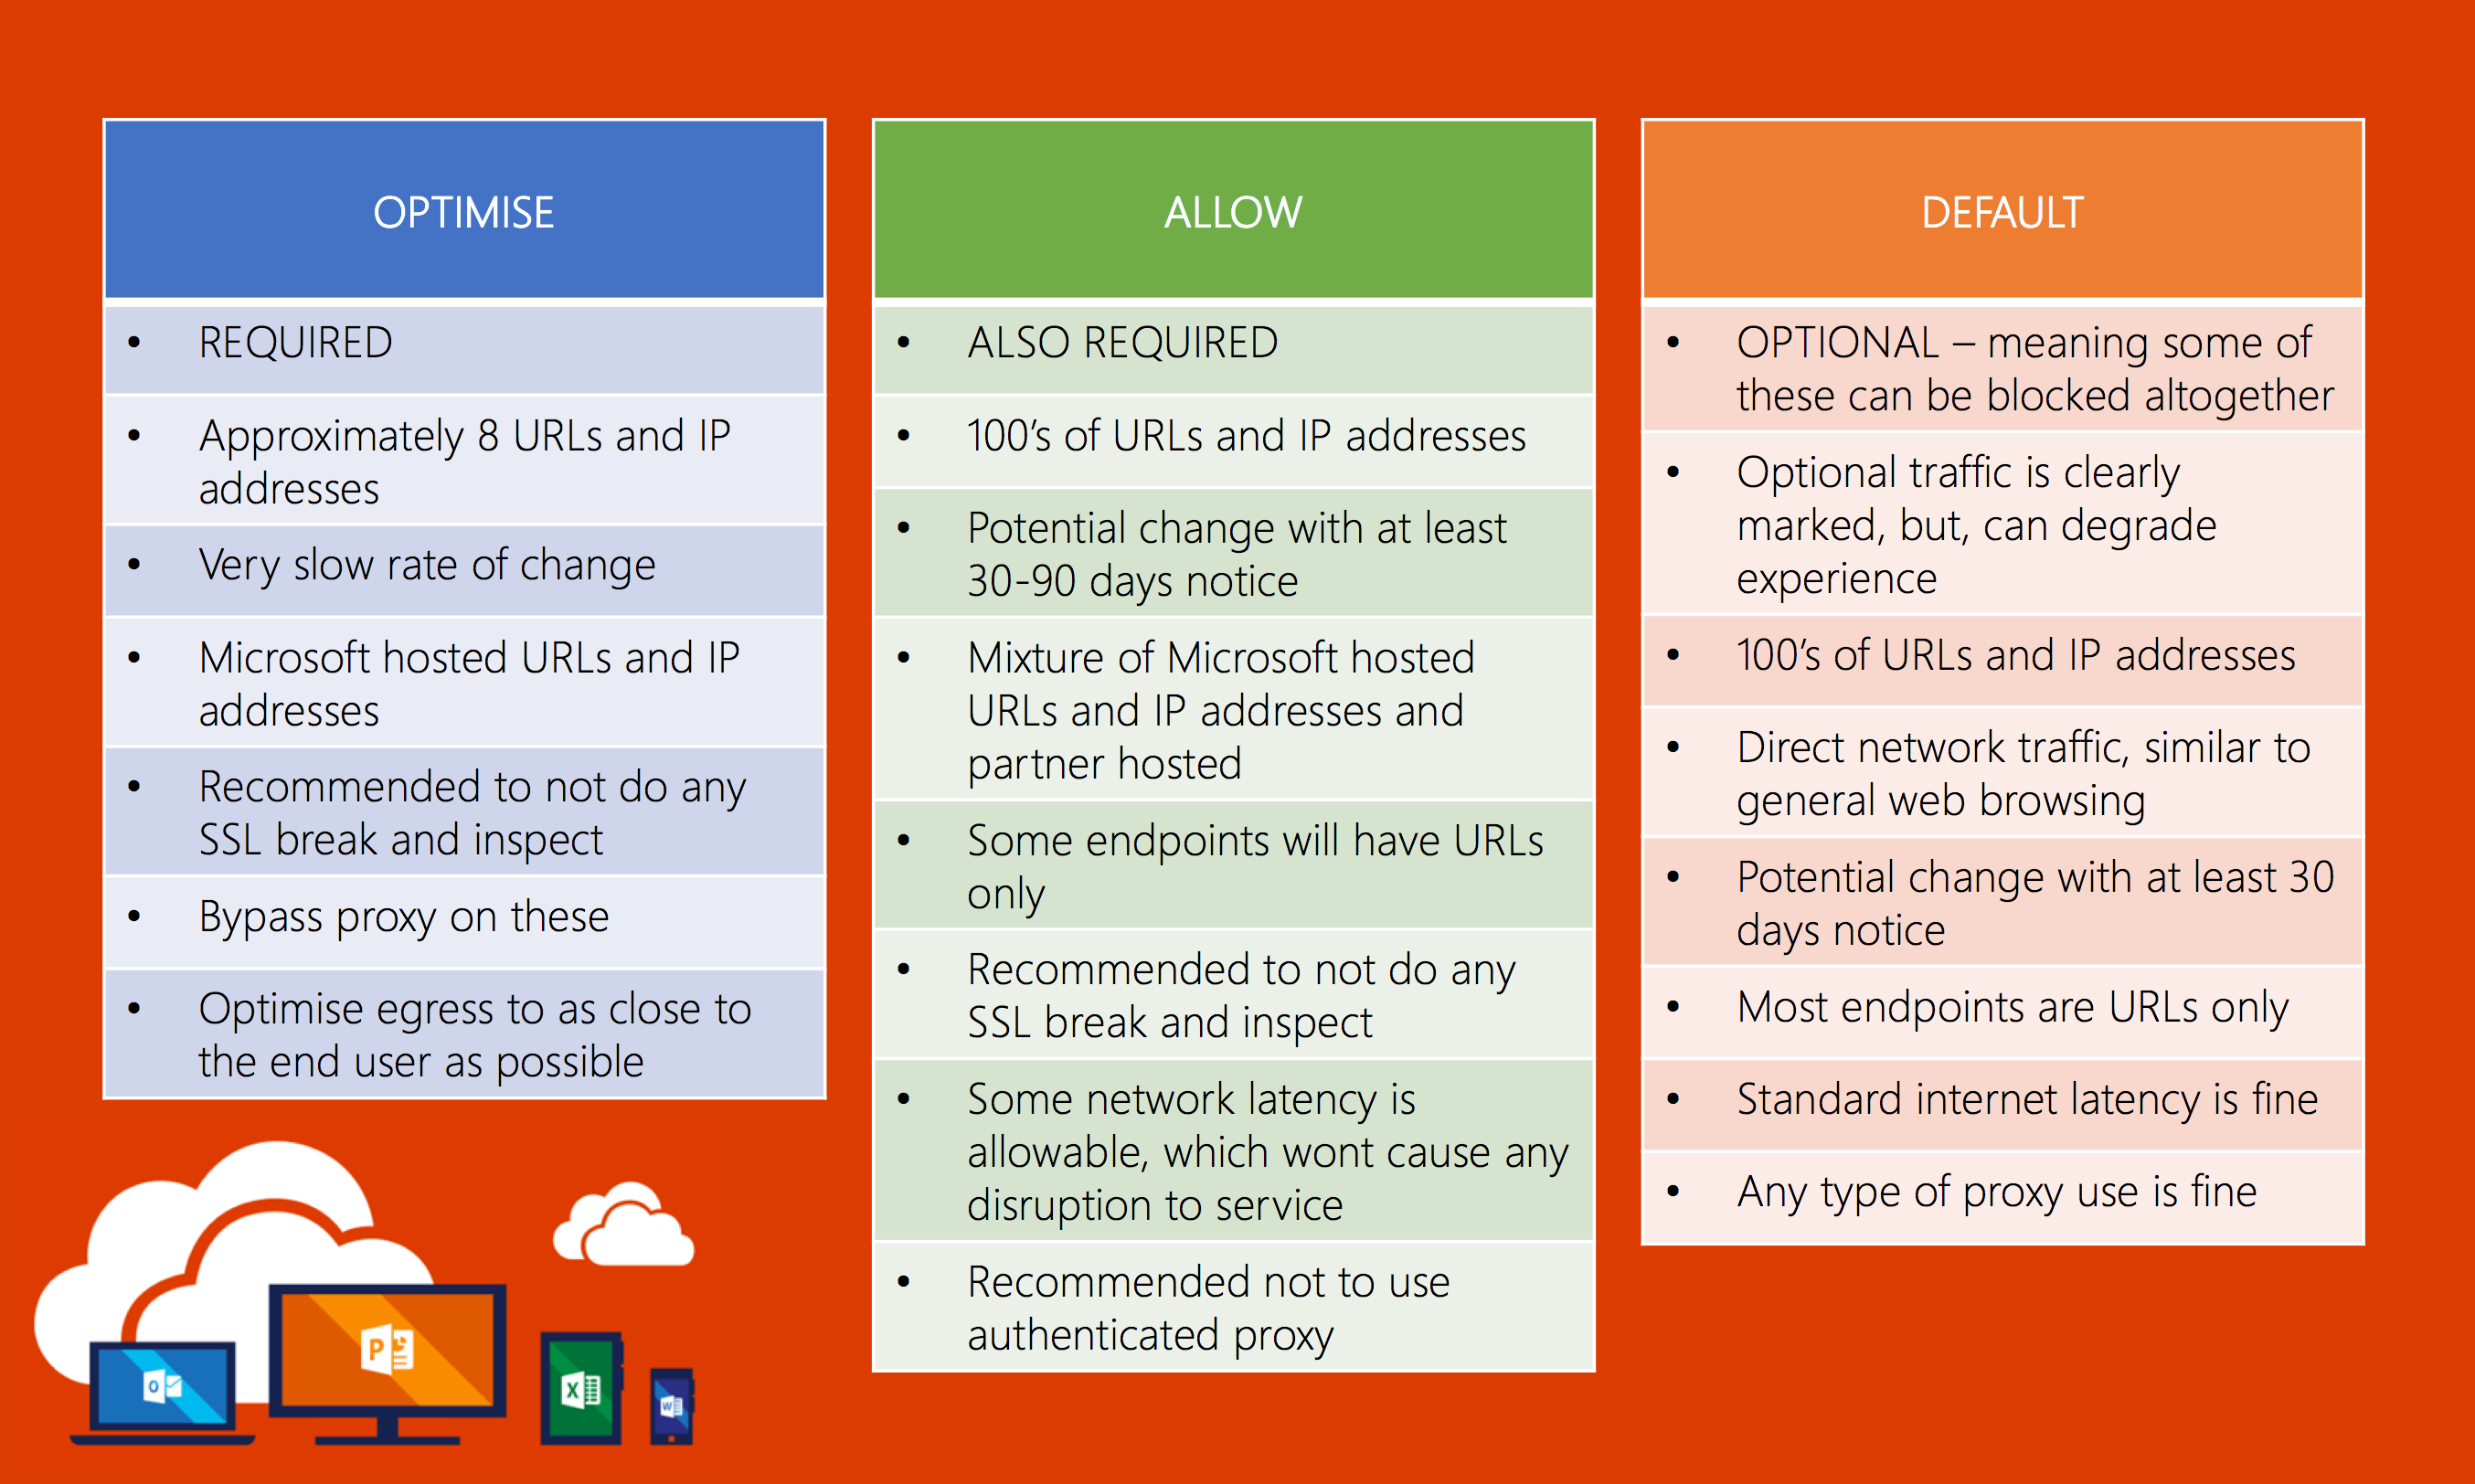
You can get more details on these 3x categories from the following blog post on TechNet: https://blogs.technet.microsoft.com/onthewire/2018/04/06/new-office-365-url-categories-to-help-you-optimize-the-traffic-which-really-matters/
It’s not all doom and gloom as your RSS feed no longer works. The new web service (still in preview, public preview, at the time of writing this blog) is rather zippy and allows for some great automation. So, that’s the target state: automation.
Microsoft wants to make it nice and easy for firewall, proxy or whatever edge security appliance vendor or service provider to programmatically interact with the web service and offer dynamic updates for Office 365 URL and IP address information. In practice, change management and governance processes will evidently still be followed. In most circumstances, organisations are following whatever ITIL or ITIL like methodologies are in place for those sorts of things.
The dream Microsoft has, though, is actually one that is quite compelling.
Before we get to this streamlined utopia where my customers edge devices update automatically, I’ve needed to come up with a process for the interim tactical state. This process runs through as follows:
- Check daily for changes in Office 365 URLs and IP addresses
- Download changes in a user readable format (So, ideally, no XML or JSON. Perhaps CSV for easy data manipulation or even ingestion into production systems)
- Email intended parties that there has been a change in the global version number of the current Office 365 URLs and IP addresses
- Allow intended parties to download the output
NOTE – for my use case here, the details for the output is purely IP addresses. That’s because the infrastructure that the teams I’ll be sending this information to only allows for that data type. If you were to tweak the web service request (details further down), you can grab both URLs and IP addresses, or one or the other.
Leveraging Microsoft Flow and Azure Automation
My first instinct here was to use Azure Automation and run a very long PowerShell script with If’s and Then’s and so on. However, when going through the script, 1) my PowerShell skills are not that high level to bang this out and 2) Flow is an amazing tool to run through some of the tricky bits in a more effortless way.
So, leveraging the goodness of Flow, here’s a high level rundown of what the solution looks like:
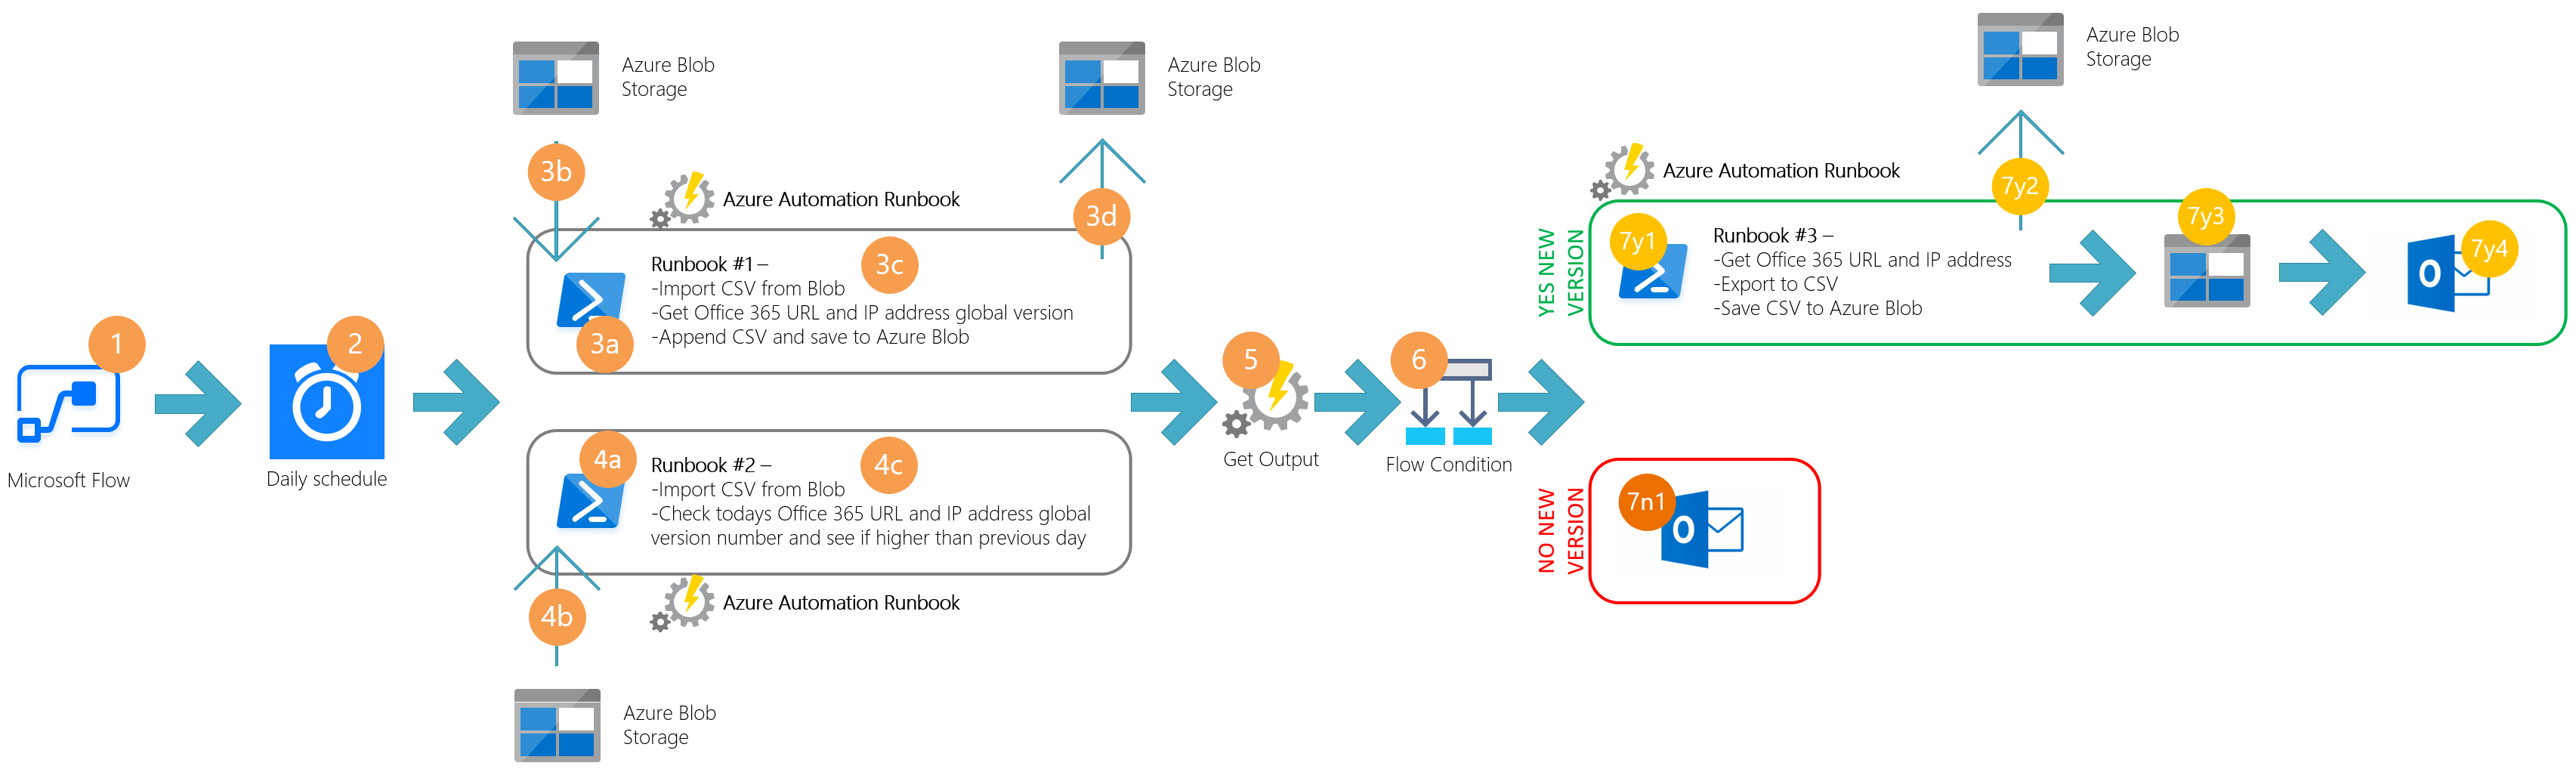
The workflow runs as follows:
- Microsoft Flow
- On a daily schedule, the flow is triggered at 6am
- Runbook #1
- Runbook is initiated
- Runbook imports CSV from Azure Blob
- Powershell runs comment to query web service and saves output to CSV
- CSV is copied to Azure Blob
- Runbook #2 imports a CSV
- Runbook is initiated
- Runbook imports CSV from Azure Blob
- The last cell in the version column is compared to the previous
- An Output is saved to Azure Automation if a newer version found, “NEW-VERSION-FOUND”
- The Output is taken from the prvious Azure Automation Runbook run
- A Flow Condition is triggered – YES if Output is found, NO if nothing found
Output = YES
- 7y1 = Runbook #3 is run
- Runbook queries web service for all 3 conditions: optimise, allow and default
- Each query for that days IP address information is saved into 3 separate CSV files
- 7y2 = CSV files are copied to Azure Blob
- 7y3 = Microsoft Flow queries Azure Blob for the three files
- 7y4 = An email template is used to email respective interested parties about change to the IP address information
- The 3x files are added as attachments
Output = Nothing or NO
- 7n1 = Sent an email to the service account mailbox to say there was no changes to the IP address information for that day
The process
Assuming, dear reader, that you have some background with Azure and Flow, here’s a detailed outlined of the process I went through (and one that you can replicate) to automate checking and providing relevant parties with updates to the Office 365 URLs and IP address data.
Lets begin!
Step 1 – Azure AD
- I created a service account in Azure AD that has been given an Office 365 license for Exchange Online and Flow
- The user details don’t really matter here as you can follow your own naming convention
- My example username is as follows: svc-as-aa-01@[mytenant].onmicrosoft.com
- Naming convention being: “Service account – Australia South East – Azure Automation – Sequence number”
Step 2 – Azure setup – Resource Group
- I logged onto my Azure environment and created a new Resource Group
- My solution has a couple of components (Azure Automation account and a Storage account), so I put them all in the same RG. Nice and easy
- My Resource Group details
- Name = [ASPRODSVCAA01RG]
- Region = Australia South East as that’s the local Azure Automation region
- That’s a basic naming convention of: “Australia South East – Production environment – Purpose, being for the SVC account and Azure Automation – Sequence number – Resource Group”
- Once the group was created, I added my service account as a Contributor to the group
- This allows the account downstream permissions to the Azure Automation and Storage accounts I’ll add to the resource group
Step 3 – Azure Setup – Storage account
- I created a storage account and stored that in my resource group
- The storage account details are as follows
- Name = [asprodsvcaa01] = Again, follow your own naming convention
- Deployment model = Resource manager
- Storage General Purpose v2
- Local redundant storage only
- Standard performance
- Hot access tier
- Within the storage account, I’ve used Blob storage
- There’s two containers that I used:
- Container #1 = “daily”
- Container #2 = “ipaddresses”
- This is where the output CSV files will be stored
- There’s two containers that I used:
- Again, we don’t need to assign any permissions as we assigned Contributor permissions to the resource group
Step 4 – Azure Setup – Azure Automation
- I created a new Azure Automation account with the following parameters
- Name = [SVCASPROD01AA] = Again, follow your own naming convention
- Default parameters, matching my resource group settings
- Yes, I also had a Run As account created (default option)
- I created three Runbooks created, as per below
- Step1-GetGlobalVersion = Again, follow your own naming convention
- This is a Powershell runbook
- Here’s the example script I put together:
#region SETUP
Import-Module AzureRM.Profile
Import-Module AzureRM.Resources
Import-Module AzureRM.Storage
#endregion
#region CONNECT
$pass = ConvertTo-SecureString "[pass phrase here]" -AsPlainText –Force
$cred = New-Object -TypeName pscredential –ArgumentList "[credential account]", $pass
Login-AzureRmAccount -Credential $cred -ServicePrincipal –TenantId "[tenant id]"
#endregion
#region IMPORT CSV FILE FROM BLOB
$acctKey = (Get-AzureRmStorageAccountKey -Name [name here] -ResourceGroupName [name here]).Value[0]
$storageContext = New-AzureStorageContext -StorageAccountName "[name here]" -StorageAccountKey '[account key here]'
Get-AzureStorageBlob -Context $storageContext -Container "[name here]" | Get-AzureStorageBlobContent -Destination . -Context $storageContext -Force
#endregion
#region GET CURRENT VERION
$DATE = $(((get-date).ToUniversalTime()).ToString("yyyy-MM-dd"))
Invoke-RestMethod -Uri https://endpoints.office.com/version/Worldwide?ClientRequestId=b10c5ed1-bad1-445f-b386-b919946339a7 | Select-Object @{Label="VERSION";Expression={($_.Latest)}},@{Label="DATE";Expression={($Date)}} | Export-Csv [daily-export.csv] -NoTypeInformation -Append
# SAVE TO BLOB
$acctKey = (Get-AzureRmStorageAccountKey -Name [name here] -ResourceGroupName [name here]).Value[0]
$storageContext = New-AzureStorageContext -StorageAccountName "[name here]" -StorageAccountKey '[account key here]'
Set-AzureStorageBlobContent -File [.\daily-export.csv] -Container "[name here]" -BlobType "Block" -Context $storageContext -Force
#endregion
#region OUTPUT
Write-Output "SCRIPT-COMPLETE"
#endregion
- Step2-CheckGlobalVersion = Again, follow your own naming convention
- This is a Powershell runbook
- Here’s the example script I put together:
#region SETUP
Import-Module AzureRM.Profile
Import-Module AzureRM.Resources
Import-Module AzureRM.Storage
#endregion
#region CONNECT
$pass = ConvertTo-SecureString "[pass phrase here]" -AsPlainText –Force
$cred = New-Object -TypeName pscredential –ArgumentList "[credential account]", $pass
Login-AzureRmAccount -Credential $cred -ServicePrincipal –TenantId "[tenant id]" #endregion
#region IMPORT CSV FILE FROM BLOB
$acctKey = (Get-AzureRmStorageAccountKey -Name [name here] -ResourceGroupName [name here]).Value[0]
$storageContext = New-AzureStorageContext -StorageAccountName "[name here]" -StorageAccountKey '[key here]'
Get-AzureStorageBlob -Context $storageContext -Container [name here] | Get-AzureStorageBlobContent -Destination . -Context $storageContext -Force
#endregion
#region CHECK IF THERE IS A DIFFERENCE IN THE VERSION
$ExportedCsv = import-csv [.\daily-export.csv]
$Last = $ExportedCsv | Select-Object -Last 1 -ExpandProperty Version # Last value in Version column
$SecondLast = $ExportedCsv | Select-Object -Last 1 -Skip 1 -ExpandProperty Version #Second last value in version column
If ($Last –gt $SecondLast) {
Write-Output '[NEW-VERSION-FOUND]'
}
- Step3-GetURLsAndIPAddresses = Again, follow your own naming convention
- This is a Powershell runbook
- Here’s the example script I put together:
#region SETUP
Import-Module AzureRM.Profile
Import-Module AzureRM.Resources
Import-Module AzureRM.Storage
#endregion
#region EXECUTE PROCESS TO DOWNLOAD NEW VERSION
$endpoints = Invoke-RestMethod -Uri https://endpoints.office.com/endpoints/Worldwide?ClientRequestId=b10c5ed1-bad1-445f-b386-b919946339a7
$endpoints | Foreach {if ($_.category -in ('Optimize')) {$_.IPs}} | Sort-Object -unique | Out-File [.\OptimizeFIle.csv]
$endpoints | Foreach {if ($_.category -in ('Allow')) {$_.IPs}} | Sort-Object -unique | Out-File [.\AllowFile.csv]
$endpoints | Foreach {if ($_.category -in ('Default')) {$_.IPs}} | Sort-Object -unique | Out-File [.\DefaultFile.csv]
$acctKey = (Get-AzureRmStorageAccountKey -Name [name here] -ResourceGroupName [name here]).Value[0]
$storageContext = New-AzureStorageContext -StorageAccountName "[name here]" -StorageAccountKey '[key here]'
Set-AzureStorageBlobContent -File [.\OptimizeFIle.csv] -Container "[name here]" -BlobType "Block" -Context $storageContext -Force
Set-AzureStorageBlobContent -File [.\AllowFile.csv] -Container "[name here]" -BlobType "Block" -Context $storageContext -Force
Set-AzureStorageBlobContent -File [.\DefaultFile.csv] -Container "[name here]" -BlobType "Block" -Context $storageContext -Force
#endregion
#region OUTPUT
Write-Output "SCRIPT COMPLETE"
#endregion
- Note that we don’t need to import the complete AzureRM Powershell modules
- You’ll find that if you do something “lazy” like that, there’s a whole lot of dependencies in Azure Automation
- You’ll need to manually add in all the sub-modules which is very time consuming
Step 5 – Microsoft Flow
- With my service account having a Flow license, I created my Flow there
- This means that I can pass this onto Managed Services to run with and maintain going forward
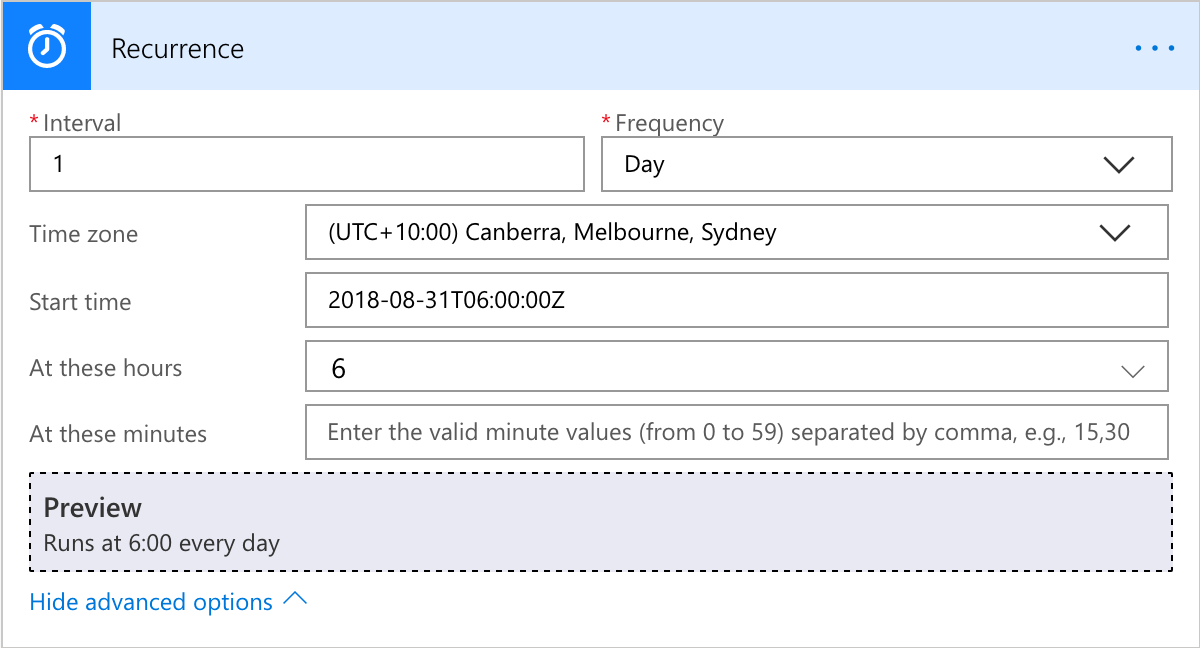
- I started with a blank Flow
- I added a schedule
- The schedule runs at 6am every day
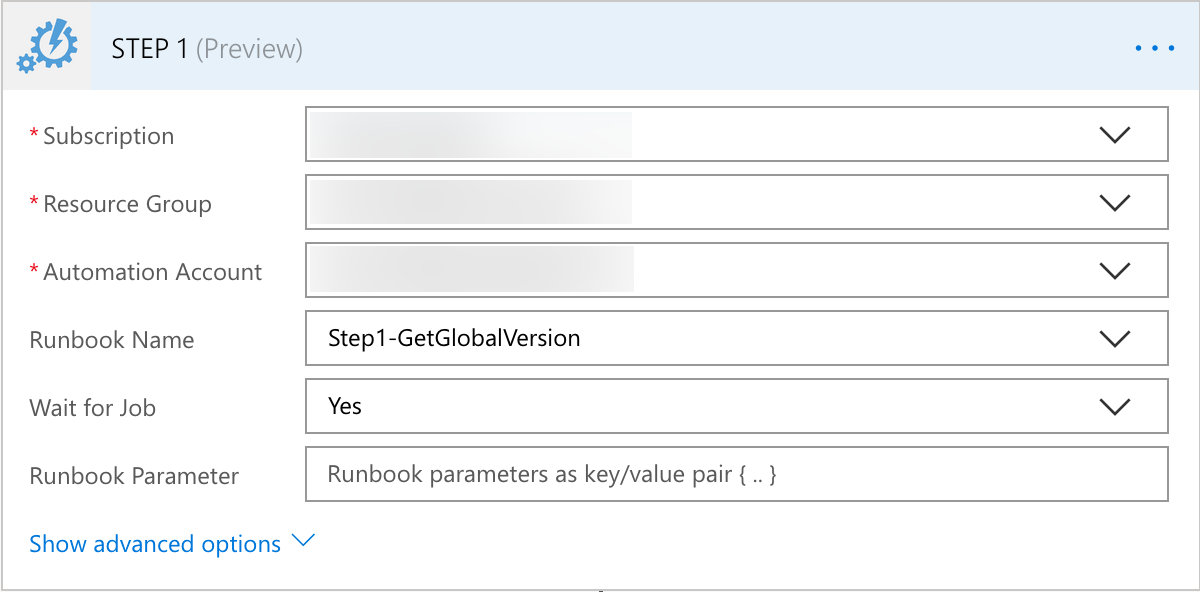
- Step 1 is to add in an Azure Automation Create Job task
- This is to execute the Runbook “Step1-GetGlobalVersion”
- Flow will try and connect to Azure with our Service account
- Because we added all the relevant permissions earlier in Azure, the Resource Group and downstream resources will come up automatically
- Enter in the relevant details
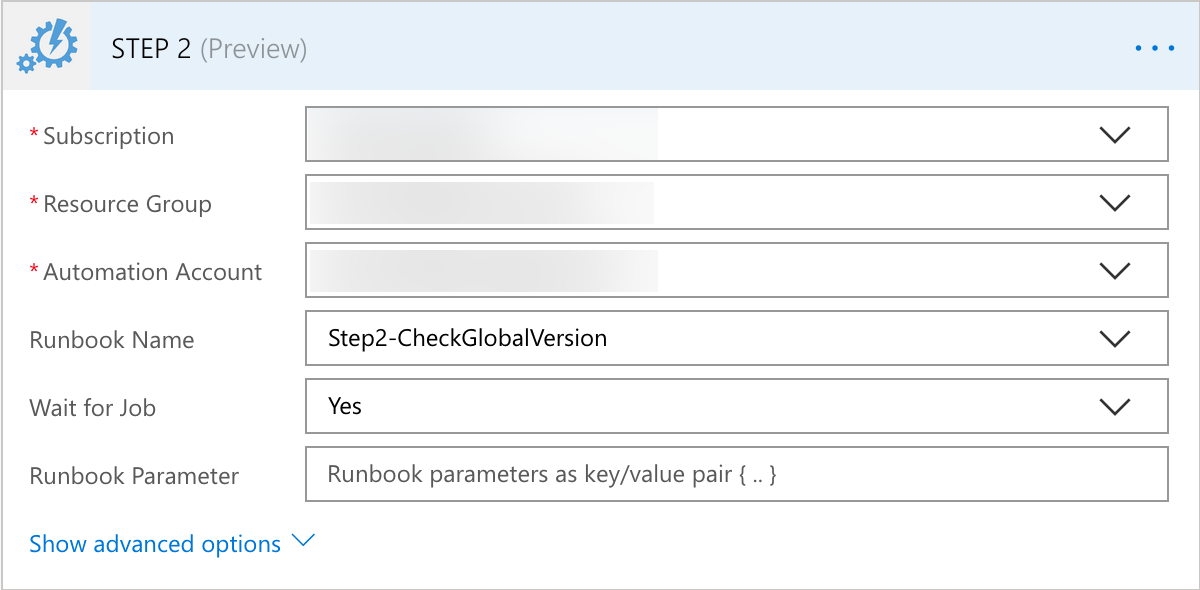
- Step 2 is to add in another Azure Automation Create Job task
- This is to execute the Runbook “Step2-CheckGlobalVersion”
- Again, Flow will connect and allow you to select resources that the service account has Contributor permissions to
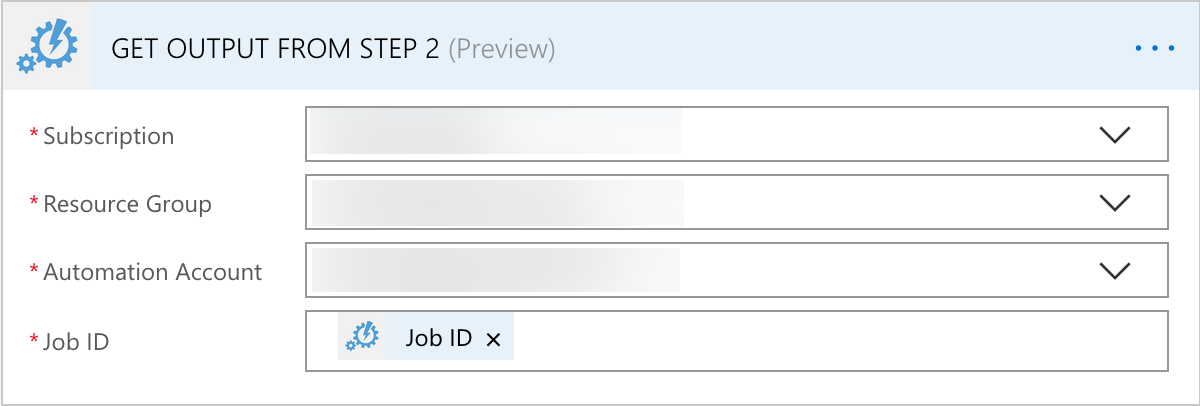
- Step 3 is to add in an Azure Automation Get Job Output
- This is to grab the Output data from the previous Azure Automation runbook
- The details are pretty simply
- I selected the “JobID” from the Step 2 Azure Automation runbook job
- Step 4 is where things get interesting
- This is a Flow Condition
- This is where we need to specify if a Value of “NEW-VERSION-FOUND” is found in the content of the Output from the Step 2 Job, Do something or Not do something
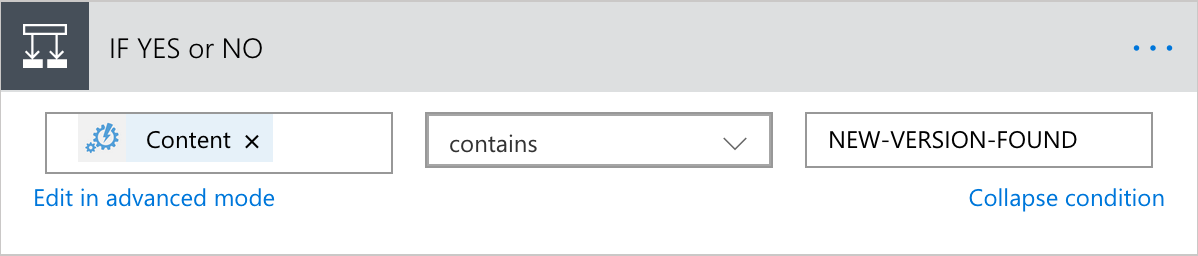
- Step 5 is where I added in all the “IF YES” flow to Do something because we have an output of “NEW-VERSION-FOUND”
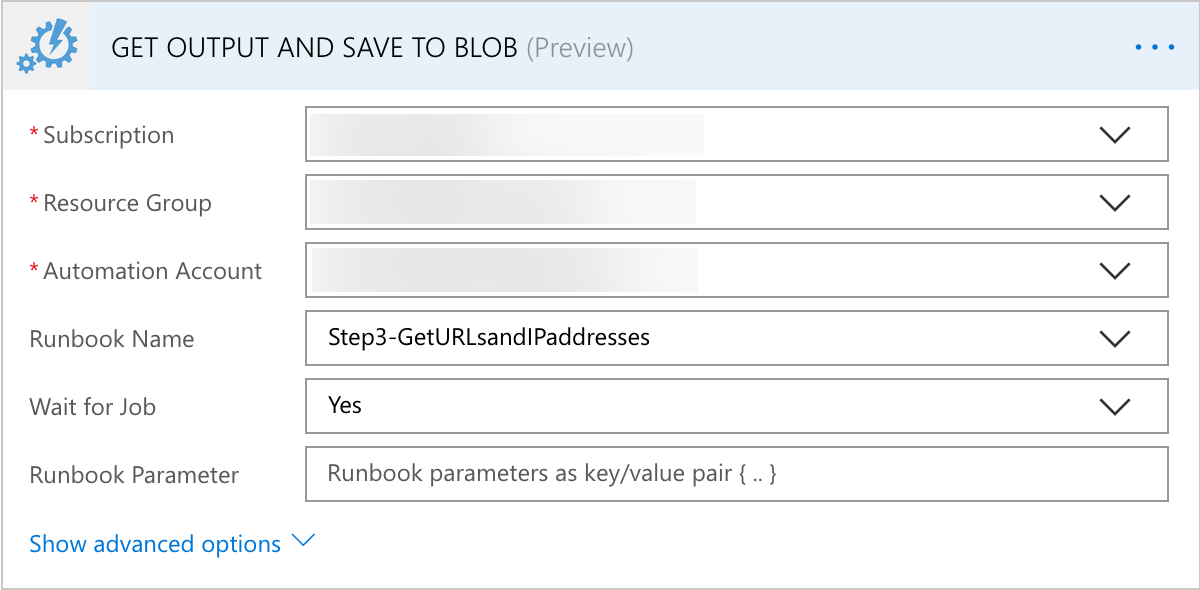
- The first sub-process is another Azure Automation Create Job task
- This is to execute the Runbook “Step3-GetURLsandIPaddresses”
- Again, Flow will connect and allow you to select resources that the service account has Contributor permissions to
- Step 6 is to create 3 x Get Blob Content actions
- This will allow us to connect to Azure Blob storage and grab the 3x CSV files that the previous steps output to Blob created
- We’re doing this so we can embed them in an email we’re going to send to relevant parties in need of this information

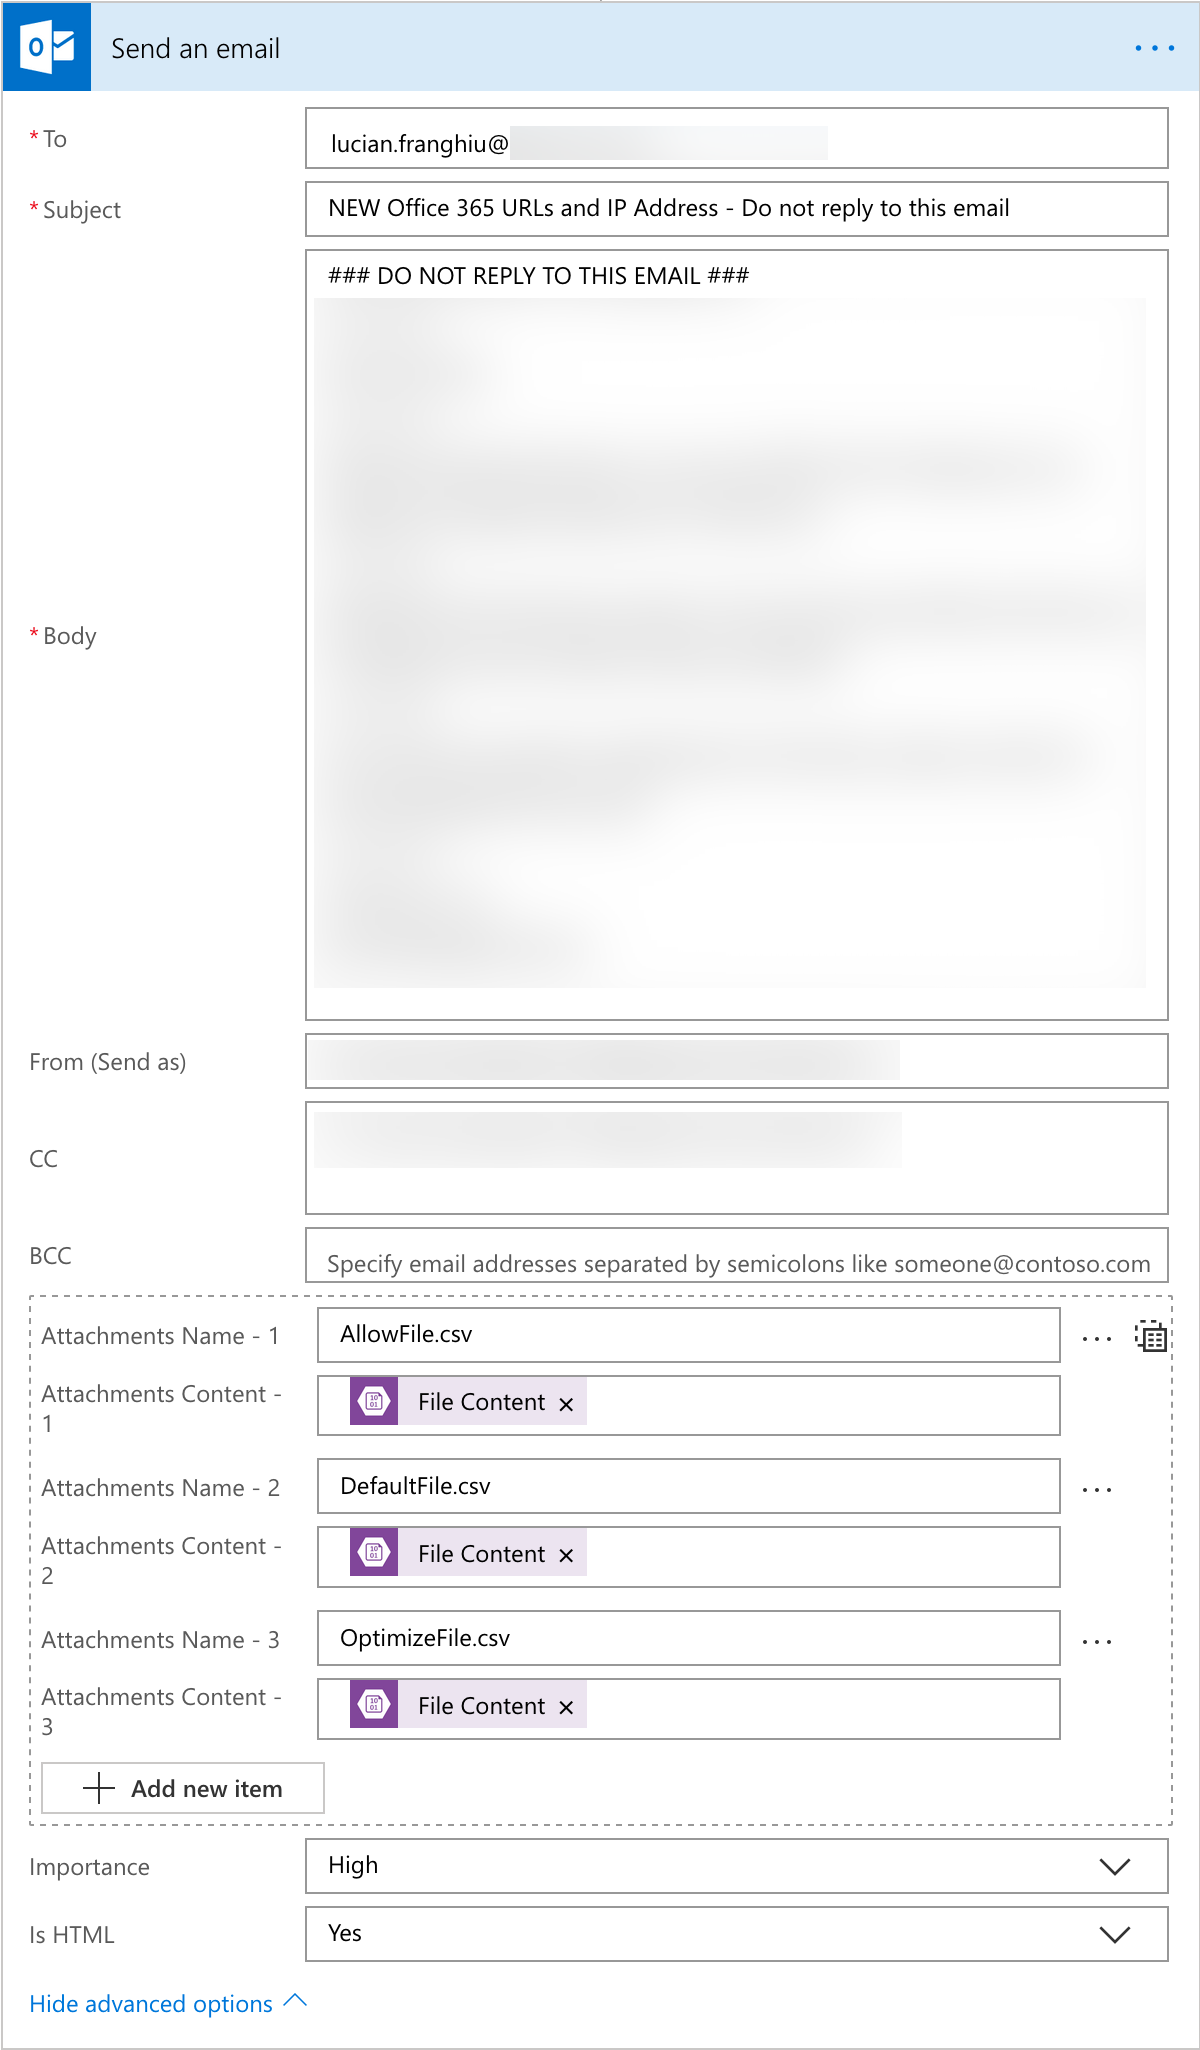
- Step 7 is to create an email template
- As we added an Exchange Online license to our service account earlier, we’ll have the ability to send email as the service accounts mailbox
- The details are pretty straight forward here:
- Enter in the recipient address
- The sender
- The subject
- The email body
- This can be a little tricky, but, I’ve found that if you enable HTML (last option in the Send An Email action), you can use
<br>or line break to space out your email nicely
- This can be a little tricky, but, I’ve found that if you enable HTML (last option in the Send An Email action), you can use
- Lastly, we’ll attach the 3x Blobs that we picked up in the previous step
- We just need to manually set the name of email file
- Then select the Content via the Dynamic Content option
- Note: if you see this error “We can’t find any outputs to match this input format.Select to see all outputs from previous actions.” – simply hit the “See more” button
- The See more button will show you the content option in the previous step (step 6 above)
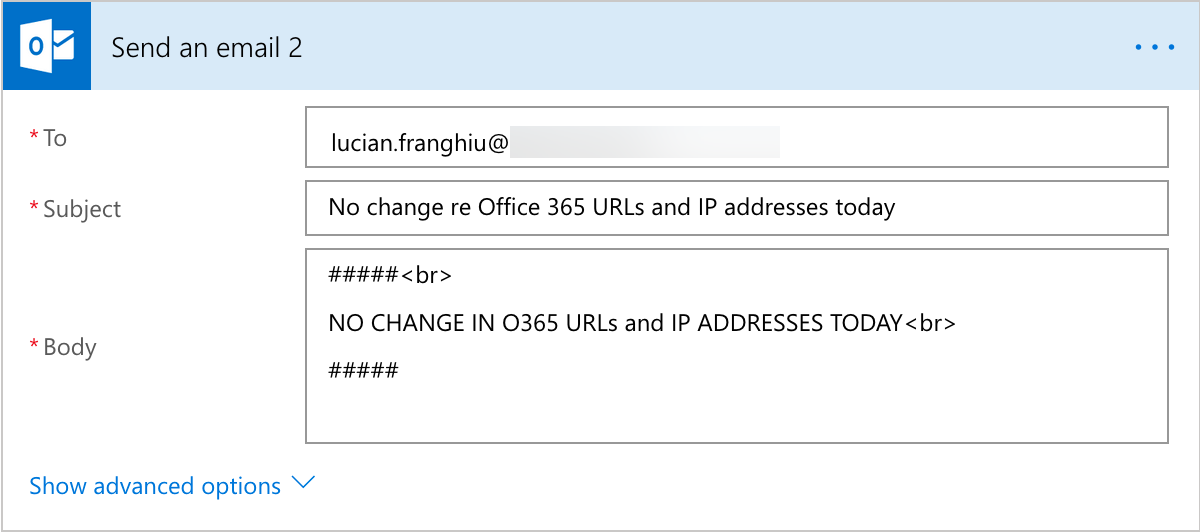
- Step 8 is to go over to the If No condition
- This is probably option because I believe the old saying goes “no new is good news”
- However, for the purposes of tracking how often changes happen easily, I thought I’d email the service account and store a daily email if no action was taken
- I’ll probably see myself as well here to keep an eye on Flow to make sure it’s running
- I can use inbox rules to move the emails out of my inbox and into a folder to streamline it further and keep my inbox clean
- The details are pretty much the same as the previous Step 7
- However, there’s no attachments required here
- This is a simple email notification where I entered the following in the body: “### NO CHANGE IN O365 URLs and IP ADDRESSES TODAY ###”
Final words
Having done many Office 365 email migrations, I’ve come to use Powershell and CSV’s quite a lot to make my life easier when there’s 1000’s of records to work with. This process uses that experience and that speed of working on a solution using CSV files. I’m sure there’s better ways to streamline that component, like for example using Azure Table Storage.
I’m also sure there’s better ways of storing credential information, which, for the time being isn’t a problem while I work out this new process. The overall governance will get ironed out and I’ll likely leverage Azure Automation Credential store, or even Azure Key Vault.
If you, dear reader, have found a more streamlined and novel way to achieve this that requires even less effort to setup, please share!
Best,
Lucian
#WorkSmarterNotHarder