Last month at the Microsoft Ignite 2017, SharePoint Framework Extensions became GA. It gave us whole new capabilities how we can customize Modern Team sites and Communication sites.
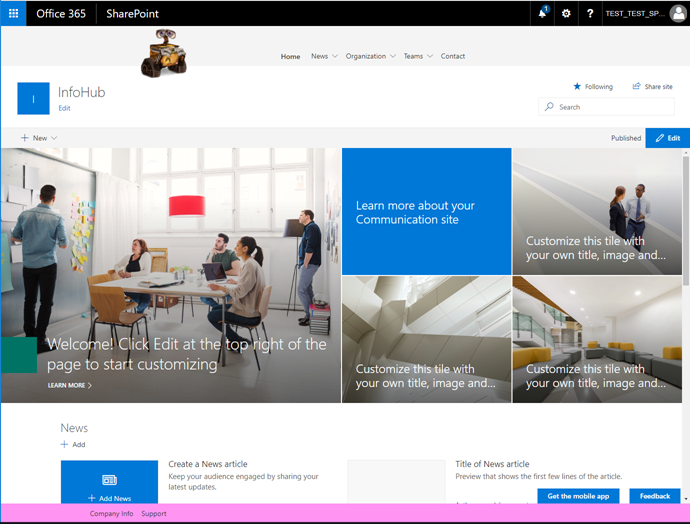
Even though there are lots of PnP examples on SPFx extensions, while presenting at Office 365 Bootcamp, Melbourne and taking a hands-on lab, I realised not many people are aware of the new capabilities that SPFx extensions provide. One of the burning question we often get from clients, if we can have a custom header, footer and global navigation in the modern sites and the answer is YES. Here is an example where Global Navigation has been derived from Managed Metadata:
Communication Site with header and footer:
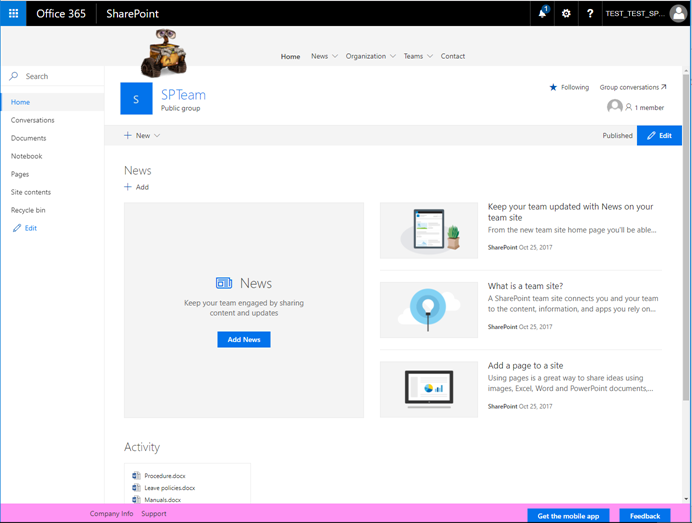
Modern Team Site with header and footer (same navigation):
With the latest Yeoman SharePoint generator, along with the SPFx Web Part now we have options to create extensions:
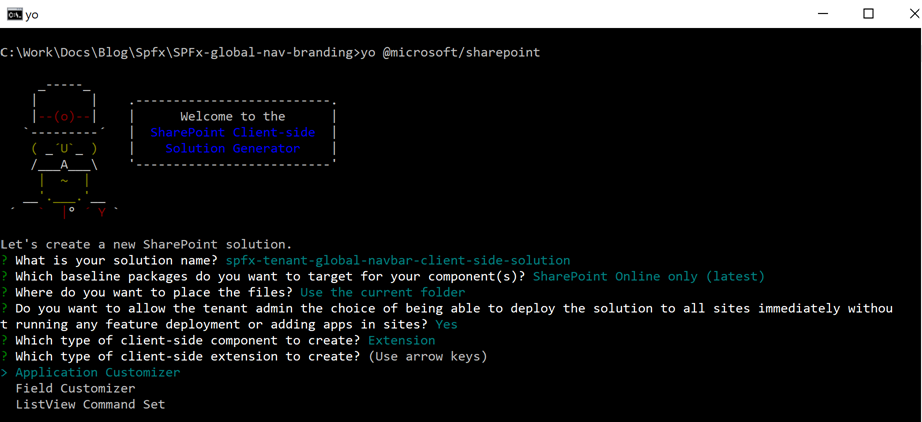
To create header and footer for the modern site, we need to select the Application Customizer extension.
After the solution has been created, one noticeable difference is TenantGlobalNavBarApplicationCustomizer is extending from BaseApplicationCustomizer and not BaseClientSideWebPart.
[code language=”javascript”]
export default class TenantGlobalNavBarApplicationCustomizer
extends BaseApplicationCustomizer
[/code]
Basic Header and Footer
Now to create a very basic Application Customizer with header/footer, make sure to import the React, ReactDom, PlaceholderContent and PlaceholderName:
[code language=”javascript”]
import * as ReactDom from ‘react-dom’;
import * as React from ‘react’;
import {
BaseApplicationCustomizer,
PlaceholderContent,
PlaceholderName
} from ‘@microsoft/sp-application-base’;
[/code]
In the onInit() function, the top(header) and the bottom (footer) placeholders need to be created:
[code language=”javascript”]
const topPlaceholder = this.context.placeholderProvider.tryCreateContent(PlaceholderName.Top);
const bottomPlaceholder = this.context.placeholderProvider.tryCreateContent(PlaceholderName.Bottom);
[/code]
Create the appropriate elements for the header and footer:
[code language=”javascript”]
const topElement = React.createElement(‘h1’, {}, ‘This is Header’);
const bottomElement = React.createElement(‘h1’, {}, ‘This is Footer’);
[/code]
Those elements can be rendered within placeholder domElement:
[code language=”javascript”]
ReactDom.render(topElement, topPlaceholder.domElement);
ReactDom.render(bottomElement, bottomPlaceholder.domElement);
[/code]
If you now run the solution:
- gulp serve –nobrowser
- Copy the id from src\extensions\.manifest.json file e.g. “7650cbbb-688f-4c62-b5e3-5b3781413223”
- Open a modern site and append the following URL (change the id as per your solution):
?loadSPFX=true&debugManifestsFile=https://localhost:4321/temp/manifests.js&customActions={“7650cbbb-688f-4c62-b5e3-5b3781413223”:{“location”:”ClientSideExtension.ApplicationCustomizer”}}
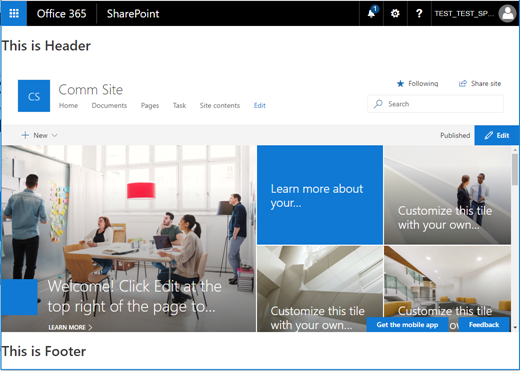
The above 6 lines code will give the following outcome:
Managed Metadata Navigation
Now back to the first example. That solution has been copied from SPFx Sample and has been updated.
To get the above header and footer:
- In the Term store (https://.sharepoint.com/sites/SPTeam/_layouts/15/termstoremanager.aspx ) , create two Term Set: TopNav and Footer. Add some sample Terms.
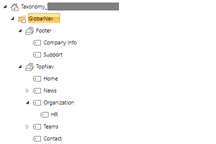
- Clone SPFx-global-nav-branding repo
Go to command line and run
- npm i
- gulp serve –nobrowser
-
To see the code running, go to the SharePoint Online Modern site and append the following with the site URL:
?loadSPFX=true&debugManifestsFile=https://localhost:4321/temp/manifests.js&customActions={“b1efedb9-b371-4f5c-a90f-3742d1842cf3”:{“location”:”ClientSideExtension.ApplicationCustomizer”,”properties”:{“TopMenuTermSet”:”TopNav”,”BottomMenuTermSet”:”Footer”}}}
Deployment
Create an Office 365 CDN
Update config\write-manifests.json file “cdnBasePath” to the new location. E.g.
[code language=”xml”]
"cdnBasePath":"https://publiccdn.sharepointonline.com/<YourTenantName>.sharepoint.com//<YourSiteName>//<YourLibName>/<FoldeNameifAny>"
[/code]
In the command line, run
- gulp bundle –ship
- gulp package-solution –ship
and upload all artefacts from \temp\deploy\ to the CDN location
Upload \sharepoint\solution.sppkg to the App Library
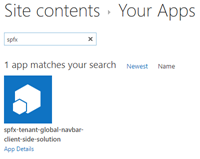
Go to the Modern Site > Site Content > New > App > select and add the app:
Hopefully, this post has given an overview on how to implement SPFx Application Customizers. There are many samples available in the GitHub SharePoint.

Hi Thank you so much for this article. Has this been tested in Modern team sites and communication sites? Is this a details info required to implement global nav across all site collections?
Hi Prakash, The screenshot in the blog is from modern team site and communication site. So it is a working prototype.
Here I have shown how to deploy the global nav into one site collection. You can add the app to other site collections to make the nav available.
Any idea how to make the footer not to stick to the bottom of the page? Just have a regular end of page footer?
The header and footer placeholders given by SPFx extensions are sticky. If is must for you to make the footer part of the content, you can dynamically add the footer content as the last div element of
can you please let me know how can we do this? my client wanted to attach the div at bottom of page
It’s not showing up at all?
I used gulp serve –nobrowser and the CDN / app deployment similar to webparts
temp/deploy assets are in the cdn hosted in sharepoint like my other working webparts
app has been added and trusted in appcatalog like my other working webparts
i used the same url query and adjusted the quotations that were left / right double quotes on the page here with the customActions guid shown in the serve.json – customactions
my code is exactly the same within the OnInit override function…
You need to append a URL such as the following to the page you’re on (not within the workbench):
?loadSPFX=true&debugManifestsFile=https://localhost:4321/temp/manifests.js&customActions={“c5d41c05-99d1-459a-a9ab-c5d030dbd207”:{“location”:”ClientSideExtension.ApplicationCustomizer”}}
Then your extension will show up from gulp serve –nobrowser
customActions GUID is specific to your extension.
If you open the Developer tools in the browser and refresh the page, do you see any error?
Thanks for sharing this. But I’m guessing you need to apply this web part on every page within the site in order for the custom header/footer to be present throughout? Also, what stops the user from removing the web part and lose our company’s branding? We’re after a solution which would allow our users to have a seamless navigation between our publishing sites, team sites, modern team sites and communications sites. At the moment we can only do it on the classic type sites which is rather frustrating as it’s preventing us from rolling out the modern experience to our users. Any suggestions are hugely appreciated. Cheers.
Hi Adam, This blog uses SPFx Extensions (Application Customizers) which is different than SPFx Web Parts. With this solution you will not need to implement on every page rather you need to deploy the solution to App Catalog once and then add the app to each site collection.
Note that this solution will only apply to Modern sites (e.g. Team, Communication etc). For classic sites, we still have to follow the old ways of customizing.
Hi, how can i modify the Office 365 top Navigation Menu, so I can add a custom logo?
Go to O365 Portal > Select Settings > Organisational Profile > Edit Theme
For more info: https://support.office.com/en-us/article/customize-the-office-365-theme-for-your-organization-8275da91-7a48-4591-94ab-3123a3f79530
How would one go about extending functionality of this to use the “split button” on elements with sub menus within the office ui fabric react contextual menu as you have implemented in your solution?
This would be useful in the case of using the heading of a submenu to as a link, and the expand button to expand the submenu. Hence a split button.
Unfortunately, just by adding ‘split: true’ within the projectMenuItem function within the TenantGlobalNavBar.tsx does not accomplish this.
Example of split button: https://developer.microsoft.com/en-us/fabric#/components/contextualmenu – “ContextualMenu with checkable menu items and toggable split button”
https://github.com/OfficeDev/office-ui-fabric-react/blob/master/packages/office-ui-fabric-react/src/components/ContextualMenu/examples/ContextualMenu.Checkmarks.Example.tsx
Hi Jesse, According to the documentation ‘split: true’ should work. I need to perform some testing before suggesting any solutions. So brb.
Any luck with this?
Hi Jesse, sorry for the late reply. Started with a new client recently that kept me busy. In this solution we are using Command Bar control which is different than Contextual Menu.
In the TermSet if you have 3rd level menu, that will show in the Top Nav. However if you are after a visual cue, I will recommend to use a divider by adding a new item with itemType : DividerContextualMenuItemType.Divider or by constructing the menu structure yourself.
There is a class “ms-CommandButton-splitIcon” that can also mimic similar look :
https://dev.office.com/fabric-js/Components/CommandBar/CommandBar.html
After updating solution packages to 1.4.1, the “split” function for the contextual menu works, but does not render correctly if an href is defined for the element. Any thoughts how to address this?
Let me clarify, split function for ContextualMenuItemType.
Hi Jesse, If you can email me the solution link or package, I can have a look next week. It is hard to troubleshoot without seeing what’s happening. My email address can be found here http://ranku.site/about-me/
I ended up working around this by using the onrender method for the contextual menu with a custom function just to use window.location.href to redirect to the simple url from the term store in conjuction with the split flag as well as the primarydisabled flag if there was not a link defined for the term.
Apologies, I used onClick, not onRender
How did you get rid of the left side navigation on that first screen shot and put the search bar on the right? Can SPX accomplish that?
This is the layout for modern communication sites, where as the left side navigation is the layout within modern teams sites, or the view when within list/libraries.
You can create the communication site from /_layouts/15/sharepoint.aspx page. This has rolled out many months ago so your tenant should have the template by now.
SPFx Extension is used here to add the header and footer on the site.
We have already migrated 40 sites to team sites a few months ago. How can I convert them to communication sites ? Can spfx accomplish that ? Thanks! And great post btw.
We have already migrated 40 sites to team sites a few months ago. How can I convert them to communication sites ? Can spfx accomplish that ? Thanks! And great post btw.
@ynotlim: Thanks man! Glad to hear that. 🙂
Currently there is no way to convert another site to Communication site. Apart from full width page you don’t loose much in Team site. You have the same web parts in there as well. You can even deploy this solution to there.
Team site is more focused on collaboration and you will see that you will have more Team sites in an organisation and only few of Communication sites. The following thread might help you:
https://techcommunity.microsoft.com/t5/Communications-Sites-AMA/Convert-to-Communication-Site/td-p/83044
How did you center the menu bar from the original source code from Microsoft? Changing the CSS file, i’m unable to center it. Thanks!!
Yes it is done through the CSS/SASS. I put “left:50%” to align. UX guys might kill me for this as this is not always the best practice. I would not recommend to use the code as is in the prod. This was just a POC.
You will find less than 639px resolution the menu disappears in the current solution (which is a default styling that I did not change). You will need to tweak the SASS based on your project need.
Got it, thanks! Btw,
How do I render the global menu and breadcrumbs in the same sharepoint extension? I need the const element to contain both the Global Nav Bar and BreadCrumb.
Any advice is appreciated.
The render function is your playground. You can have as many controls you want. You can use either UI Fabric or any other CSS/JS library controls. You can even split those across multiple solutions.
However you already have OOTB Breadcrumb in the modern document library. If you are implementing a new one, you will ended up having 2 Breadcrumbs.
How to hide left nav using javascirpt using SPFx
Any chance you could shed some light on how you integrated the image into the global nav?
Hi Sean,
The Render function is the play groun for any control: https://github.com/AnupamRanku/SPFx-global-nav-branding/blob/master/src/extensions/tenantGlobalNavBar/components/TenantGlobalNavBar.tsx
If we take a step back, you can even simply insert / implement any dom element in ReactDom.render(topElement, topPlaceholder.domElement);
Killer. Thanks for the response, there’s definitely more to crack open here.
Can i Deploy my JS and Css files for branding the same way
Yes you can. For better performance, create O365 CDN. It is free and very easy to setup. https://dev.office.com/blogs/general-availability-of-office-365-cdn
i would like to know how to hide left nav in SPFx using javascript.
right now i am able to do it by inject javascript in header with little setTimeOut
and for sure its not the best approach.
Hi Asfand,
The communication site template does not have any left navigation. For other Modern Team site there is no SPFx supported way to hide left Nav. I will suggest not to use JS hack to achieve this because in future any new changes might break the site.
Adding sublevel removes the link of the parent level and converts it to button. For example if I am adding something under News, News is no longer a link it is a button to show its sub levels. Does it happens for you as well? If so how should we change the code to retain the parent link?
Hi Sharanya, That behaviour is intentional. The header and sub-menu items have set differently. Check here: https://github.com/AnupamRanku/SPFx-global-nav-branding/blob/master/src/extensions/tenantGlobalNavBar/components/TenantGlobalNavBar.tsx
Currently, you can see the submenu by clicking on the header. If you want to change the behaviour, you might have to introduce mouse hover instead.
Hi Anupam,
Thank you for the quick response. Could you please let me know how to introduce mouse hover? I am new to SPFx.
Hi Anupam,
I am getting the error below when I do a gulp serve:
PS C:\SPFx-global-nav-branding> gulp serve
Build target: DEBUG
C:\SPFx-global-nav-branding\node_modules\@microsoft\node-core-library\lib\JsonSchema.js:178
throw new Error(prefix + os.EOL +
^
Error: JSON validation failed:
C:\SPFx-global-nav-branding\config\tslint.json
Error: #/ (Defines configuration options for the…)
Additional properties not allowed: lintConfig,useDefaultConfigAsBase,removeExistingRules,displayAsWarning
at validateObjectWithCallback (C:\SPFx-global-nav-branding\node_modules\@microsoft\node-core-library\lib\JsonSchema.js:178:19)
at JsonSchema.validateObjectWithCallback (C:\SPFx-global-nav-branding\node_modules\@microsoft\node-core-library\lib\JsonSchema.js:193:13)
at JsonSchema.validateObject (C:\SPFx-global-nav-branding\node_modules\@microsoft\node-core-library\lib\JsonSchema.js:175:14)
at TslintCmdTask._readConfigFile (C:\SPFx-global-nav-branding\node_modules\@microsoft\gulp-core-build\lib\tasks\GulpTask.js:311:28)
at TslintCmdTask.onRegister (C:\SPFx-global-nav-branding\node_modules\@microsoft\gulp-core-build\lib\tasks\GulpTask.js:87:32)
at Object.initialize (C:\SPFx-global-nav-branding\node_modules\@microsoft\gulp-core-build\lib\index.js:299:24)
at SPWebBuildRig.initialize (C:\SPFx-global-nav-branding\node_modules\@microsoft\sp-build-common\lib\BuildRig.js:61:19)
at SPWebBuildRig.initialize (C:\SPFx-global-nav-branding\node_modules\@microsoft\sp-build-common\lib\SPBuildRig.js:28:15)
at SPWebBuildRig.initialize (C:\SPFx-global-nav-branding\node_modules\@microsoft\sp-build-web\lib\SPWebBuildRig.js:14:15)
at Object.exports.initialize (C:\SPFx-global-nav-branding\node_modules\@microsoft\sp-build-web\lib\index.js:22:17)