In this post, I am going to share my experience about publishing multi-tenant applications in Azure Active Directory where Azure Active Directory’s role is OAuth server.
You can read more about OAuth2.0 at https://oauth.net/2/ . I am going to use implicit flow where client is an un-trusted application. For instance AngularJs application or phone application etc. Why these clients are called un-trusted because they cannot hide the secrets given/shared by OAuth server.
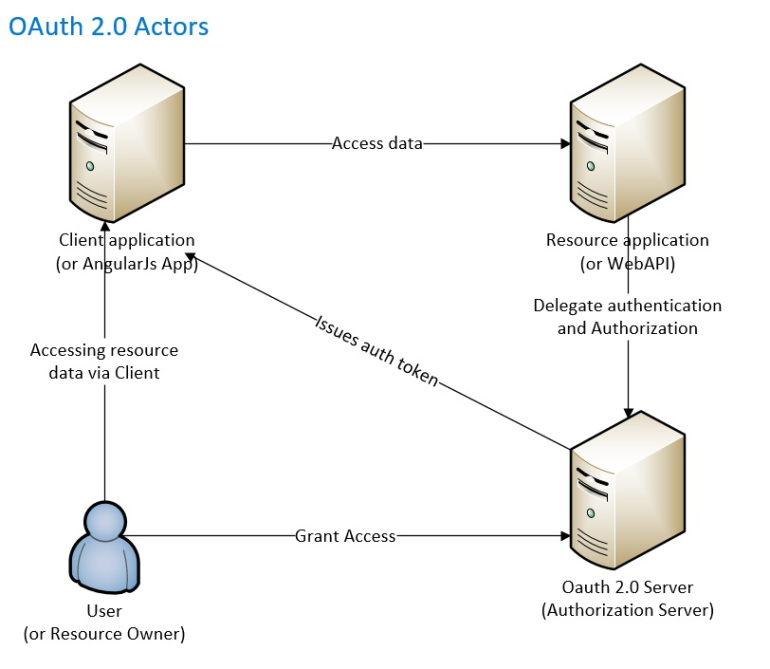
Let’s have a look at OAuth 2.0 actors in implicit flow. Below is the diagram of the implicit flow in OAuth 2.0:
Implicit flows:
- User tries to access the resource (e.g. WebAPI) via Client Application (e.g. AngularJS app)
- OAuth 2.0 server presents consent screen to user (e.g. resource owner)
- User accepts/rejects the consents
- If user accepts the consent, OAuth 2.0 grants client application to resource by presenting the auth token to resource
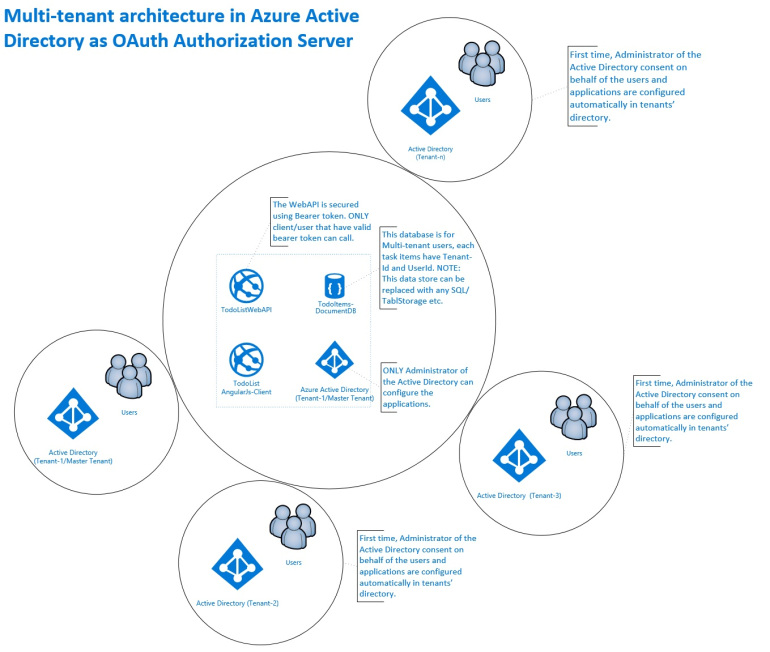
Now, we have got some terminology related to OAuth 2.0 implicit flow so we can map it to actual implementation. Please see below high level diagram:
We can see from the diagram, we have got all 4 actors but resource owners (or Users) are spread across various active directories.
I am extending angularjs todo list application published at https://azure.microsoft.com/en-us/documentation/articles/active-directory-devquickstarts-angular/ and moved all AngularJs stuff to its own project called “TodoAngularJsClient” like shown below:

Following changes will configure the WebAPI to use Bearer token for authentication:
NOTE: We are not validating issuer as we don’t know the issuer in advance but we can control if desired via custom Authorize filter to allow access to certain tenants.
You can clone the project from https://github.com/mmasooddatascience/angularjs-webapi-multi-tenant-app and follow below steps to configure applications in your active directory.
- Configure AngularJs Client application
- Navigate to Azure Active Directory > Applications
- Click on Add link at the bottom
- Click on “Add an application my organization is developing” link
- In Name field, provide a descriptive name which will be shown in consent screen. For instance “Todo Application”
- Select “Web Application And/Or Web API” as type
- Click Next Arrow
- In Sign-On URL, please type the url of the application where you are planning to deploy. For instance https://angularjs-client-app-url/
- In APP ID URI, please type following: https://<YOUR-TENANT-NAME>/todo-angularjs-client you should replace <YOUR-TENANT-NAME> with actual tenant name you have.
- Click Tick button at the bottom. It will take you to the configuration page of the application.
- Now download the Manifest and make following changes:
- Enable oauth2AllowImplicitFlow to true.
- Enable availableToOtherTenants to true.
- Save the .json file and upload it again.
- Configure WebAPI application
- Navigate to Azure Active Directory > Applications
- Click on Add link at the bottom
- Click on “Add an application my organization is developing” link
- In Name field, provide a descriptive name. For instance Todo WebAPI.
- Select “Web Application And/Or Web API” as type
- Click Next Arrow
- In Sign-On URL, please type the url of the application where you are planning to deploy. For instance https://todo-webapiurl/
- In APP ID URI, please type following: https://<YOUR-TENANT-NAME>/todo-webapi you should replace <YOUR-TENANT-NAME> with actual tenant name you have.
- Click Tick button at the bottom. It will take you to the configuration page of the application.
- Now download the Manifest and make following changes:
- Add client id GUID from Angularjs client configuration and paste it to knownClientApplications array like: “knownClientApplications”: [“client-id-guid”]
- Enable oauth2AllowImplicitFlow to true.
- Enable availableToOtherTenants to true.
- Save the .json file and upload it again.
- Now update your angularjs client application code
- Update adal configuration in app.js
- Update todoListSvc.js
- Now re-publish the Angularjs client application to App service
ADAL Configuration changes:
todoListSvc.js changes:
Before the application can be access by the users of a directory, we need initiate some process that copies the applications metadata to tenant’s directory. For this purpose a signup process is introduced like shown below that initiate the consent process:

The following code snippet initiates and presents consent screen to administrator:
When an administrator clicks on Signup button, ADAL presents consent screen on behalf of every users in his/her directory like shown below:

The number shown in above consent screen has following characteristics:
- Todo Application (This is the name you have configured in Azure Active directory. So put a proper name)
- It lists all the scope you have assigned when configured the application.
Once a signup process has been successfully completed, we need to let the admin know about it like shown below.

Also this is the step/point where we can capture the active directory information (e.g. active directory tenant id, admin name etc). These information can be used to control the access of the application to desired tenants.
If you want your application to be accessed by specific tenants, then you can introduce a workflow between signup processes that will let you (configured admin) know that tenant is just subscribed to use your application. If you approve that tenant then he/she and his/her users can use it. You can have this control by writing custom Authorize filter that query database and validate the incoming tenant.
For simplicity we allow every active directory’s tenant to have access to this application. So after signup process, Active directory will copy the application details to your active directory. Once above process is completed, you can access the application and start using it. Like shown below:

That’s it for now. Please provide your feedback.


Hi there, Is this solution works with Live accounts like hotmail.com/outlook.com/live.com.
I’m getting 401 error while accessing the api’s