The following Azure Resource Manager mode PowerShell will allow you to create an image of an existing Windows virtual machine in Azure, deploy it at will and join it to a domain if necessary.
Login to PowerShell
[code language=”powershell”]
Get-AzureSubscription
$SubID = "your-subscription-ID"
Login-AzureRMAccount
Select-AzureRmSubscription -SubscriptionId $SubID
[/code]
Create the virtual machine image
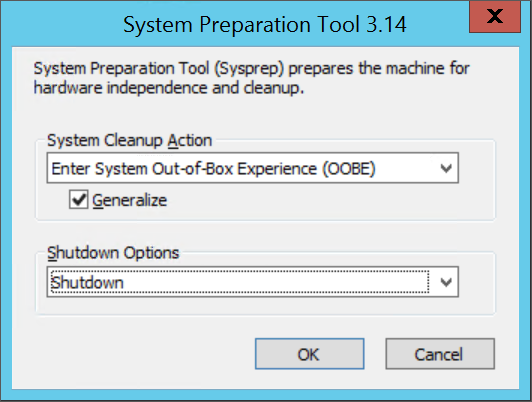
Run sysprep on the desired virtual machine in Azure.
[code language=”dos”]%windir%\system32\sysprep[/code]
When prompted for System Cleanup Action choose ‘Enter System Out of The Box Experience (OOBE)‘, Generalize and Shutdown from Shutdown Options.

Deallocate and generalize the virtual machine
[code language=”powershell”]
Stop-AzureRmVM -ResourceGroupName "resourceGroup" -Name "vmName"
Set-AzureRmVm -ResourceGroupName "resourceGroup" `
-Name "vmName" -Generalized
[/code]
Create the virtual machine image
[code language=”powershell”]
Save-AzureRmVMImage -ResourceGroupName YourResourceGroup `
-VMName YourWindowsVM `
-DestinationContainerName YourImagesContainer `
-VHDNamePrefix YourTemplatePrefix -Path Yourlocalfilepath\Filename.json
[/code]
Set the path to the image file you’ve just created the URI to which is available in the storage account where the image file was created under the following path.
[code language=”dos”]\storageAccountName\blobs\system\microsoft.compute\images\images\[/code]
[code language=”powershell”]
$imageURI = "https://storageAccountName.blob.core.windows.net/system/Microsoft.Compute/Images/imagesContainer/templatePrefix-osDisk.xxxxxxxx-xxxx-xxxx-xxxx-xxxxxxxxxxxx.vhd"
[/code]
Define the required variables
Complete the list of variables below needed to define the deployment.
[code language=”powershell”]
$rgname = "destination-resource-group-name"
$vmsize = "vm-size"
$vmname = "vm-name"
$locName= "vm-location"
$nicName = "network-interface-name"
$vnetName = "virtual-network-name"
$SubName = "subnet-name"
$DomainName = "domain-name"
$DomainJoinAdminName = $DomainName + "\username"
$DomainJoinPassword = "password"
$osDiskName = "OS-disk-name"
$osDiskVhdUri = "URL-to-your-OS-disk-image-file"
[/code]
Deploy the virtual machine.
Complete the deployment using the PowerShell below.
[code language=”powershell”]
$vm = New-AzureRmVMConfig -VMName $vmname -VMSize $vmsize
$vnet=Get-AzureRmVirtualNetwork -Name $vnetName -ResourceGroupName $rgName
$subnet = $Vnet.Subnets | Where-Object { $_.Name -eq $SubName}
$pip=New-AzureRmPublicIpAddress -Name $nicName -ResourceGroupName $rgName -Location $locName -AllocationMethod Dynamic
$nic=New-AzureRmNetworkInterface -Name $nicName -ResourceGroupName $rgName -Location $locName -SubnetId
$subnet.Id -PublicIpAddressId $pip.Id
$vm = Add-AzureRmVMNetworkInterface -VM $vm -Id $nic.Id
$vm = Set-AzureRmVMOSDisk -VM $vm -VhdUri $osDiskVhdUri -name $osDiskName -CreateOption attach -Windows
New-AzureRmVM -ResourceGroupName $rgname -Location $locName -VM $vm[/code]
Join the domain.
Join the virtual machines to the domain using the PowerShell below.
[code language=”powershell”]
Set-AzureRMVMExtension -VMName $VMName –ResourceGroupName $rgname -Name "JoinAD" -ExtensionType "JsonADDomainExtension" -Publisher "Microsoft.Compute" -TypeHandlerVersion "1.0" -Location $locName -Settings @{ "Name" = $DomainName; "OUPath" = ""; "User" = $DomainJoinAdminName; "Restart" = "true"; "Options" = 3} -ProtectedSettings @{ "Password" = $DomainJoinPassword}
[/code]

Hi,
great article, but do pip and nic really should have the same name?
$pip=New-AzureRmPublicIpAddress -Name $nicName…
$nic=New-AzureRmNetworkInterface -Name $nicName -ResourceGroupName $rgName..
What’s the thinking behind that notion?
Hello, it looks like your PowerShell code is not displaying the quote mark, so if anyone were to try to run it, it’ll error out. You may want to fix it. 🙂
Thanks Nick – should be fixed now.