As focus moves towards mobile-first development, enterprise developers should also focus on automated testing. In an enterprise setting, we like to test for merge conflicts, sync issues, authentication failures, etc and we need to test this on hundreds of devices.
In this post, we will look at how we can set UI test project and application code so that we can test against scenarios that we face in a real-life situation (no connection, sync issues, authentication failures). We will achieve this by utilizing mock application services in the application. The project is a Xamarin Forms application, where most of the application code resides in a .NET Core project. It does not matter which application pattern we use, e.g. MVC, MVVM or MVP.
In a basic unit test, we test various method of a library by mocking all services that it might depend upon and check against expected behaviour.
In UI tests, our aim is to check that UI layout works across multiple devices, and the fact the data displayed by the view is correct. We also check that the application behaves as expected in scenarios such as password expiration, where there is no connection, a failure to get device location etc. Using the same principles as above, we should be able to simulate multiple conditions/data sets for the UI and test against expected results.
All of the code for the below application is available for download at Sample UI Automation.
MOCKING
The first service to mock will be a network service, i.e. a service that is responsible for interacting will back-end APIs. Like any other project, we have a basic network service contract inside our application, defined as:
Assuming we already have an implementation for the above service called NetworkService (along with its unit tests), we are going to add a mocked service. The below code works in 2 modes, RECORD, and MOCK. In RECORD mode, the service acts similar to a real network service, but also saves those interactions (mostly JSON/XML payloads) to a file. These interactions are then used to replay the scene inside a UI test.
The RECORDING mode is used with an Android device so that we are able to save the file on the file system and retrieve it using ADB shell tool.
Project Setup
Before we use the above service, let’s define a new configuration for our solution called ‘Automation’.
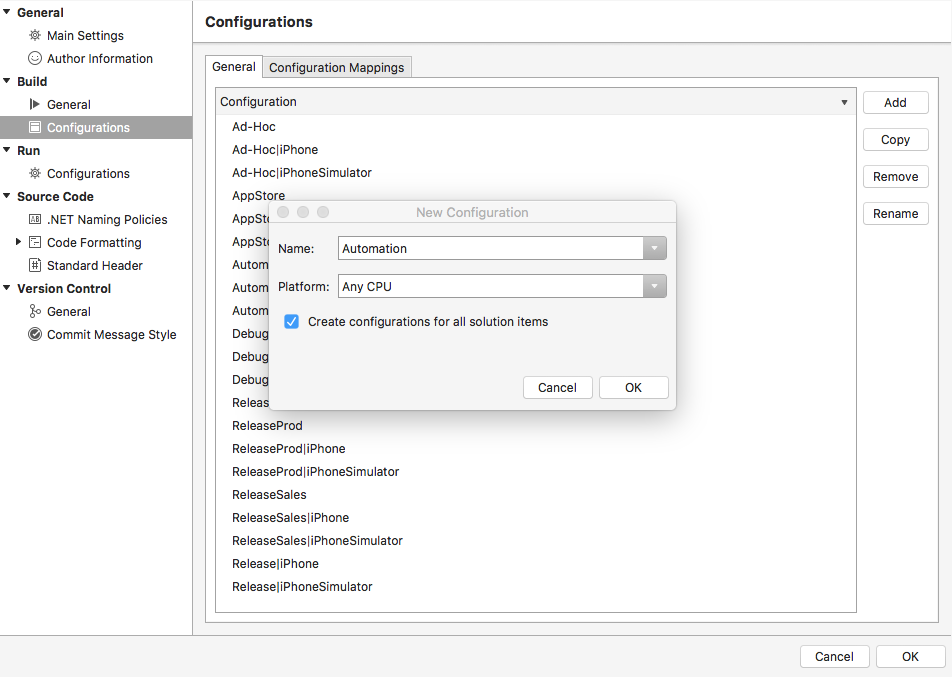
Right click on your project solution and click ‘Options’. Then under Build -> Configurations, select the ‘General’ tab. Now Click ‘Add’. Enter the name as ‘Automation’. Do this for each platform i.e. Any CPU, iPhone, and iPhoneSimulator.

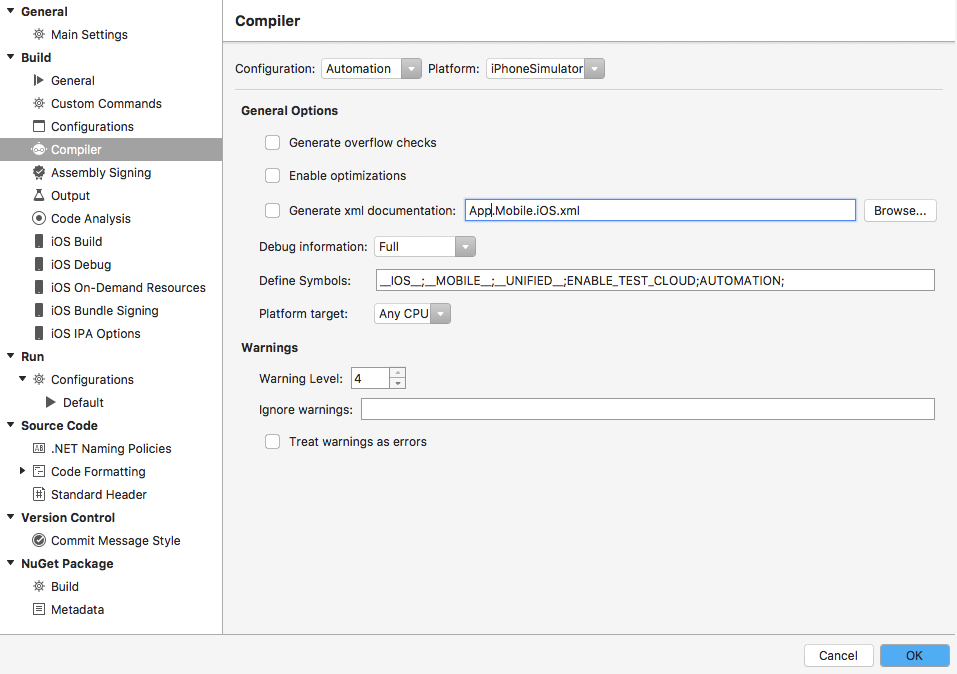
Now go to your main iOS and Android projects and define symbols for ‘Automation’ configuration. Here I have added ‘ENABLED_TEST_CLOUD’ and ‘AUTOMATION’.

For this project, we are using Autofac for IoC. When the configuration selected is Automation, the mock network service will be injected into the application.
The mock service, in the RECORDING mode, behaves like the real service and also save those interactions. After loading the service, all that is left to do is test your screen manually. Once the manual testing of the application is finished, we should be able to retrieve the MockRecoding.json file (name defined in the service above) from the Android device. This file will have all the data that we will need while writing our UI tests.
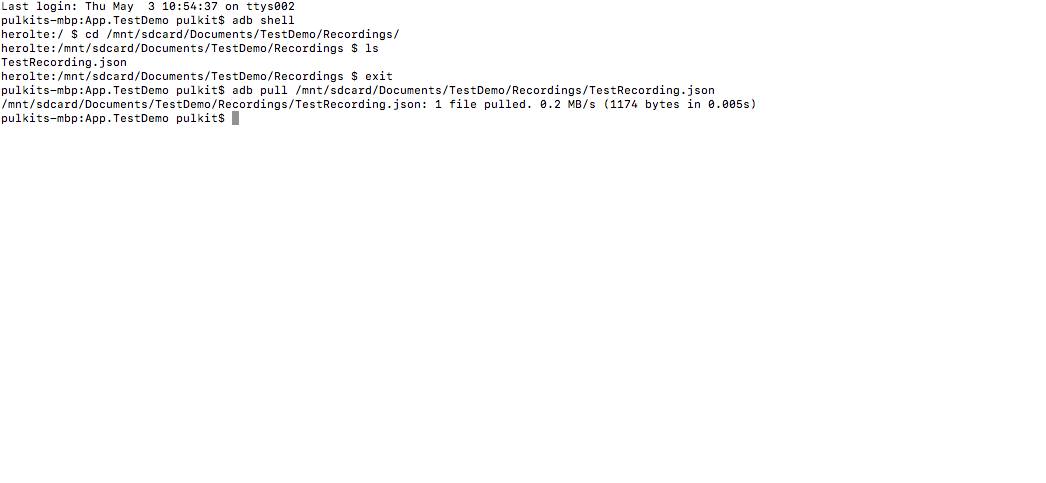
Retrieve the file using ADB tools as shown below

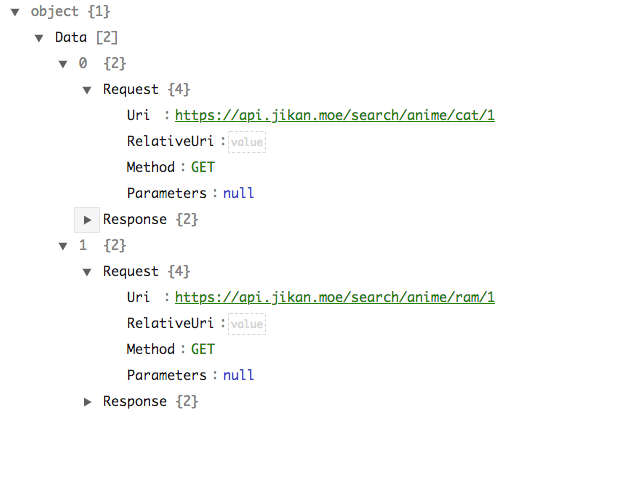
Here is the structure of the recording that we have saved.

Backdoor methods
Next, we will see how we can use the above-saved interaction file and use it in our tests. UI tests are mostly commands that we send to the application, such as button clicks and gestures, and we then test the UI for expected results. We need to write backdoor methods in our application that we can later invoke from a UI test.
Below is a ‘LoadApiData’ method, which injects data into mock service using its exposed public methods. Again, this code only works when the selected configuration is ‘Automation’.
Consider a scenario where we swipe down a list view to refresh it. For testing this scenario, we want to first set the data that the list initially has, then we will want to set the refreshed data, then perform the swipe gesture, and finally check that the list has the expected data in it.
Add the recording file that we saved earlier inside a folder in our UI test project. To use the above recording, add it to your test project inside a folder named ‘Data’. Then right-click on the file and set its ‘Build Action’ to ‘EmbeddedResource’. For more about the embedded resource, check out this blog.
The test can be as simple as this. Note how it uses the backdoor method before moving to list screen. Using Xamarin test cloud (now App center), we can run the below test on hundreds of devices and check for UI specifics.
With mocking and utilizing test cloud we are able to able to test the same scenario on hundreds of devices. Not only that – since we are mocking it, the same MockNetworkService can be used to perform development too, such as when APIs are under development. All we need is the JSON payload, and we can manually edit the recording file.
