Still stuck on azure service manager (ASM)? Have load balancers in environment which you need to configure often to remove/add vms? Not a worry. Even though when it comes to load balancer configuration option in ASM we are pretty much tied down to PowerShell but in this post I will show you how you can use simple PowerShell scripts to configure your load balancer.
Azure load balancer is a layer 4 load balancer (TCP, UDP) and manages the incoming traffic for load and availability. Azure classic portal does not provide any functionality for the Azure administrators to configure load balancer via portal. The only option we have is the PowerShell.
In real world scenario you will often need to take your azure Vms out of load balancer to perform updates or to trouble shoot production issues. And that’s where capability to configure your load balancers comes handy. Lets have a look at a simple scenario as an example where you have two azure Vms Web01 and Web02 in a subscription named Myazuresubscription, both are configured for an external load balancer in Azure named ExtLB. Vms have service names as Webserv01 and Websrv02 respectively. Let’s get started:
Remove Vm from Load Balancer
Let’s first log into our subscription using the following PowerShell commands.
Once you are logged into your subscription, its time to take your vm out of load balancer. Its worth mentioning here that basically this means that we are going to remove the endpoints of vm which are associated with load balancer. Typically, a vm behind load balancer would be a web server, meaning we will have end points configured for http and https. Hence we will need to remove both these endpoints to take it off the load balancer. However, you may have a different scenario but I will consider in this example that we have configured endpoint for both protocols.
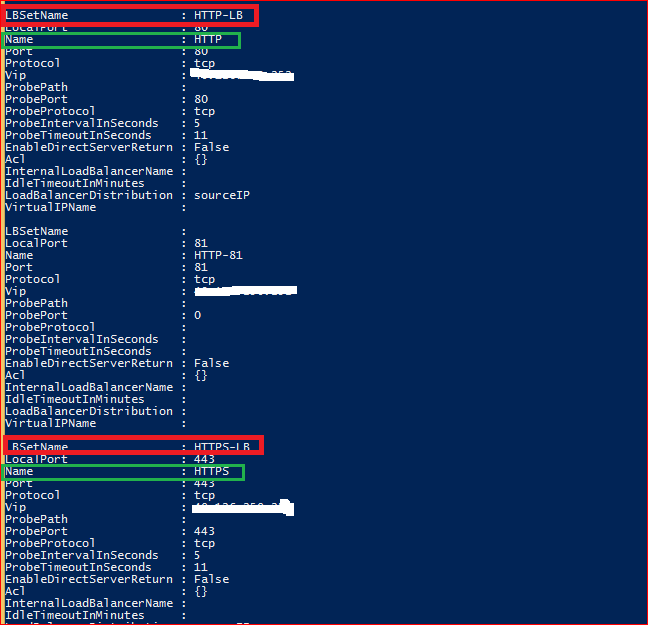
Let’s inspect the existing endpoints of vm Web01:
Important thing to note is that you will need to know the cloud service name of your VM. You can view this under your vm Dashboard in ASM and in ARM it will be the name of Resource group in which this vm resides.

The LBSetName highlighted in red represent the name of load balancer and name highlighted in green represent name of the endpoint. We will use the name of endpoint in our following PowerShell.
To remove Http and Https endpoints from load balancer we will run following command for each endpoint. So in this example we will run it twice once for http and second for https.
This will remove the VM from load balancer. To verify it you can rerun the command above we used to inspect vm endpoints and you will be able to see the endpoints removed in Output. Once you have removed all endpoints of VM configured with Load balancer you can work on your vm and once you are ready its time to add it back.
Important thing to consider is that you should not remove your both web servers together from load balancer as it may result in service loss.
Add VM to Azure Load Balancer
To add a vm into Azure load balancer, following PowerShell script can be used. Again you will need to run this script twice each for Http and Https end points.
And we are done. We have successfully added a vm into azure load balancer for both http and https endpoints. Important thing to remember here is that if your Vms are deployed in ARM, you can add/remove vms from load balancer using Azure portal as well as PowerShell.
Also, if you are looking to configure your load balancer for a distribution mode then have a read of another fantastic blog written by our Kloudie.
Azure Load Balancer – Set Distribution Mode
