First published on Nivlesh’s personal blog at https://nivleshc.wordpress.com
Introduction
Over the Easter holidays, while watching my son play with his radio-controlled toy car, I had a strange thought pop into my head. Instead of using the sticks on the remote control, won’t it be cool to control the car by using just your voice? You could tell the car to move forward, backward, left or right. What if you could save all the moves you have asked the car to take so far and then at a later time, get the car to replay all those moves?
Now, that would be a car I would love to play with!
In this blog, I will introduce the high-level design for accomplishing the above-mentioned goal. Then over the next few blogs I will take you through the steps to transform the high-level design into a working prototype.
Hardware Requirements
For this prototype, I settled on using the following hardware devices
- Amazon Echo Dot – this will be used to process my voice commands
- Raspberry Pi 3 with a GPIO expansion Breadboard
- A set of four 5v Relay Board Modules
- A radio-controlled race car
- A soldering iron, solder wire and a digital multimeter
Design considerations
To make the prototype work, I decided to create an Amazon Alexa Skill called race car. This will be used to process my voice commands.
Challenge #1: How would I control the radio-controlled car?
I found two options for this
1. Completely bypass the remote control and send the radio frequency instructions directly to the race car
2. Emulate the button presses on the remote control so that it “thinks” someone is pressing those buttons and then it sends the appropriate radio frequency instructions to the race car
Option Chosen: I chose option 2 because it required the least amount of work. For this option, the only thing I needed to figure out was what happened when a button was pressed. After some experimentation, I found the contacts on the printed circuit board (PCB) of the remote control which I could open and close the contacts on, to emulate the button presses.
Challenge #2: I will use a python script running on a Raspberry Pi 3 within my home network to emulate the button presses on the remote control. How will I get the Amazon Alexa Skill to connect to my Raspberry Pi 3 which is running on my internal home network?
Solution: I found a neat trick at https://developer.amazon.com/blogs/post/Tx14R0IYYGH3SKT/flask-ask-a-new-python-framework-for-rapid-alexa-skills-kit-development. To expose my internal Raspberry Pi 3 python script to the Amazon Alexa Skill, I will use ngrok (https://ngrok.com) to create a secure tunnel between my Raspberry Pi 3 and the ngrok service. This provides me with an HTTPS endpoint within ngrok’s domain, which forwards any requests directed at the ngrok endpoint to the python script running on my internal Raspberry Pi 3 using the secure tunnel.
High Level Design for the prototype
Using the above-mentioned design considerations, the below schematic was developed to create the prototype.
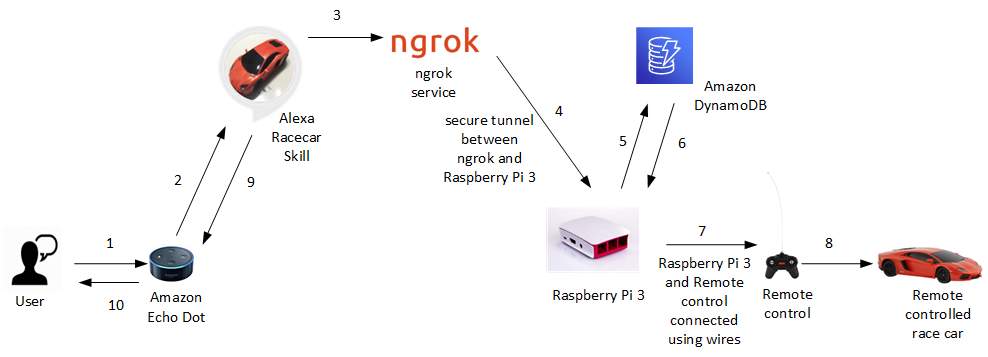
Let’s go through each of the steps (denoted by the numbers) to better understand the design.
1. The user will invoke the race car Amazon Alexa Skill and ask to either move the car in a certain direction, save all the movements that have been requested so far, or run a previously saved set of movements.
2. The Alexa device (Amazon Echo Dot) will record the audio from the user and send it to the Alexa Cloud for processing. Alexa Cloud converts the audio into JSON using Natural Language Processing (NLP). Based on the invocation name, it will pass the JSON file to the race car Amazon Alexa Skill.
3. The race car Amazon Alexa Skill will check to ensure that the intent supplied by the user is valid. Once confirmed, the race car Amazon Alexa Skill will pass the JSON to the endpoint defined for the skill. In our case, this is an endpoint that is hosted at ngrok (https://ngrok.com)
4. The ngrok endpoint will receive the JSON file from the race car Amazon Alexa Skill and then forward it using the secure tunnel to the python script running on the Raspberry Pi 3 within the home network. The python script will use the Flask-Ask framework to process the intents from the Alexa Skills Kit (more information for Flask-Ask can be obtained from https://flask-ask.readthedocs.io/en/latest/)
5. If the user requested to save all the car movements carried out so far, then the python script will write the movements to a table within Amazon DynamoDB.
6. If the user requested to load a previously saved set of movements, then the python script will read the movements from the table within Amazon DynamoDB.
7. If the use requested to either load a previously saved set of movements or to move the car in a certain direction, the python script will emulate the appropriate button presses on the remote control.
8. The remote control will translate the emulated button presses into radio frequency instructions and send them to the car. The car will receive these instructions and move accordingly.
To give you a sneak peek of the prototype, checkout the video at https://youtu.be/4SMYDhuri0Q (there are some minor bugs with the car movement which I intend on getting fixed as soon as possible).
In the next blog in this series, we will go through the process of “hacking” the remote control and also setting up the Raspberry Pi 3 ancillary hardware.
I hope to see you then.
Till then, enjoy!