With the introduction of Function as a Service capabilities in Azure (Web Functions) and AWS (Lambda) it has become possible to build applications which don’t use any servers in the cloud. This has many advantages from an operational perspective
- No server management
- Flexible scaling
- High availability
- No idle capacity
In addition to this we can easily leverage all of the components that the cloud computing providers have built to improve the way we process and manage data. This is particularly attractive for startups as costs will scale as their user base grows.
In this post I’m using the term “serverless” in a generic sense; this example does not use the Serverless framework which you’ll see mentioned frequently in Google searches.
We’re going to build an application in AWS which retrieves some simple data from a database and displays it to the user.
Once you’ve got this basic application working you can then start to use some of the other great PAAS components available to you in AWS.
Prerequisites
- An AWS account
- Generated AWS access key and secret
- This can be done from the Identity and Access Management console in AWS
- Create a user
- In the Security Credentials tab for the user you can create access keys
Technology:
- React + Bootstrap – for the basic user interface
- NodeJS + Express – for the REST APIs
- MySQL and Sequelize – for the database layer
The solution we’re building will use the following AWS components mapped to a traditional three tier application structure:
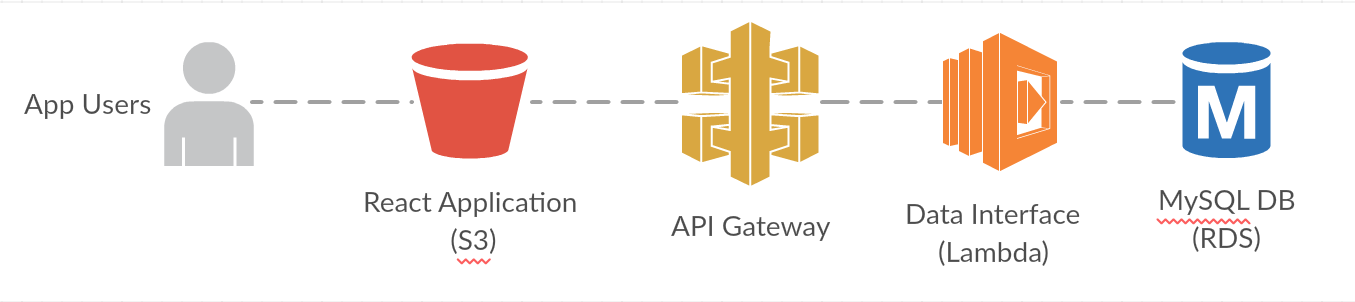
Application Layer
- S3
Business Layer
- API Gateway
- Lambda
Database Layer
- RDS
IDE
Lately I’ve been using the online Cloud9 IDE which allows me to access my code from anywhere.
It combines a conventional IDE with a Linux console. Its also built on a NodeJS backend which means that it supports npm natively and interfaces with AWS with minimal configuration.
Database
1. Log into the AWS console and go to RDS.
2. Create a database with the following parameters:
| Type | MySQL |
| Use Case | Dev/Test |
| DB instance class | db.t2.micro |
| DB instance identifier | backend |
| Master username | |
| Master password | |
| Database name | backend |
You’ll now need to wait until the database is created.
3. Load a MySQL client (I use MySQL Workbench) and connect to the database using the credentials you provided
4. Run the “serverless-demo.sql” script to create a table and add some data
(Source: https://en.wikipedia.org/wiki/List_of_The_Simpsons_characters)
REST API
The backend of the application will be a REST API written using NodeJS and Express which will retrieve data from a MySQL database hosted in RDS.
Doing this natively would involve manually creating and deploying the Lambda functions and using the API gateway to build our REST API. Using Claudia.js simplifies this by allowing you to create a simple Express application and to deploy it to AWS using a single deployment command. This will create the API Gateway components and the underlying Lambda functions.
1. Create a backend folder
2. Install Claudia.js and the API Builder into your project folder
~/backend$ npm install claudia -d
~/backend$ npm install claudia-api-builder -S
3. Create a .aws folder in your root folder
4. Inside the .aws folder create a file called “credentials”
~/.aws$ nano credentials
The file will have the following contents:
5. Inside the backend folder create a file called “app.js” with the following code.The credentials file should have the following structure
- Run the following command to build your prototype API
~/backend $ claudia create –region –api-module app
This will deploy a basic “hello world” application into your AWS account and generate a “claudia.json” into your root directory. It will generate the following in AWS:
- A new role “backend-executor”
- A lambda function “backend”
- A new API in the API Gateway called “backend”
The following details will be displayed to you at the completion of the build process. Make sure that you copy the URL because you’ll use it later in the build process.
“lambda”: {
“role”: “backend-executor”,
“name”: “backend”,
“region”: “”
},
api”: {
“id”: “”,
“module”: “app”,
“url”: “https://YOUR_API_KEY.execute-api.amazonaws.com/latest”
}
}
- If you go to https://YOU_API_KEY.execute-api.amazonaws.com/latest/hello you should see the hello world text.Now that our basic API is working, the next step is to retrieve data from the database we created – the first step is to install the Sequelize, MySQL and MySQL2 NodeJS modules
~/backend$ npm install mysql
~/backend$ npm install mysql2
~/backend$ npm install sequelize
- To use Sequelize we need to create a model file which reflects the structure of the table we created in our database. Create a “models” directory in your backend folder. Then create a “characters.js” file in the models folder. The file should have the following content:
- We now have to update your “app.js” to the following. You’ll notice that the code contains lots of Promises which are a necessity when using asynchronous functionality in Lambda. The Promises mean that the Lamdba function will wait until the response from the database is received and the promise is resolved. If Promises aren’t used the asynchronous requests will be sent but the Lambda function won’t wait for it to come back. Make sure that you update the App Id and AWS Region.
- Open the “package.json” and update the scripts attribute so it looks like this (update the AWS Region):
- Run the following command to update your build in AWS:
~/backend$ npm run deploy
- If you go to https://YOUR_API_KEY.execute-api.amazonaws.com/latest/characters you should see a JSON extract of data from the database.
- By default the generated Lambda will have a “Timeout” value of 3s. This may be too little for your function to run and you may get an error when you go to the above link. If you navigate to the Lambda section of AWS and click on the name of your function you can edit the “Timeout” value and set it to 60s.
Front End
- To speed up the development time for our React frontend we’ll use create-react-app. This gives us a pre-configured react application and all of the common NodeJS libraries we will need.
~$ npm install -g create-react-app
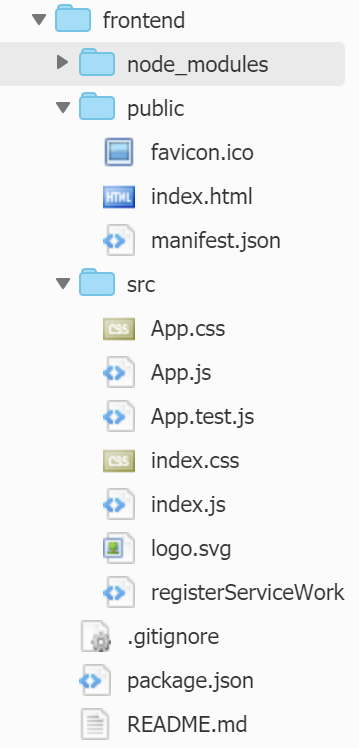
~$ create-react-app frontend
This will create a project with the following structure:
- To start the build server
~$ cd frontend
~/frontend$ npm start
You should see a message saying something like:
Compiled successfully!
You can now view frontend in the browser.
Local: http://localhost:8080/
On Your Network: http://172.17.0.43:8080/
Note that the development build is not optimized.
To create a production build, use npm run build.
If we go to the URL we should see the following page:

- Create a new folder in the src folder called “components”
- Create a new folder in the components folder called “characters”
- Create a file called Characters.js in the characters folder with the following content (update the API details with your App ID and AWS Region:
This will load data from our backend webservice when the component is loaded and then display it in a table.
- Create a new file in the characters folder called characters.css with the following content:
- Update src/App.js so that it looks like this
- Update public/index.html to add a reference to a CDN version of Bootstrap in the header
- If you look at your application in a browser it will now look something like this:
- We’ve now successfully created a React app which uses our webservice backend and displays the data to the user
- To make the application fully serverless we need to build the final version of the React app and upload it into S3
~/frontend$ npm run build
This will create an optimised version of our React app in a new folder called “build”.
- Log into the AWS console and create a new S3 bucket called “serverless-demo-bucket”
- Make sure that you make the bucket “public”
- Copy the contents of your build folder into the S3 bucket
- Click on “serverless-demo-bucket” and then click on the “properties” tab
- Enable “Static Web Hosting” – and copy the name of the endpoint – this will be something like: http://serverless-demo-bucket.s3-website-YOUR_AWS_REGION.amazonaws.com
- If you paste this URL into a browser your website will be displayed – congratulations you’ve just create the building blocks for a serverless three tier application
The files listed above can be found in this GIT repository:
https://github.com/hugesean/serverless-demo