Sharegate supports PowerShell scripting which can be used to automate and schedule migrations. In this post, I am going to demonstrate an example of end to end automation to migrate network Shares to SharePoint Online. The process effectively reduces the task of executing migrations to “just flicking a switch”.
Pre-Migration
The following pre-migration activities were conducted before the actual migration:
- Analysis of Network Shares
- Discussions with stakeholders from different business units to identify content needs
- Pilot migrations to identify average throughput capability of migration environment
- Identification of acceptable data filtration criteria, and prepare Sharegate migration template files based on business requirements
- Derive a migration plan from above steps
Migration Automation flow
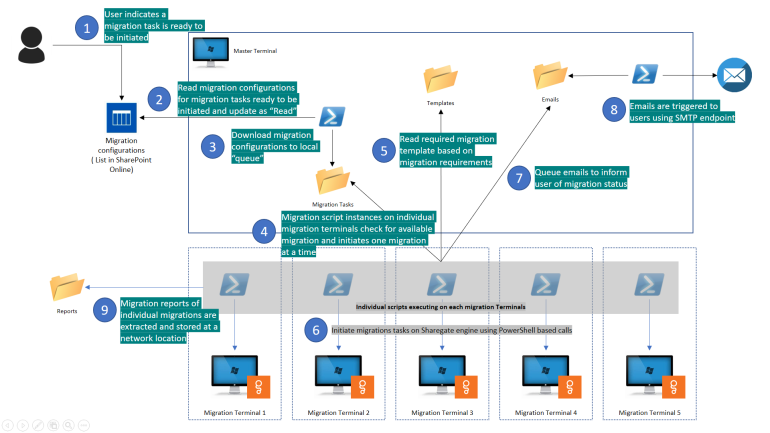
The diagram represents a high-level flow of the process:

The migration automation was implemented to execute the following steps:
- Migration team indicates that migration(s) are ready to be initiated by updating the list item(s) in the SharePoint list
- Updated item(s) are detected by a PowerShell script polling the SharePoint list
- The list item data is downloaded as a CSV file. It is one CSV file per list item. The list item status is updated to “started”, so that it would not be read again
- The CSV file(s) are picked up by another migration PowerShell script to initiate migration using Sharegate
- The required migration template is selected based on the options specified in the migration list item / csv to create a migration package
- The prepared migration task is queued for migration with Sharegate, and migration is executed
- Information mails are “queued” to be dispatched to migration team
- Emails are sent out to the recipients
- The migration reports are extracted out as CSV and stored at a network location.
Environment Setup
Software Components
The following software components were utilized for the implementing the automation:
Environment considerations
Master and Migration terminals hosted as Virtual machines – Each terminal is a windows 10 virtual machine. The use of virtual machines provides following advantages over using desktops:
- VMs are generally deployed directly in datacenters, hence, near the data source.
- Are available all the time and are not affected by power outages or manual shutdowns
- Can be easily scaled up or down based on the project requirements
- Benefit from having better internet connectivity and separate internet routing can be drawn up based on requirements
Single Master Terminal – A single master terminal is useful to centrally manage all other migration terminals. Using a single master terminal offers following advantages:
- Single point of entry to migration process
- Acts as central store for scripts, templates, aggregated reports
- Acts as a single agent to execute non-sequential tasks such as sending out communication mails
Multiple Migration terminals – It would be optimal to initiate parallel migrations and use multiple machines (terminals) to expedite overall throughput by parallel runs in an available migration window (generally non-business hours). Sharegate has option to use either 1 or 5 licenses at once during migration. We utilized 5 ShareGate licenses on 5 separate migration terminals.
PowerShell Remoting – Using PowerShell remoting allows opening remote PowerShell sessions to other windows machines. This will allow the migration team to control and manage migrations using just one terminal (Master Terminal) and simplify monitoring of simultaneous migration tasks. More information about PowerShell remoting can be found here.
PowerShell execution policy – The scripts running on migration terminals will be stored at a network location in Master Terminal. This will allow changing / updating scripts on the fly without copying the script over to other migration terminals. The script execution policy of the PowerShell window will need to be set as “Bypass” to allow execution of scripts stored in network location (for quick reference, the command is “Set-ExecutionPolicy -ExecutionPolicy Bypass”.
Windows Scheduled Tasks – The PowerShell scripts are scheduled as tasks through Windows Task schedulers and these tasks could be managed remotely using scripts running on the migration terminals. The scripts are stored at a network location in master terminal.
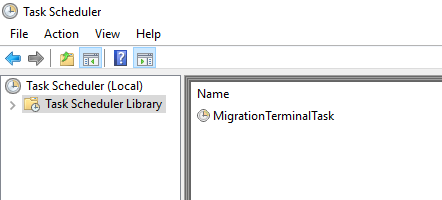
Basic task in a windows scheduler
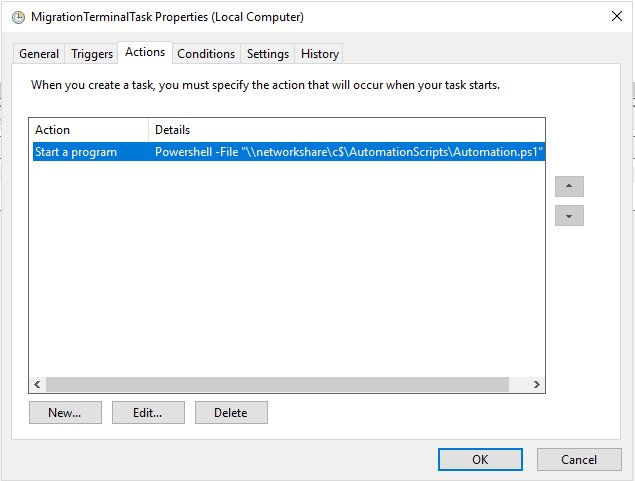
PowerShell script file configured to run as a Task
Hardware specifications
Master terminal (Manage migrations)
- 2 cores, 4 GB RAM, 100 GB HDD
- Used for managing scripts execution tasks on other terminals (start, stop, disable, enable)
- Used for centrally storing all scripts and ShareGate property mapping and migration templates
- Used for Initiating mails (configured as basic tasks in task scheduler)
- Used for detecting and downloading migration configuration of tasks ready to be initiated (configured as basic tasks in task scheduler)
- Windows 10 virtual machine installed with the required software.
- Script execution policy set as “Bypass”
Migration terminals (Execute migrations)
- 8 cores, 16 GB RAM, 100 GB HDD
- Used for processing migration tasks (configured as basic tasks in windows task scheduler)
- Multiple migration terminals may be set up based on the available Sharegate licenses
- Windows 10 Virtual machines each installed with the required software.
- Activated Sharegate license on each of the migration terminals
- PowerShell remoting needs to be enabled
- Script execution policy set as “Bypass”
Migration Process
Initiate queueing of Migrations
Before migration, migration team must perform manual pre – migration tasks (if any as defined by the migration process as defined and agreed with stake holders). Some of the pre-migration tasks / checks may be:
- Inform other teams about a possible network surge
- Confirming if another activity is consuming bandwith (scheduled updates)
- Inform the impacted business users about the migration – this would be generally set up as the communication plan
- Freezing the source data store as “read-only”
A list was created on a SharePoint online site to enable users to indicate that the migration is ready to be processed. The updates in this list shall trigger the actual migration downstream. The migration plan is pre-populated in this list as a part of migration planning phase. The migration team can then update one of the fields (ReadyToMigrate in this case) to initiate the migration. Migration status is also updated back to this list by the automation process or skip a planned migration (if so desired).
The list provides as a single point of entry to initiate and monitor migrations. In other words, we are abstracting out migration processing with this list and can be an effective tool for migration and communication teams.
The list was created with the following columns:
- Source => Network Share root path
- Destination site => https://yourteanant.sharepoint.com/sites/<Sitename>
- Destination Library => Destination library on the site
- Ready to migrate => Indicates that the migration is ready to be triggered
- Migrate all data => Indicate if all data from the source is to be migrated (default is No). Only filtered data based on the predefined options will be migrated. (more on filtered options can be found here)
- Started => updated by automation when the migration package has been downloaded
- Migrated => updated by automation after migration completion
- Terminal Name => updated by automation specifying the terminal being used to migrate the task

Migration configuration list
After the migration team is ready to initiate the migration, the field “ReadyToMigrate” for the migration item in the SharePoint list is updated to “Yes”.
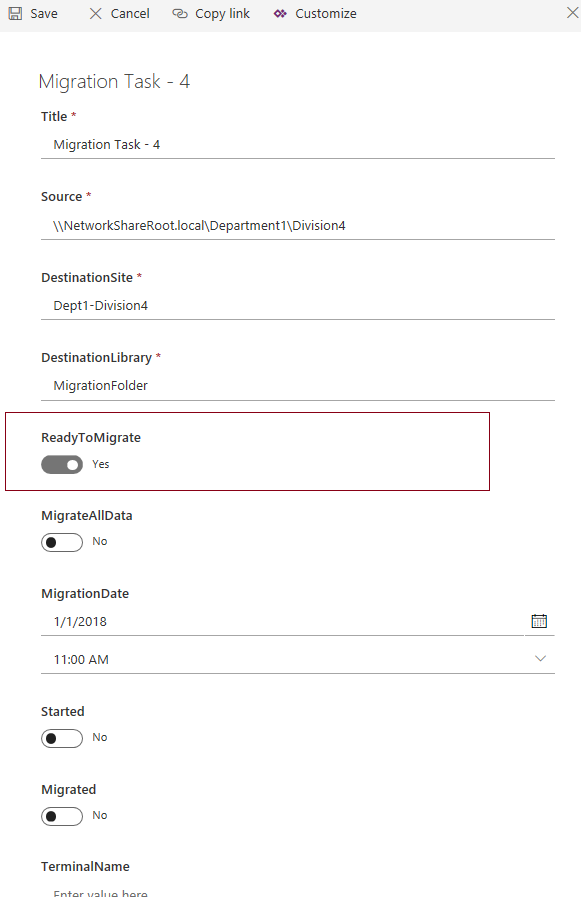
“Flicking the switch”
Script to create the migration configuration list
The script below creres the source list in sharepoint online.
Script to store credentials
The file stores the credentials and can be used subsequent scripts.
Queuing the migration tasks
A PowerShell script is executed to poll the migration configuration list in SharePoint at regular intervals to determine if a migration task is ready to be initiated. The available migration configurations are then downloaded as CSV files, one item / file and stored in a migration packages folder on the master terminal. Each CSV file maps to one migration task to be executed by a migration terminal and ensures that the same migration task is not executed by more than one terminal. It is important that this script runs on a single terminal to ensure only one migration is executed for one source item.
Execute Migration
The downloaded migration configuration CSV files are detected by migration script tasks executing on each of the migration terminals. Based on the specified source, destination and migration options the following tasks are executed:
- Reads the item from configuration list to retrieve updated data based on item ID
- Verify Source. Additionally, sends a failure mail if source is invalid or not available
- Revalidates if a migration is already initiated by another terminal
- Updates the “TerminalName” field in the SharePoint list to indicate an initiated migration
- Checks if the destination site is created. Creates if not already available
- Checks if the destination library is created. Creates if not already available
- Triggers an information mail informing migration start
- Loads the required configurations based on the required migration outcome. The migration configurations specify migration options such as cut over dates, source data filters, security and metadata. More about this can be found here.
- Initiates the migration task
- Extracts the migration report and stores as CSV
- Extracts the secondary migration report as CSV to derive paths of all files successfully migrated. These CSV can be read by an optional downstream process.
- Triggers an information mail informing migration is completed
- Checks for another queued migration to repeat the procedure.
The automatioin script is given below –
Additional Scripts
Send Mails
The script triggers emails to required recipients.
This script polls a folder: ‘\masterterminal\c$\AutomatedMigrationData\mails\input’ to check any files to be send out as emails. The csv files sepcify subject and body to be send out as emails to recipients configured in the script. Processed CSV files are moved to final folder.
Manage migration tasks (scheduled tasks)
The PowerShell script utilizes PowerShell remoting to manage windows Task scheduler tasks configured on other terminals.
Conclusion
The migration automation process as described above helps in automating the migration project and reduces manual overhead during the migration. Since the scripts utilize pre-configured migration options / templates, the outcome is consistent with the plan. Controlling and monitoring migration tasks utilizing a SharePoint list introduces transparency in the system and abstracts the migration complexity. Business stakeholders can review migration status easily from the SharePoint list and this ensures an effective communication channel. Automated mails informing about migration status provide additional information about the migration. The migration tasks are executed in parallel across multiple migration machines which aids in a better utilization of available migration window.
Hi Vibhu Kuchhal,
Interesting concept you have here. You mentioned ‘The automatioin script is given below –’. I haven’t seen them in your post. Could you provide (a link to) them/ update the post?
Thanks.
Hi,
I also didn’t find the Script link that you have provided. You have mentioned that script is given below. could you please provide the link of the script?