Continued from part 1
The 2nd part of the series will describe how we construct Azure Resource Manager linked templates.
Quick Recap
In the first part, we set up the first template which deploys the storage, virtual network, and subnets. This will be our “master” template where we will link all our related templates.
- 1st template: master template – we will modify this template slightly to capture parameters and the linked templates
- 2nd template: two web servers (IIS) – this is a new template
- 3rd template: DB server (MySQL) – a new template
We will use the Azure quickstart templates on GitHub as the basis for the second and third templates. The quickstart template is your go-to site to shop for Azure templates. The point of using templates is for re-usability and most likely you do not need to start with a blank template as you may find existing templates that you can build upon.
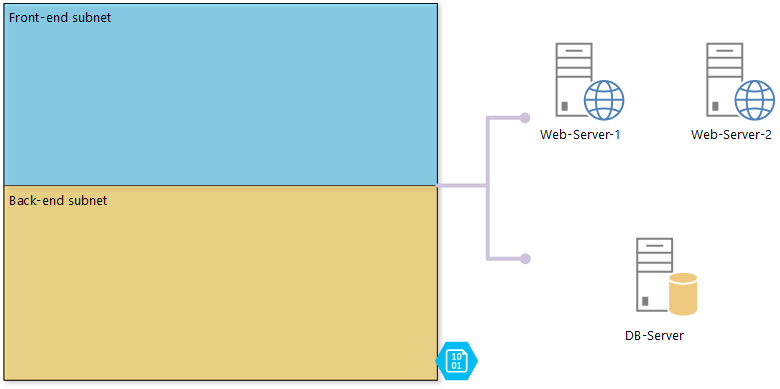
The templates will provision two Windows web servers with IIS + one Linux server with mySQL . The second template is adapted from windows on IIS. This template was modified so that it creates two instances of IIS server – installed using the DSC extension. There are some interesting aspects of this template that is worth examining, especially the way we deploy multiple resource instances. The third template is based on mySql on Ubuntu. This template, like the second template, was modified to reference our master template.
We will also revisit the master template in order to link all of our templates together. All templates are provided at the end of this blog post including where to find them on Github.
The templates are not particularly short but bear with me as I highlight the interesting bits so we understand their significance.
The point of using templates is for re-usability and most likely you do not need to start with a blank template as you may find existing templates that you can build upon.
Important Bits
Second template: two web servers (IIS)
First is the use of Copy() function to create multiple resource instances. This function allows you to create multiple instances of a given resource. This will result in a less-cluttered template as you do not need to copy & paste resource when more than one resource is needed.
"copy" : {
        "name" : "publicIpCopy",
        "count" : "[parameters('numOfInstances')]"
 }
The above has a number of consequences. We have a way to copy resource – which is all well and good. But we need to ensure that any resource that is duplicated has a unique name, or otherwise they will be in conflict. This is avoided by the concat() and copyIndex() functions. These two functions allow us to concatenate our base name with a counter index of the resource we are duplicating.
"resources" : {
   "name" : "[concat(parameters('vmName'), copyIndex())]"
}
Then, what do we do with the dependsOn attribute when we have multiple resources created. Good question! And the answer is the same :), we will use the copyIndex() to point Azure RM to the resource it needs. This is the same for assigning resourceId in the properties attribute.
"dependsOn" : [
   "[concat('Microsoft.Network/networkInterfaces/', variables('nicName'), copyIndex())]"
]

"id": "[concat(resourceId('Microsoft.Network/networkInterfaces', variables('nicName')), copyIndex())]"
There is also a DSC (desired state configuration) extension, this extension is responsible for installing the web server role using the PowerShell provider.
Finally, all references to the creation of storage account and virtual network are removed as we employ VNET and storage account from the master template. They are provided as parameters.
Third template: one DB server (MySQL)
The DB template is pretty basic, we will deploy a new Linux VM with a mySQL database installed using the Linux extension. Similar to the second template, we will also replace storage and virtual network resources definition with parameters so that they refer to our master template.
Linking all the templates together
There are two ways we can link templates: the first method is to hard-code the URLs of the linked templates. The second method is a smarter way of linking templates (and is my preferred approach) – which uses variables to link templates.
OK, there is a third method :), using parameters; and based on what being passed, deploy specific linked templates (also known as conditional nested templates). Note: I will explain the two methods and I might save the third one for another time as it is beyond the scope of this post.
Hard-coded
With this method, we simply hard-code the URLs of our linked templates.
{
 "apiVersion": "2015-01-01",
 "name": "dbserverLinked",
 "type": "Microsoft.Resources/deployments",
 "properties": {
   "mode": "Incremental",
   "templateLink": {
     "uri": "https://urltotemplate.com/linkedtemplate.json",
     "contentVersion": "1.0.0.0"
   },
   "parametersLink": {
     "uri": "https://urltotemplate.com/linkedparamtemplate.json",
     "contentVersion": "1.0.0.0"
   }
 }
}
We could, for example, use variables to group all the URL’s together.
"variables" {
  "linkedTemplate" : {
    "templateUrl" : "https://urltotemplate.com/linkedtemplate.json",
    "paramUrl" : "https://urltotemplate.com/linkedtemplate.param.json"
  }
}

...
"templateLink": {
     "uri": "[variables('linkedTemplate').templateUrl]",
     "contentVersion":"1.0.0.0"
},
"parametersLink": {
     "uri": "[variables('linkedTemplate').paramUrl]",
     "contentVersion":"1.0.0.0"
}
...
The downside of the hard-coded way is that you need to update every single linked template URL every time you move your templates e.g when you fork or migrate to templates in your source control.
The downside of the hard-coded way is that you need to update every single linked template URLs every time you move your templates.
Alternatively, we can choose to pass the parameters in our template – as opposed to using parameters file denoted by the parametersLink attribute.
"templateLink": {
     "uri": "[variables('linkedTemplate').templateUrl]",
     "contentVersion": "1.0.0.0"
},
"parameters": {
     "attribute1" : "someValue",
     "attribute2" : "someValue"
}
The above method can also be applied to the second method (discussed below).
Variables to construct templates
This is the method we will use to link our templates together. The approach is rather simple albeit more elegant, we assign a variable which contains the URL to the directory of all linked templates. From this variable, linked template variables are built utilising the concat() method.
This method effectively avoids the need to update every single URL as we only need to update the shared URL variable which the linked templates’ URLs are built on (by concatenating the two together).
"variables" : {
   "sharedBaseUrl" : "https://raw.githubusercontent.com/vicperdana/azure-quickstart-templates/master/windows-iis-sql-linked-multivm/nested/"
   "secondTemplate" : {
     "templateUrl" : "[concat(variables('sharedBaseUrl'),'azuredeploy-web.json')]",
     "paramUrl" : "[concat(variables('sharedBaseUrl'),'azuredeploy-web.parameters.json')]"
   }
   ...
}

...
"resources" : {
   "templateLink": {
       "uri": "[variables('secondTemplate').templateUrl]",
       "contentVersion":"1.0.0.0"
    },
   "parametersLink": {
       "uri": "[variables('secondTemplate').paramUrl]",
       "contentVersion":"1.0.0.0"
    }
As you can see there are a few permutations we can use, whichever method you prefer, it is quite easy to link templates together.
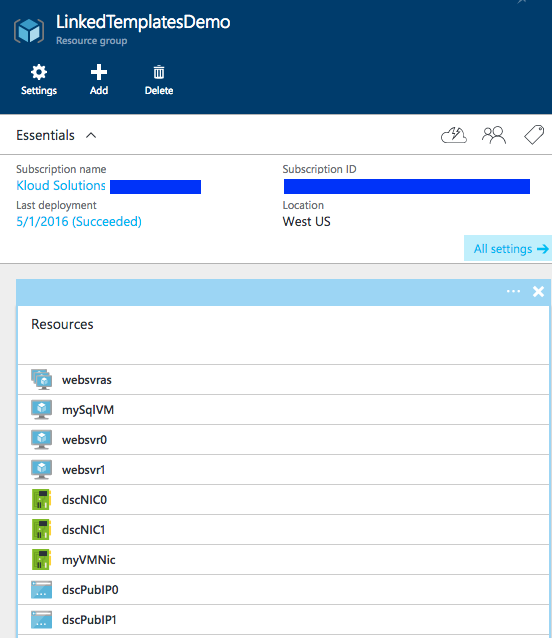
All templates are now linked

The linked templates on Azure portal once deployed
Extra bits
One thing we need to keep in mind is that each linked template is an entity that can be deployed independently.
When linking templates, ensure that no resource in the parent template or other templates other than what is being defined on the current template is referred to in the dependsOn attribute, otherwise it will throw an error. This makes sense since the dependsOn attribute scope is within a template and it does not have visibility to other templates other than where it is defined.
Finally, Azure Resource Manager has a two-part validation: before and during deployment. The before deployment checks whether a template is syntactically correct and that it would be accepted by the Azure Resource Manager. Then the during deployment validation (runtime) checks for resource dependencies within your Azure subscription. The templates may seem valid, but until they are deployed as there is no fool-proof way to guarantee that it is a working template. However, as a good practice when deploying templates, make pre-deployment validation a habit as it will catch most obvious errors detected by Azure Resource Manager.
As a good practice when deploying templates, make pre-deployment validation a habit as it will catch most obvious errors detected by Azure Resource Manager.
The next post
Now that we have covered the linked templates – we will look at how we can leverage KeyVault to secure our templates and any sensitive information passed into them such as credentials. Hang tight :).
Below, you will find the updates made to the master template & the new templates; or if you are looking for the full template including the linked ones, I have made them available on my forked quick-templates on Github. Enjoy!
Updated master template
2 x web servers template — second template
The DB template — third template
Thanks for sharing this method. It’s helping me deploy things alot better. I stripped out dsc configs from the web VM’s and added a “dnsLabelPrefix” to it. It’s complaining about:
New-AzureRmResourceGroupDeployment : 12:15:46 PM – Resource Microsoft.Network/publicIPAddresses ‘PubIP1’ failed with message ‘{
“error”: {
“code”: “DnsRecordInUse”,
“message”: “DNS record demo.southcentralus.cloudapp.azure.com is already used by another public IP.”,
“details”: []
}
}’
Hi – I’m surprised no one has asked this yet but what what are the steps in deploy this with VS? When I run a new deployment I’m getting errors. Slowly, one by one, I am working through them. For example the linked parameter file was still passing your original storage account name which obviously raised a conflict. However, try as I might, I am still getting errors.
What’s my ask? I was hoping you could provide instructions for how to run the deployment from a new deployment from VS2017. Even something high level would be appreciated. For example, ‘you may need to host parameter files within your GitHub account so you can edit them.’
That sort of thing…..
But great work! Seeing the examples and working through the errors have greatly strengthened my understanding of how the templates themselves work.
Fingers poised abpve the keyboard I await your response….even if its ‘Sorry, I don’t have time.’
😉
CloudLasso