
This post suggests the idea of automatic copying of SharePoint Online(SPO) workflow tasks’ metadata into the external data warehouse. In this scenario, workflow tasks are becoming a subject of another workflow that performs automatic copying of task’s data into the external database using a custom Web API endpoint as the interface to that database. Commonly, the requirement to move workflow tasks data elsewhere arises from limitations of SPO. In particular, SPO throttles requests for access to workflow data making it virtually impossible to create a meaningful workflow reporting system with large amounts of workflow tasks. The easiest approach to solve the problem is to use Nintex workflow to “listen” to the changes in the workflow tasks, then request the task data via SPO REST API and, finally, send the data to external data warehouse Web API endpoint.
Some SPO solutions require creation of a reporting system that includes workflow tasks’ metadata. For example, it could be a report about documents with statuses of workflows linked to these documents. Using conventional approach (ex. SPO REST API) to obtain the data seems unfeasible as SPO throttles requests for workflow data. In fact, the throttling is so tight that generation of reports with more than a hundred of records is unrealistic. In addition to that, many companies would like to create Business Intelligence(BI) systems analysing workflow tasks data. Having data warehouse with all the workflow tasks metadata can assist in this job very well.
To be able to implement the solution a few prerequisites must be met. You must know basics of Nintex workflow creation and to be able to create a backend solution with the database of your choice and custom Web API endpoint that allows you to write the data model to that database. In this post we have used Visual Studio 2015 and created ordinary REST Web API 2.0 project with Azure SQL Database.
The solution will involve following steps:
- Get sample of your workflow task metadata and create your data model.
- Create a Web API capable of writing data model to the database.
- Expose one POST endpoint method of the Web REST API that accepts JSON model of the workflow task metadata.
- Create Nintex workflow in the SPO list storing your workflow tasks.
- Design Nintex workflow: call SPO REST API to get JSON metadata and pass this JSON object to your Web API hook.
Below is detailed description of each step.
We are looking here to export metadata of a workflow task. We need to find the SPO list that holds all your workflow tasks and navigate there. You will need a name of the list to be able to start calling SPO REST API. It is better to use a REST tool to perform Web API requests. Many people use Fiddler or Postman (Chrome Extension) for this job. Request SPO REST API to get a sample of JSON data that you want to put into your database. The request will look similar to this example:
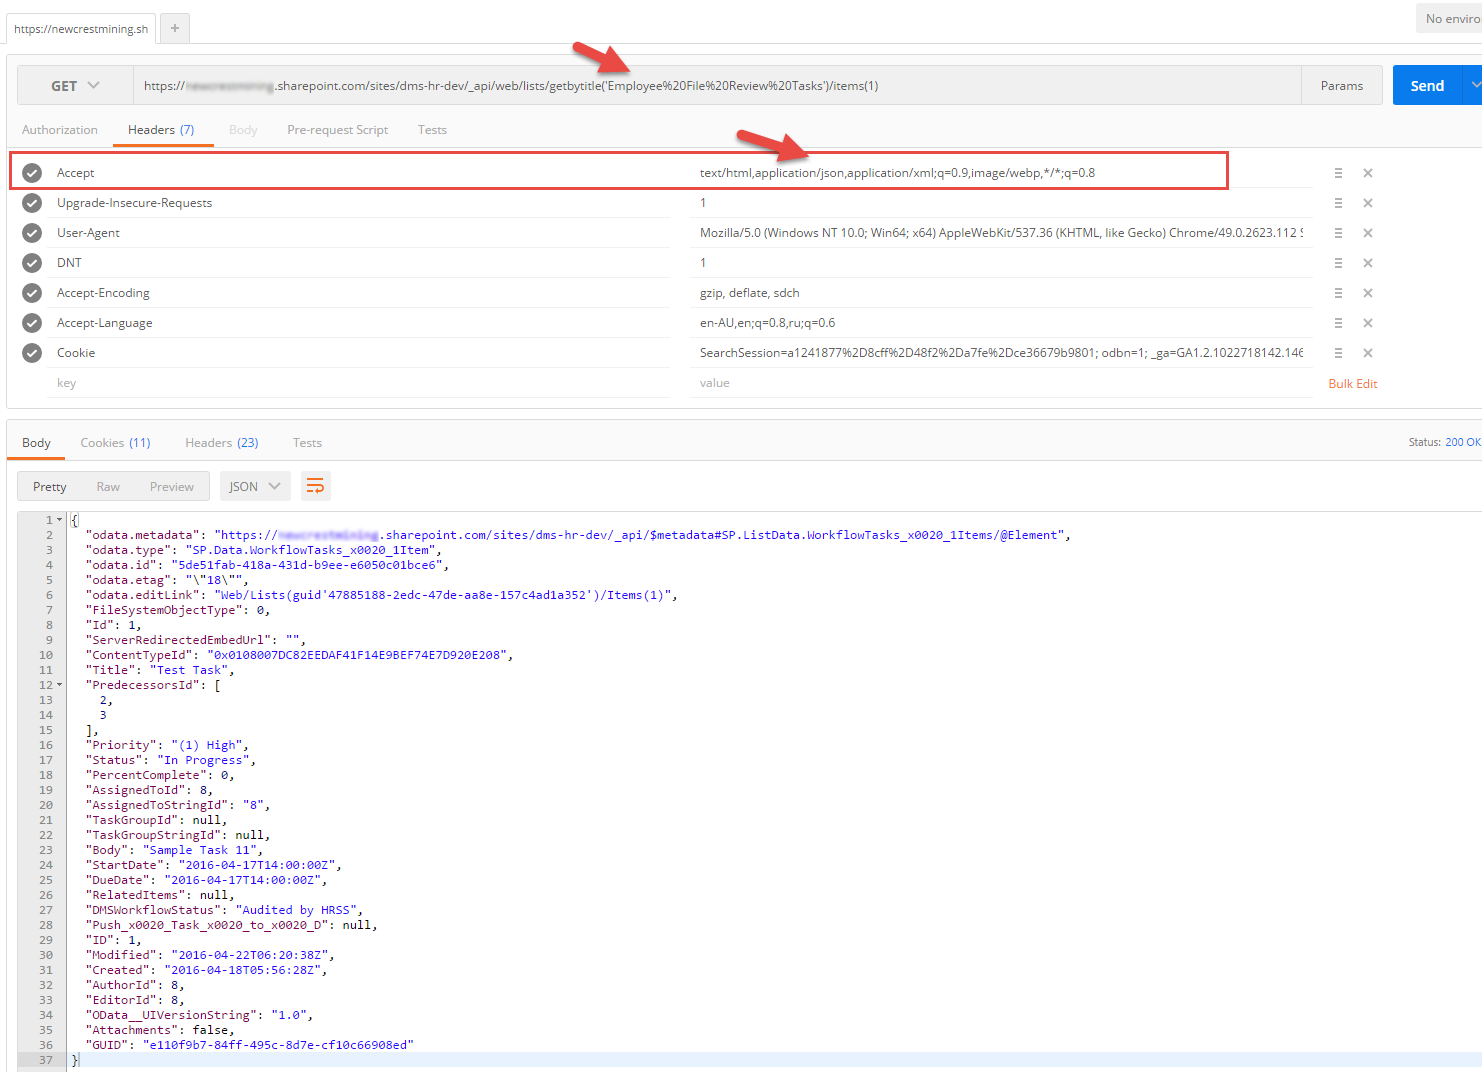
The key element in this request is getbytitle(“list name”), where “list name” is SPO list name of your workflow tasks. Please remember to add header “Accept” with the value “application/json”. It tells SPO to return JSON instead of the HTML. As a result, you will get one JSON object that contains JSON metadata of Task 1. This JSON object is the example of data that you will need to put into your database. Not all fields are required in the data warehouse. We need to create a data model containing only fields of our choice. For example, it can look like this one in C# and all properties are based on model returned earlier:
The next step is to create a Web API that exposes a single method that accepts our model as a parameter from the body of the request. You can choose any REST Web API design. We have created a simple Web API 2.0 in Visual Studio 2015 using general wizard for MVC, Web API 2.0 project. Then, we have added an empty controller and filled it with the code that works with the Entity Framework to write data model to the database. We have also created code-first EF database context that works with just one entity described above.
The code of the controller:
The code of the database context for Entity Framework
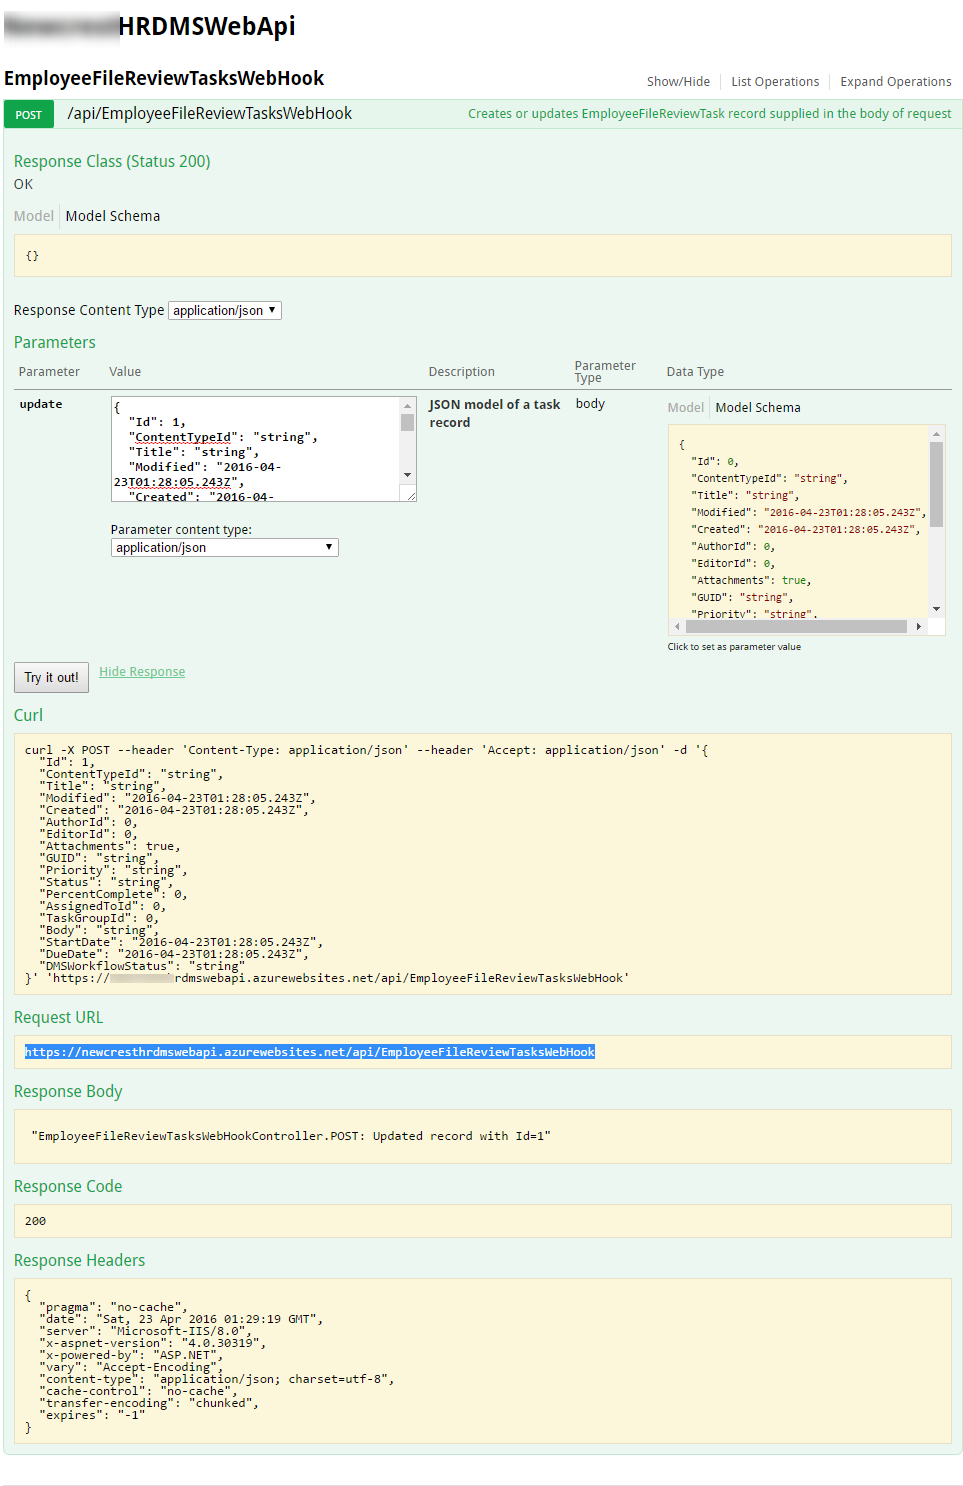
Once you have created the Web API, you should be able to call Web API method like this:
https://yoursite.azurewebsites.net/api/EmployeeFileReviewTasksWebHook
You will need to put your model data in the request body as a JSON object. Also don’t forget to include proper headers for your authentication and header “Accept” with “application/json” and set type of the request to POST. Once you’ve tested the method, you can move on to the next steps. For example, below is how we tested it in our project.
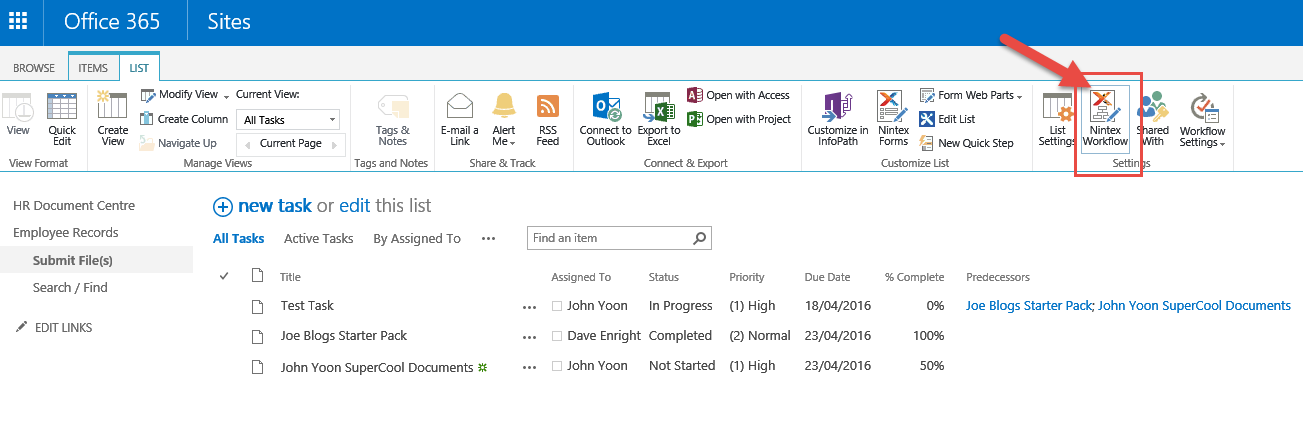
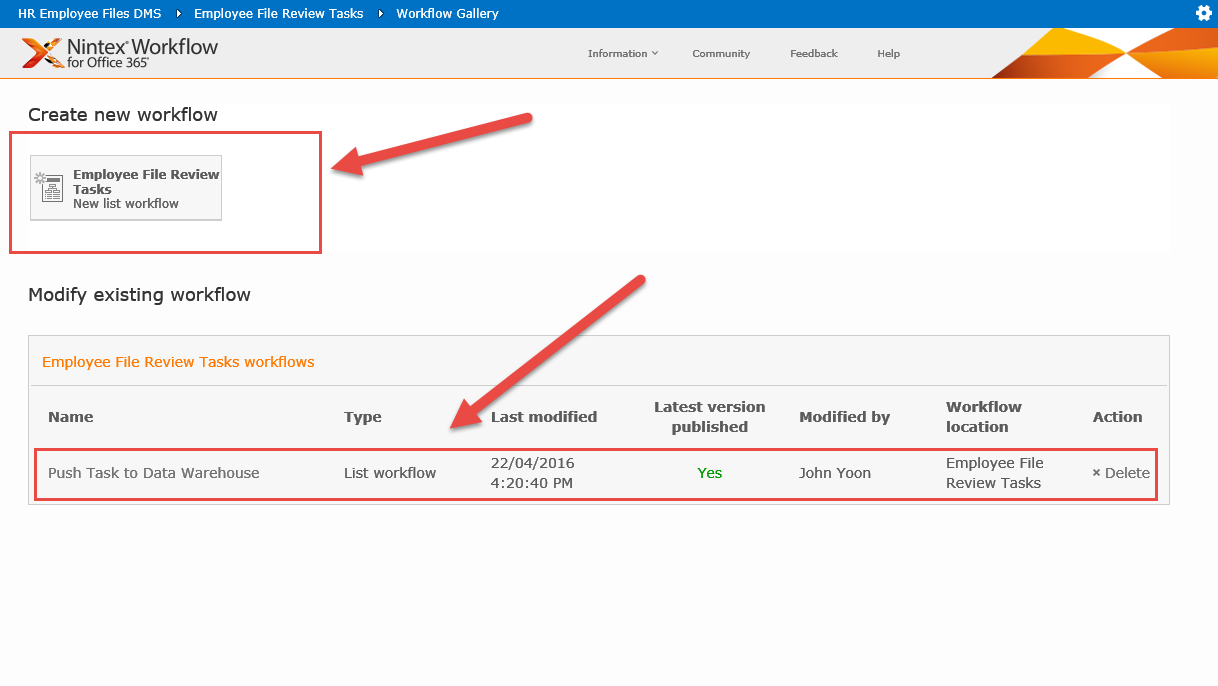
Next, we will create a new Nintex Workflow in the SPO list with our workflow tasks. It is all straightforward. Click Nintex Workflows, then create a new workflow and start designing it.
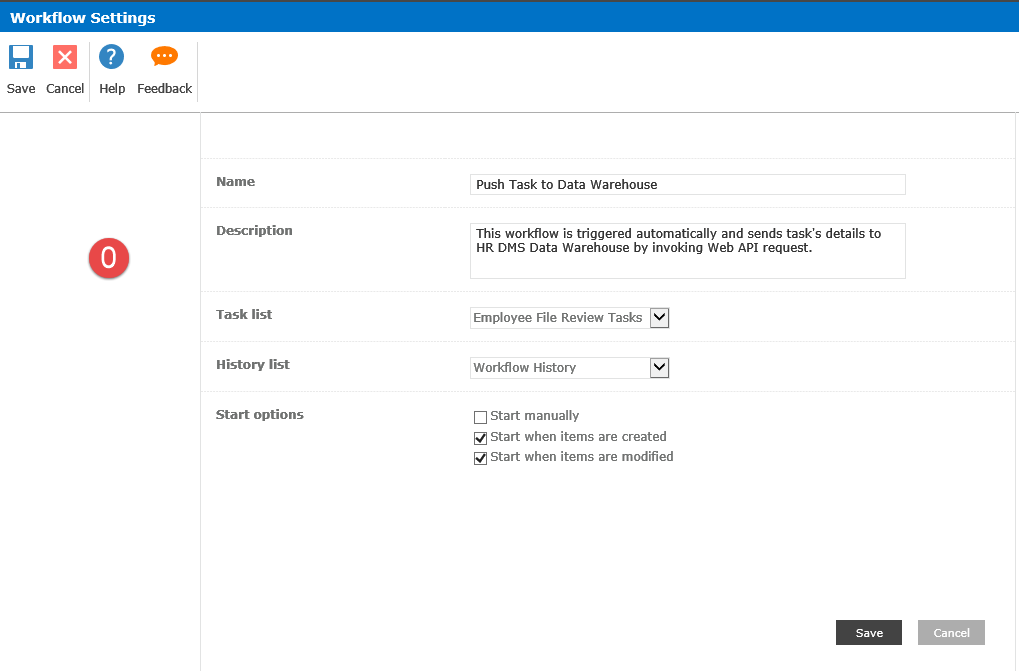
Once you’ve created a new workflow, click on Workflow Settings button. In the displayed form please set parameters as it shown on screenshot below. We set “Start when items are created” and “Start when items are modified”. In this scenario, any modifications of our Workflow task will start this workflow automatically. It also includes cases when Workflow task have been modified by other workflows.
Create 5 steps in this workflow as it shown on the following screenshots labelled as numbers 1 to 5. Please keep in mind that blocks 3 and 5 are there to assist in debugging only and not required in production use.
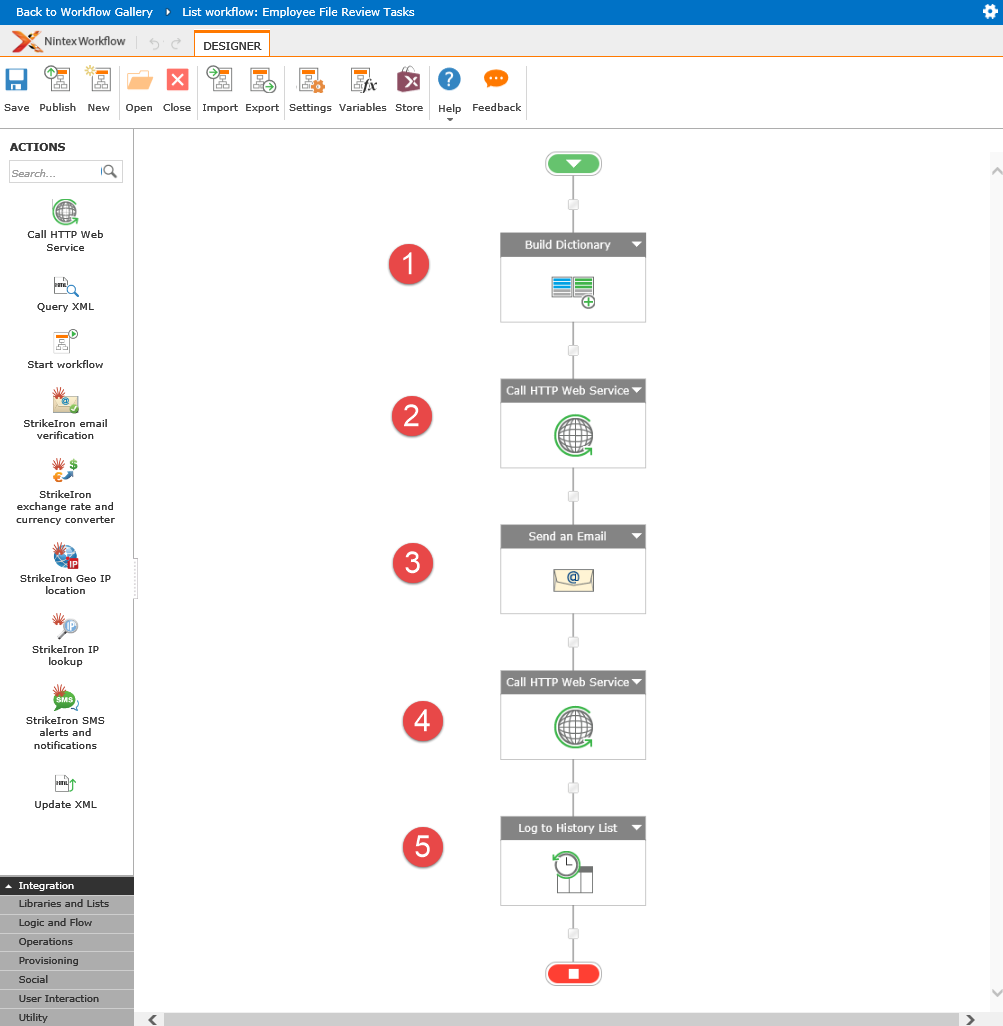
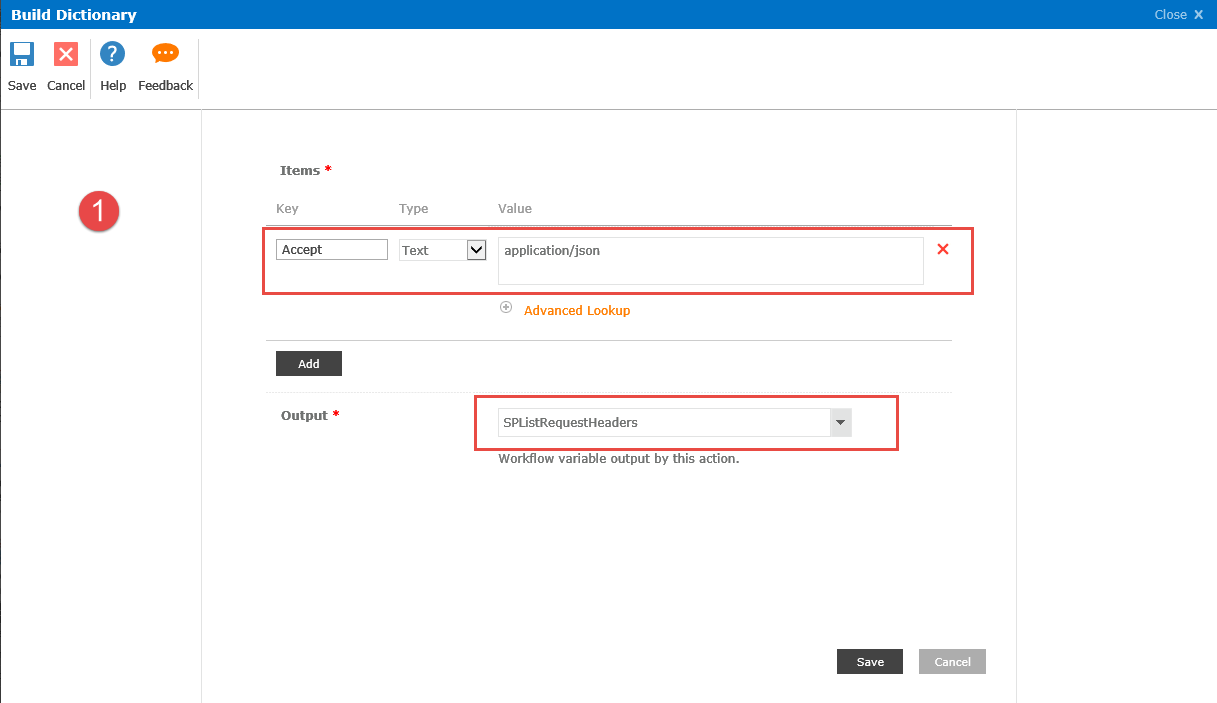
Step 1. Create a Dictionary variable that contains SPO REST API request headers. You can add any required headers, including Authentication headers. It is essential here to include Accept header with “application/json” in it to tell SPO that we want JSON in responses. We set Output variable to SPListRequestHeaders so we can use it later.
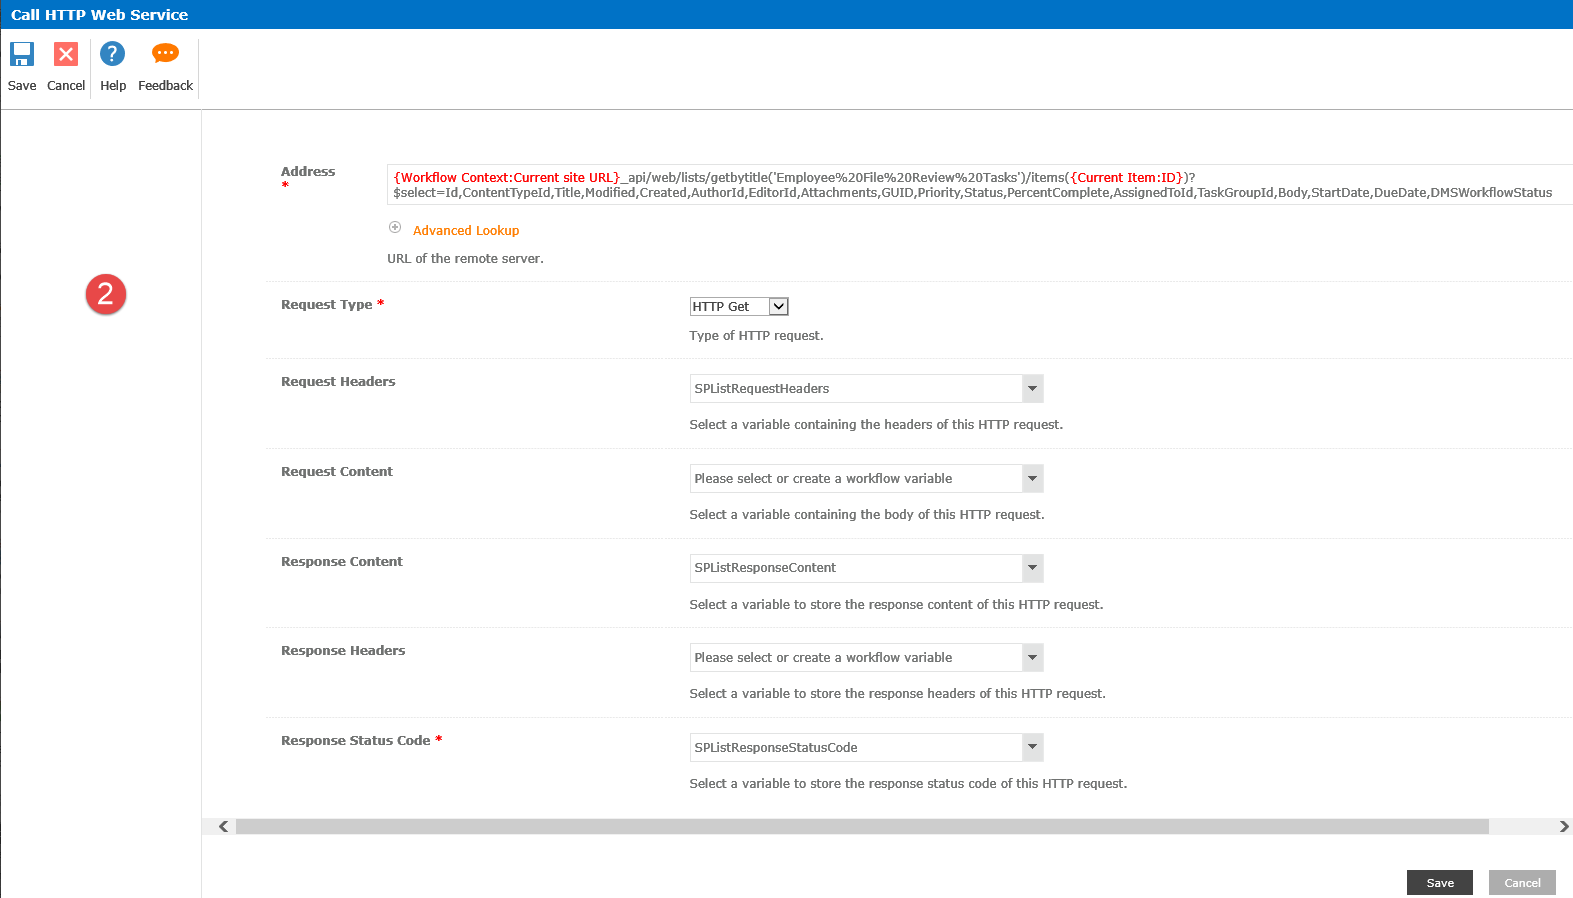
Step 2. Call HTTP Web Service. We call SPO REST API here. It is important to make sure that getbytitle parameter is correctly set to your Workflow Tasks list as we discussed before. The list of fields that we want to be returned is defined in the “$select=…” parameter of OData request. We need only fields that are included in our data model. Other settings are straightforward: we supply our Request Headers created in Step 1 and create two more variables for response. SPListResponseContent will get resulting JSON object that we going to need at the Step 4.
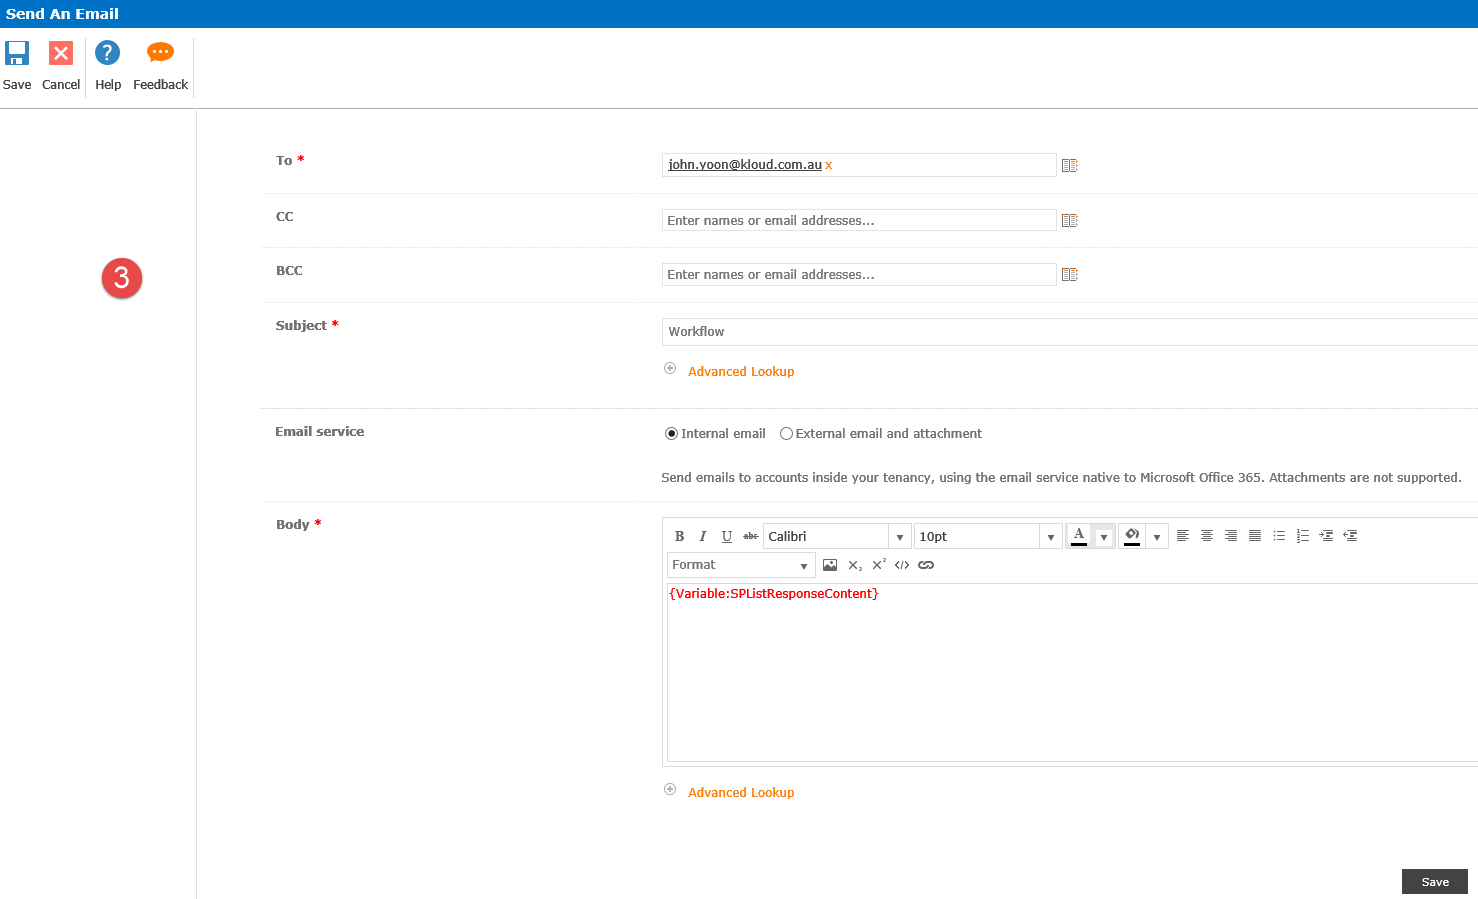
Step 3 is optional. We’ve added it to debug our workflow. It will send an email with the contents of our JSON response from the previous step. It will show us what was returned by SPO REST API.
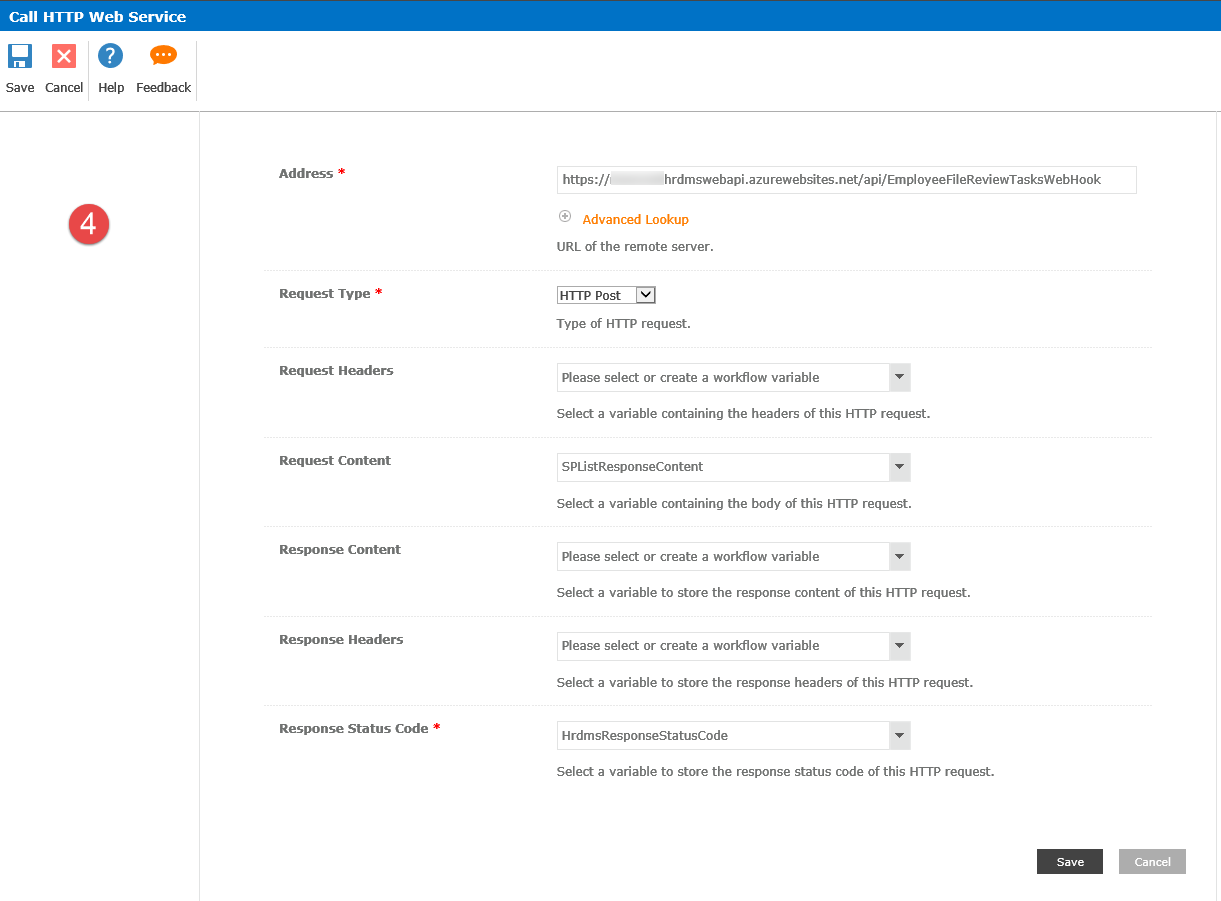
Step 4. Here we are calling our custom API endpoint with passing JSON object model that we got from SPO REST API. We supply full URL of our Web Hook, Set method to POST and in the Request body we inject SPListResponseContent from the Step 2. We’re also capturing response code to display later in workflow history.
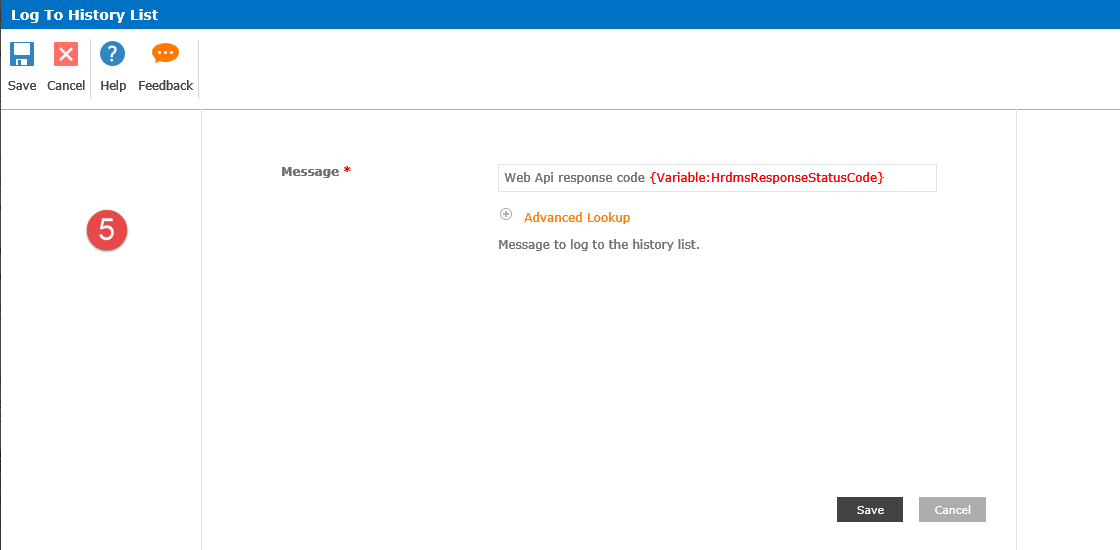
Step 5 is also optional. It writes a log message with the response code that we have received from our API Endpoint.
Once all five steps are completed, we publish this Nintex workflow. Now we are ready for testing.
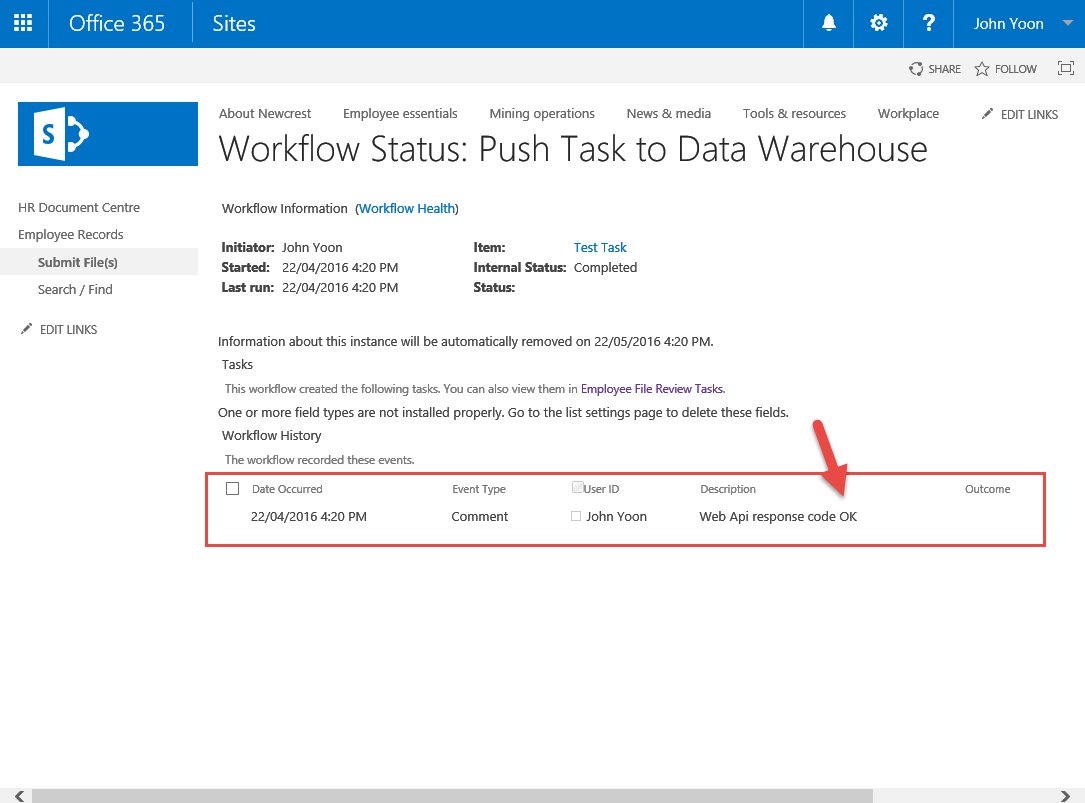
To test the system, open list of our Workflow tasks. Click on any task and modify any of task’s properties and save the task. This will initiate our workflow automatically. You can monitor workflow execution in workflow history. Once workflow is completed, you should be able to see messages as displayed below. Notice that our workflow has also written Web API response code at the end.
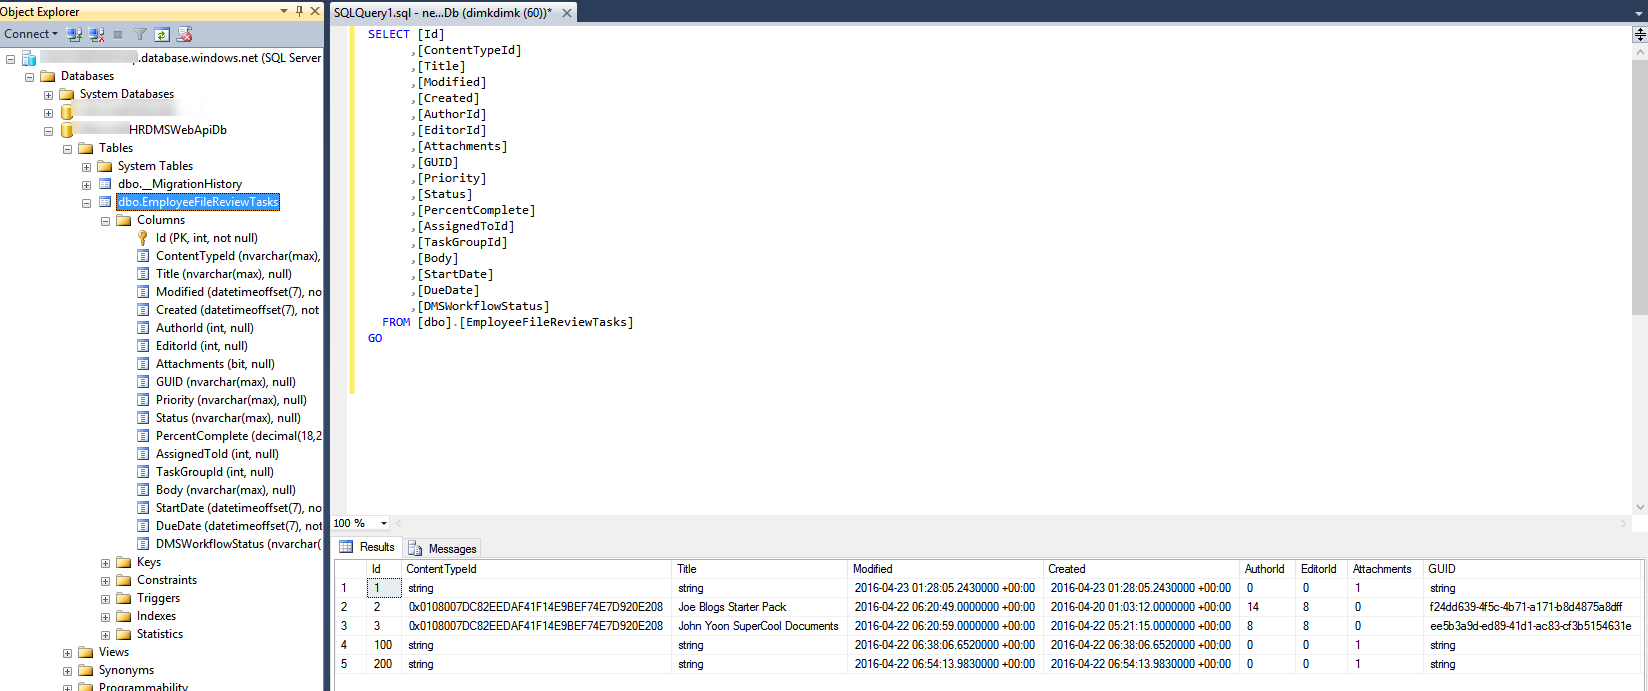
To make sure that everything went well, open your database and check the records updated by your Web API. After every Workflow Task modification you will see corresponding changes in the database. For example:
In this post we have shown that automatic copying of Workflow Tasks metadata into your data warehouse can be done with a simple Nintex Workflow setup and performing only two REST Web API requests. The solution is quite flexible as you can select required properties from the SPO list and export into the data warehouse. We can easily add more tables in case if there are more than one workflow tasks lists. This solution enables creation of powerful reporting system using data warehouse and also allows to employ BI data analytics tool of your choice.