On a recent project I was part of a team developing an AngularJS website with a C# ASP.NET backend API hosted in Azure. It was a great project as I got to work with a bunch of new tools, but it got me wondering on how simple it could be to use a Javascript API instead. That way the entire development stack would be written in Javascript.
And so a personal project was born. To create a simple JS API and get it running in the cloud.
Getting started
So here goes, a quick guide on setting up a nodejs API using the express framework.
I’ll start by getting the environment running locally on my mac in 6 simple steps:
[sourcecode language=”bash”]
# 1. Create a directory for your application
$ mkdir [your_api_name]
# 2. Install Express (the -g will install it globally)
$ npm install express -g
# 3. Use the express generator as it makes life easier!
$ npm install express-generator -g
# 4. Create your project
$ express [your_project_name_here]
# 5. Install any missing dependencies
$ npm install
# 6. Start your API
$ npm start
[/sourcecode]
That’s it. You now have a nodejs API running locally on your development environment!
To test it, and prove to yourself it’s working fine, run the following curl command:
[sourcecode language=”bash”]
$ curl http://localhost:3000/users
[/sourcecode]
If everything worked as planned, you should see “respond with a resource” printed in your terminal window. Now this is clearly as basic as it gets, but you can easily make it [a bit] more interesting by adding a new file to your project called myquickapi.js in your [app name]/routes/ folder, and add the following content:
[sourcecode language=”javascript”]
var express = require(‘express’);
var router = express.Router();
// get method route
router.get(‘/’, function (req, res) {
res.send(‘You sent a get request’);
});
// post method route
router.post(‘/’, function(req, res) {
res.send(‘You sent me ‘ + req.param(‘data’));
});
module.exports = router;
[/sourcecode]
A quick change to the app.js file to update our routes, by adding the following 2 lines:
[sourcecode language=”javascript”]
var myquickapi = require(‘./routes/myquickapi’);
app.use(‘/myquickapi’, myquickapi);
[/sourcecode]
Re-start your node service, and run:
[sourcecode language=”bash”]
$ curl -X POST http://localhost:3000/myquickapi?data=boo
[/sourcecode]
And you will see the API handle the request parameter and echo it back to the caller.
Spin up an AWS EC2 instance
Log into the AWS portal and create a new EC2 instance. For my project, as it is only a dev environment, I have gone for a General Purpose t2.Micro Ubuntu Server. Plus it’s free which happens to be okay too!
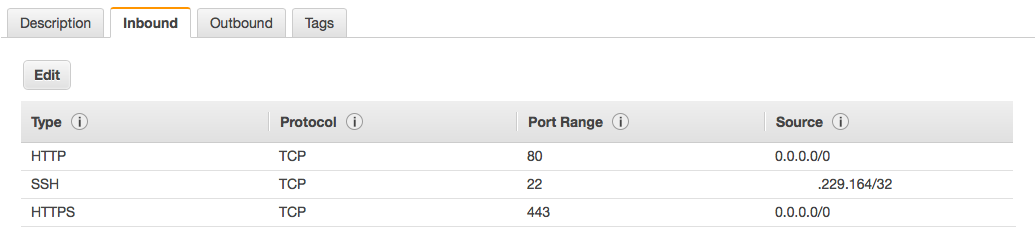
Once the instance is up and running you will want to configure the security group to allow all inbound traffic using port 443, and 80 – after all it is a web api and I guess you want to access it! I also enabled SSH for my local network:
Using your pem file ssh into your new instance, and once connected, run the following commands:
[sourcecode language=”bash”]
# 1. update any out of date packages
sudo apt-get update
# 2. install nodejs
sudo apt-get install nodejs
# 3. install node package manager
sudo apt-get install npm
[/sourcecode]
Now you can run node using the nodejs command. This is great, but not for the JS packages we’ll be using later on. They reference the node command instead. A simple fix is to create a symlink to the nodejs command:
[sourcecode language=”bash”]
$ sudo ln -s /usr/bin/nodejs /usr/bin/node
[/sourcecode]
Set up nginx on you EC2 instance
We’ll use nginx on our server to proxy network traffic to the running nodejs instance. Install nginx using the following commands:
[sourcecode language=”bash”]
# 1. install nginx
$ sudo apt-get install nginx
# 2. make a directory for your sites
$ sudo mkdir -p /var/www/express-api/public
# 3. set the permission of the folder so it is accessible publicly
$ sudo chmod 755 /var/www
# 4. remove the default nginx block
$ sudo rm /etc/nginx/sites-enabled/default
# 5. create the virtual hosts file
$ sudo nano /etc/nginx/sites-available/[your_api_name]
[/sourcecode]
Now copy the following content into your virtual hosts file and save it:
[sourcecode language=”bash”]
upstream app_nodejs {
server 127.0.0.1:3000;
keepalive 8;
}
server {
listen 80;
listen [::]:80 default_server ipv6only=on;
listen 443 default ssl;
root /var/www/[your_site_folder]/public/[your_site_name];
index index.html index.htm;
# Make site accessible from http://localhost/
server_name [your_server_domain_name];
location / {
proxy_set_header X-Real-IP $remote_addr;
proxy_set_header X-Forwarded-For $proxy_add_x_forwarded_for;
proxy_set_header Host $http_host;
proxy_set_header X-NginX-Proxy true;
proxy_pass http://localhost:3000/;
proxy_redirect off;
}
}
[/sourcecode]
This basically tells your server to listen on ports 80 and 443 and redirect any incoming traffic to your locally running nodes server on port 3000. A simple approach for now, but all that is needed to get our API up and running.
Activate your newly created hosts file by running the following command:
[sourcecode language=”bash”]
$ sudo ln -s /etc/nginx/sites-available/[your_api_name] /etc/nginx/sites-enabled/[your_api_name]
[/sourcecode]
Now restart nginx to make your settings take place:
[sourcecode language=”bash”]
$ sudo service nginx restart
[/sourcecode]
As a sanity test you can run the following command to confirm everything is setup correctly. If you are in good shape you will see a confirmation that the test has run successfully.
[sourcecode language=”bash”]
$ sudo nginx -c /etc/nginx/nginx.conf -t
[/sourcecode]
Final steps
The last step in the process, which you could argue is the most important, is to copy your api code onto your new web server. If you are creating this for a production system then I would encourage a deployment tool at this stage (and to be frank, probably a different approach altogether), but for now a simple secure copy is probably all that’s required:
[sourcecode language=”bash”]
$ scp -r [your_api_directory] your_username@aws_ec2_api:/var/www/[your_site_folder]/public/
[/sourcecode]
And that’s it. Fire up a browser and try running the curl commands against your EC2 instance rather than your local machine. If all has gone well then you should get the same response as you did with your local environment (and it’ll be lightning fast).
… Just for fun
If you disconnect the ssh connection to your server it will stop the application from running. A fairly big problem for a web api, but a simple fix to resolve.
A quick solution is to use the Forever tool.
Install it, and run your app (you’ll be glad you added the symlink to nodejs earlier):
[sourcecode language=”bash”]
$ sudo npm install -g forever
$ sudo forever start /var/www/[your_site_folder]/public/[your_site_name]/bin/www
[/sourcecode]
Hopefully this will have provided a good insight into setting up a nodejs API on AWS. At the moment it is fairly basic, but time permitting, I would like to build on the API and add additional features to make it more useable – I’d particularly like to add a Javascript OAuth 2.0 endpoint!
Watch this space for future updates, as I add new features I will be sure to blog about the learnings I find along the way.
As Always; any questions, then just reach out to me, or post them below
–
Top notch blog!
Nice write up! PM2 > Forever though :3
I followed the tutorial, on a linux aws instance.
But when trying to access the api from my local computer (curl -X POST http://pollwapp.com/myquickapi?data=boo , or curl -X POST http://pollwapp.com/users
)
I get this
404 Not Found
404 Not Found
nginx/1.4.6 (Ubuntu)
which just a simple html page to print 404 Not found
any idea ???
thx.